

Program Overview
In this scenario, you will be required to complete the task of investigating possible gas leaks outside dwellings and buildings. Multiple types of leaks may be present. Using available tools and resources, you must determine the source of the leak and take the appropriate steps to resolve the issue.
For a video walkthrough of the module, click this link: OLI Walkthrough
Core Learning Objectives
-
Detection — Finding the leak source
-
Classify — Properly classify the grade of a leak and respond appropriately
-
Marking — Use of provided tools to mark and tag leak
-
Safety Device / Hazard Recognition
-
Safety devices in good order
-
Debris / impediment clearing and notification
-
- Reporting / Documentation — Step taken / resolution / documentation
Tools
How to use each tool in the Toolbox: (open Wrist Menu > Toolbox to access)
- Laser Pointer — To interact with menus and objects, aim the laser pointer at the item and pull the trigger on the controller to select it.
-
CGI Tool — To take a reading, aim the tool and pull the trigger on the controller.
-
Soap Spray — To test for a leak once an abnormal reading is found, aim and pull the trigger on the controller.
-
If bubbles appear, there is a leak.
-
If there are no bubbles, the leak is coming from somewhere else.
-
-
Spray Marker — If a leak is discovered, mark the leak’s location by pulling the trigger on the controller.
-
Voltage Pen — To inspect meters for electric current, place the pen tip near the meter to detect if it is electrified.
-
If electric current is present, the tip will light up red and beep.
-
-
Rock Drill — To drill holes in concrete or asphalt to check for gas, aim the tool and pull the trigger on the controller.
-
Plunger Bar — To place the probe and create bar holes, pull the trigger on the controller.
-
Shovel — To dig up partially buried gas meters, aim at the gas meter and pull the trigger on the controller.
-
Traffic Cone — To block off the street and mark opened manhole covers, pull the trigger on the controller to place traffic cones.
-
Valve Shut Off — To turn off gas flow at mainline valves, pull the trigger on the controller.
-
Crescent Wrench — To turn off a gas meter, pull the trigger on the controller.
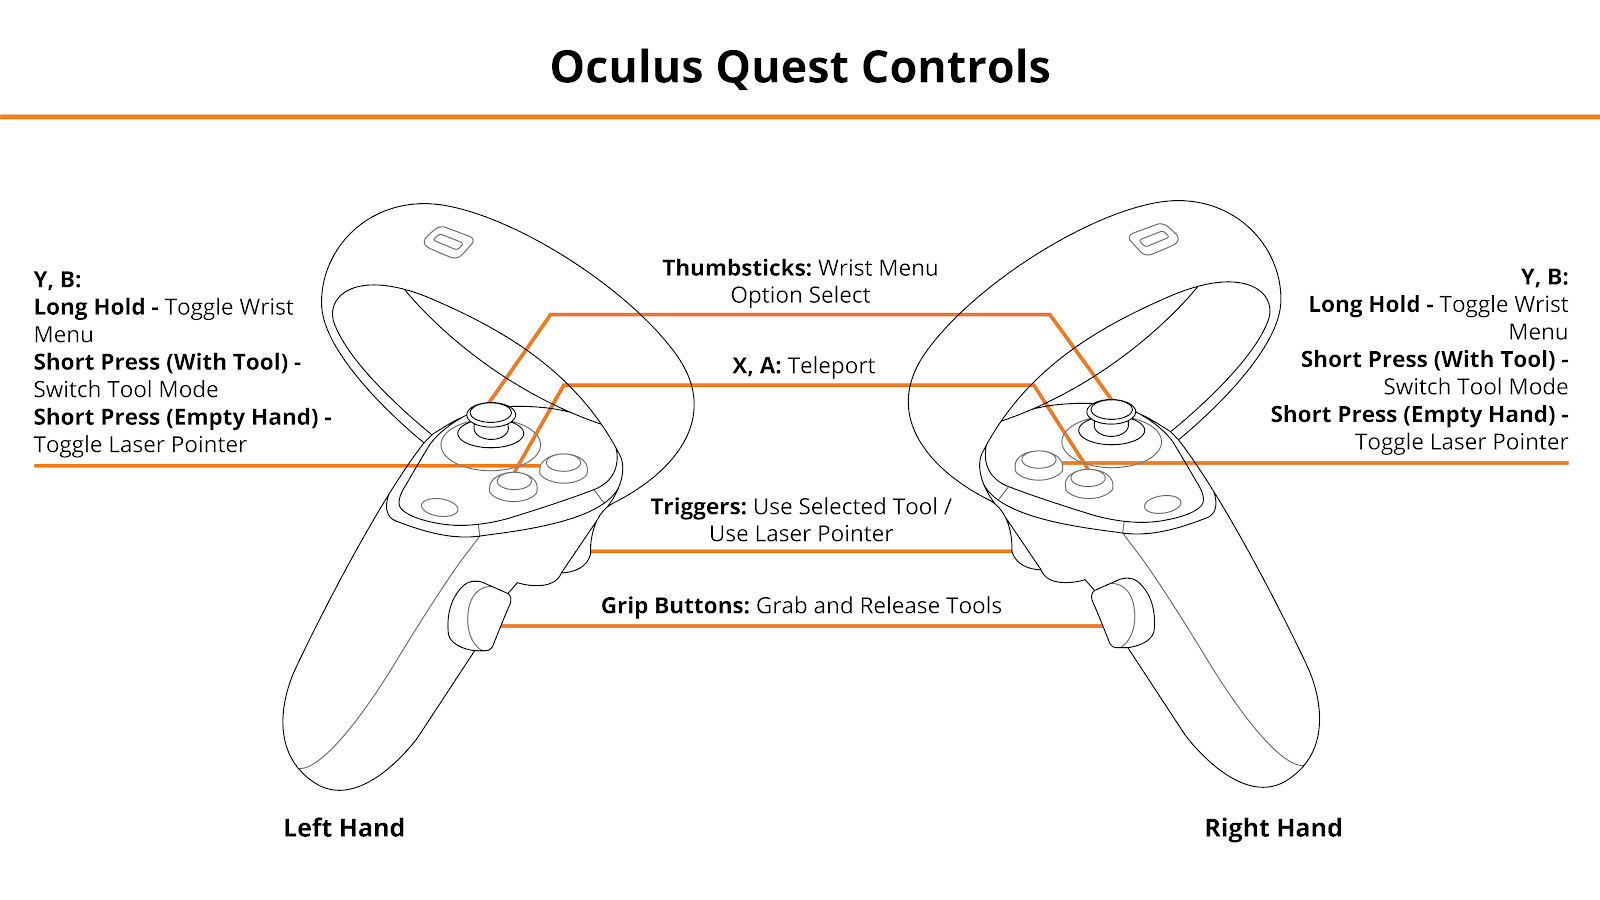
User Controls
PICO & Meta Quest Headsets
- Trigger — Use Equipped Object, Use Laser Pointer
- Grip Buttons — Grab / Release Object
- X,A — Teleport
- Y,B
-
Long Hold — Toggle Wrist Menu
-
Short Press with Empty Hand — Toggle Laser Pointer
- Short Press while Holding Tool — Switch Tool Mode
-
- Thumbsticks — Select Option in Wrist Menu
See below for button positions on Meta Quest controllers.
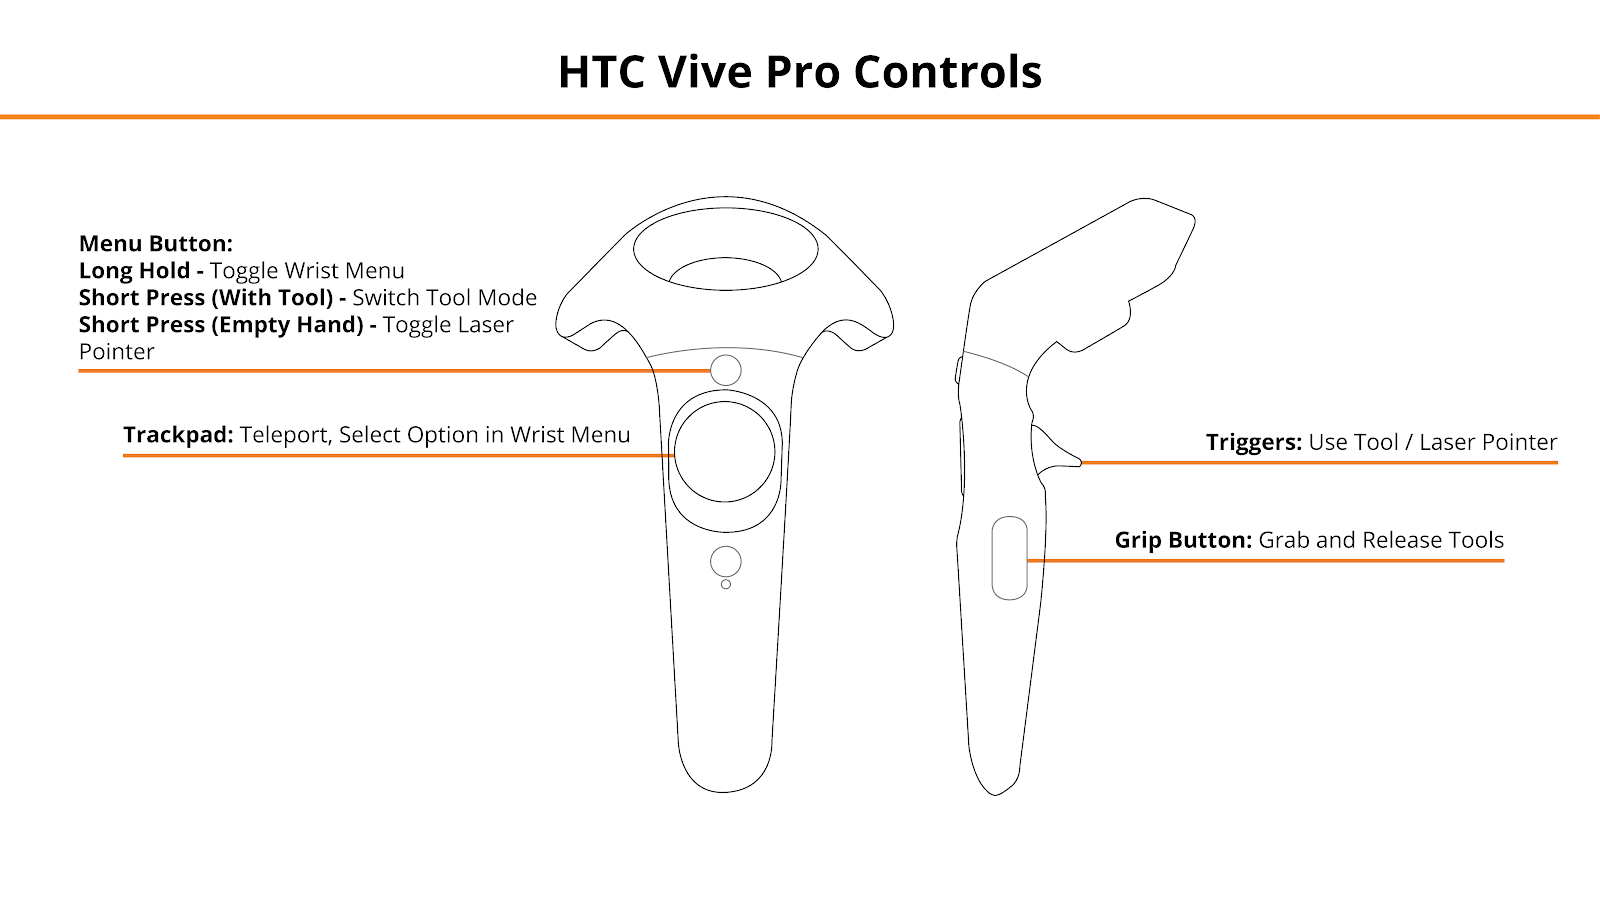
HTC Vive Pro and Focus Plus Headsets
- Menu Buttons
-
Long Hold — Toggle Wrist Menu
-
Short Press with Empty Hand — Toggle Laser Pointer
- Short Press while Holding Tool — Switch Tool Mode
-
- Trackpads — Teleport, Select Option in Wrist Menu
- Grip Buttons — Grab / Release Tools
- Triggers — Use Selected Tool / Laser Pointer
See below for button positions on HTC Vive Pro controllers.
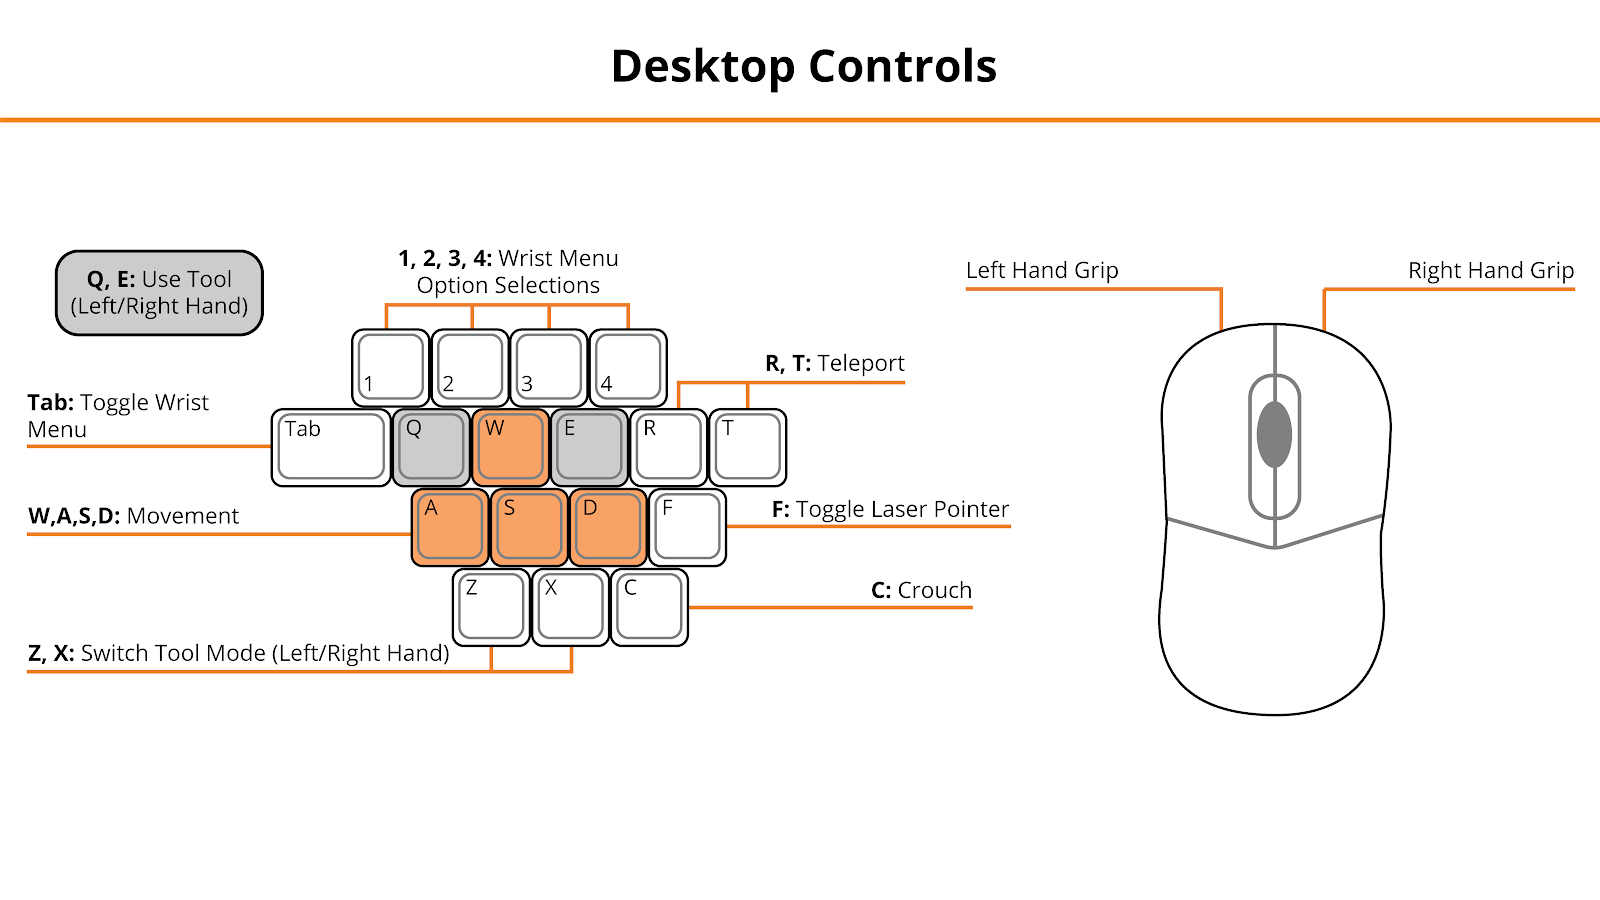
Desktop
- Mouse Left Click, Right Mouse Click — Left Hand Grip / Right Hand Grip
- Q, E — Engage Tool
- Tab — Open/Close Wrist Menu
- 1, 2, 3, 4 — Select Option in Wrist Menu
- R, T — Teleport
- F — Toggle Laser Pointer
See below for the desktop diagram.
Entering the Experience
Login and Authentication
To use this experience, you must log in using a PIXO account created by the organization’s administrator, or by a PIXO VR Representative. The login must be performed from a headset that is connected to the internet for authentication to work successfully.
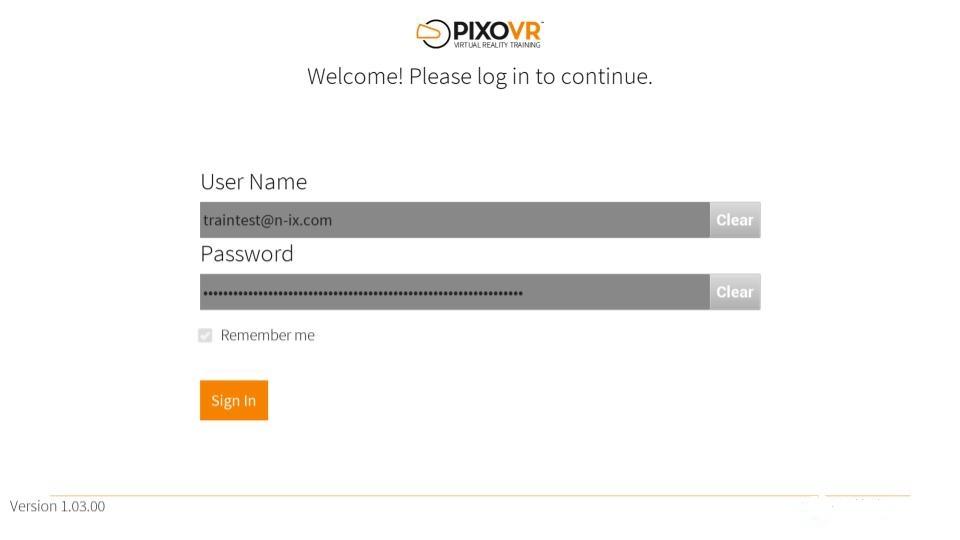
Tip: Select the Remember me flag to save your login credentials for your next session.
-
Enter your PIXO credentials in the corresponding fields, then select Sign In.
-
Once logged in, you will proceed to the tutorial.
Lobby

After completing the tutorial, you will proceed to the lobby, where you can choose between:
-
Tutorial — Covers the basics of operation in virtual reality, including teleportation, motion controllers, and using buttons.
-
Start Single User
-
Join Multi-User
Additionally, the screen to the right of the mode selection menu allows instructors to build a specific scenario. The instructor can select the leak grade and type, customer type, leak sign, false positive signs, as well as which hazards and AOCs they will have.
Experience Walkthrough
- A Work Order will appear in front of you detailing the customer complaint. Select Show Facility Location to see where the customer's home is located on the Service Map, then walk to their home.

-
Once you locate the customer's house, select their door with your laser pointer and select Knock on the Door.
-
If the customer did not call, check with nearby NPCs.
-
-
Next, note all AOCs and hazards. A few examples of AOCs and Hazards that should be noted are:
-
AOCs — Damaged Meter Missing, Damaged, Severe Tilt, Corrosion, Buried
-
Hazards — Vicious Dog, “Beware of Dog” Sign, Locked Gate, Wasp Nest, Poison Ivy, Ant Hill, or Pothole
-
-
Once an AOC or Hazard is discovered, you should respond properly by reporting them through your Wrist Menu and contacting the right personnel.
-
After responding to AOCs and hazards, you can repair the leak.

-
Locate the gas leak.
-
To find the gas leak, investigate through the use of sight, sound, questioning people present at the location, and by using your tools.
-
Tools can be accessed through your Wrist Menu > Toolbox.
-
-
Once the leak is found, assess the leak’s potential for leak migration by taking CGI readings at the centerline sewer manholes, catch basins, and utility vaults.
-
If gas is found near a building wall or centerline sewer — request assistance, check all buildings for gas, and vent immediately.
-
-
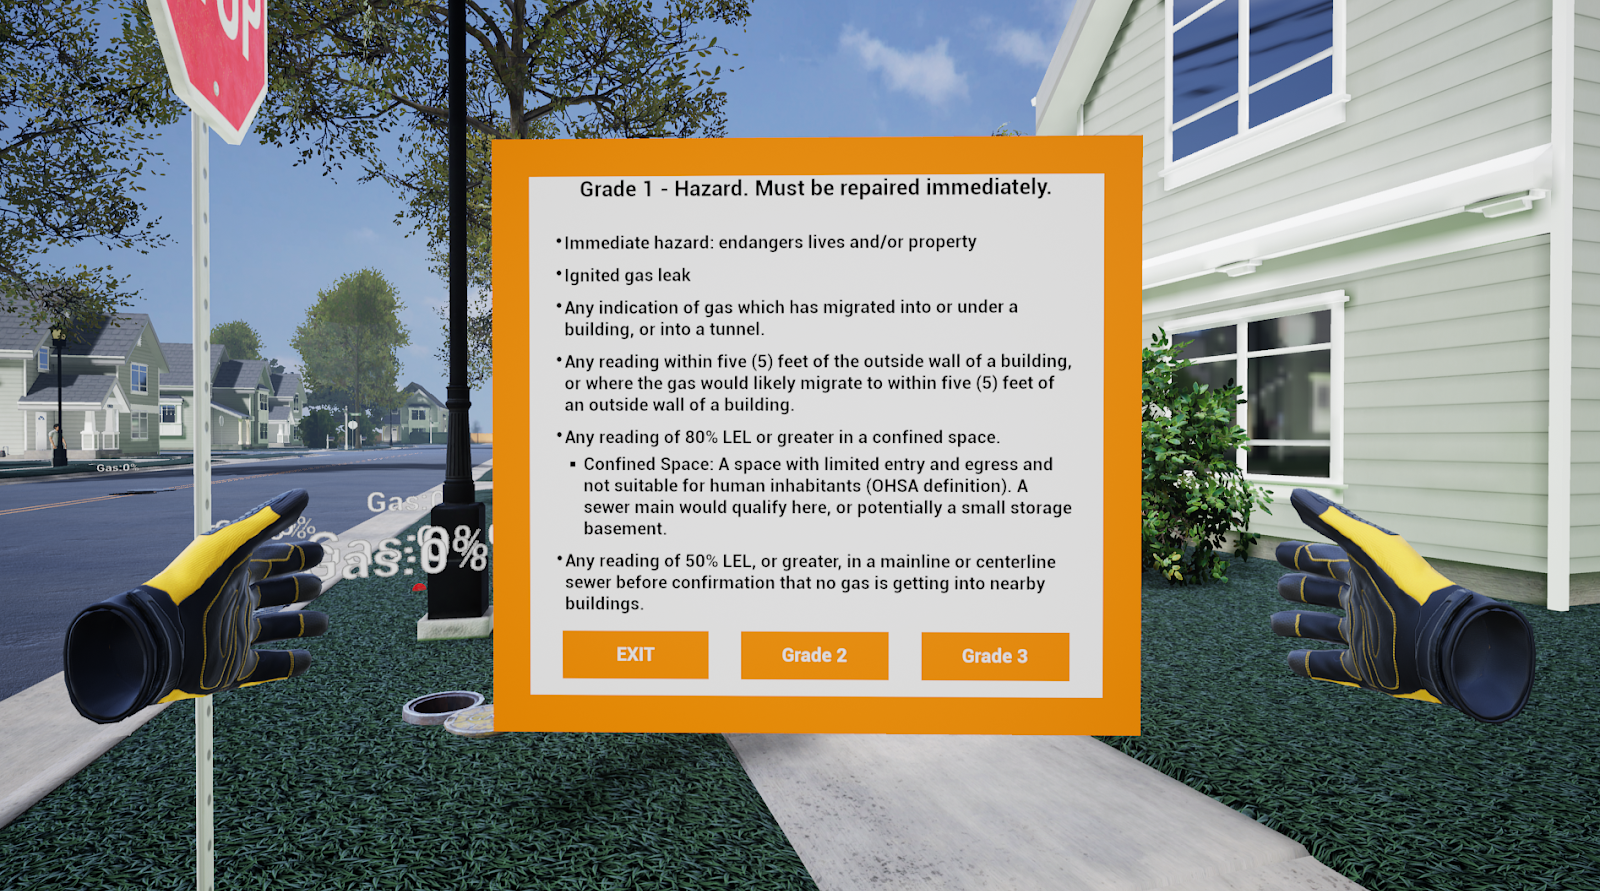
Next, classify the leak.
-
Check for definitions of each leak grade within your Wrist Menu by selecting Reference Material > Leak Grade Card.
-
Grade 1 — Hazardous. Act immediately.
-
Grade 2 — Fix or re-classify within 30 days.
-
Grade 3 — Not hazardous, and is not likely to change. Check every 90 days to see if the leak is gone or needs to be re-classified.
-
-
After classifying the leak, report the leak and call for assistance if needed based on the leak’s classification.
-
Lastly, recheck all areas and document through the wrist menu. Select Submit with Final Report to end the scenario.
- Tip: To submit mid-investigation findings and document hazards without ending the module, you can instead select immediately when choosing when to submit findings.
Review Performance
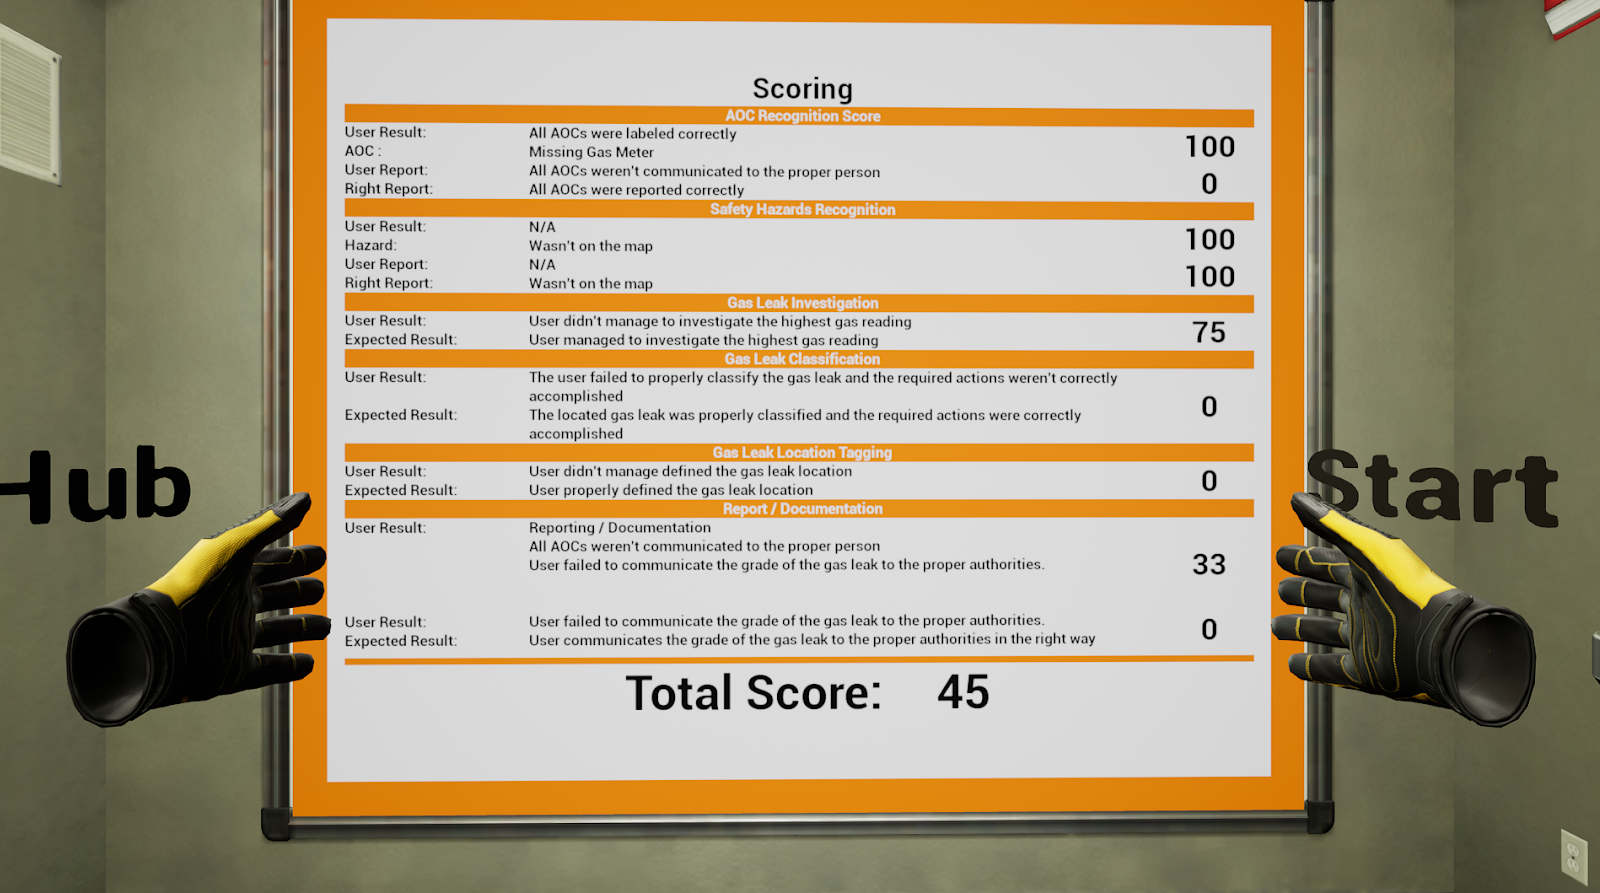
When finished with the scenario, you are taken to a grading room and shown your results. If you wish to, you can revisit the scenario to review what was missed in Review Mode by pressing the Start Review button.
Press the Exit to Hub button to return to the main lobby.
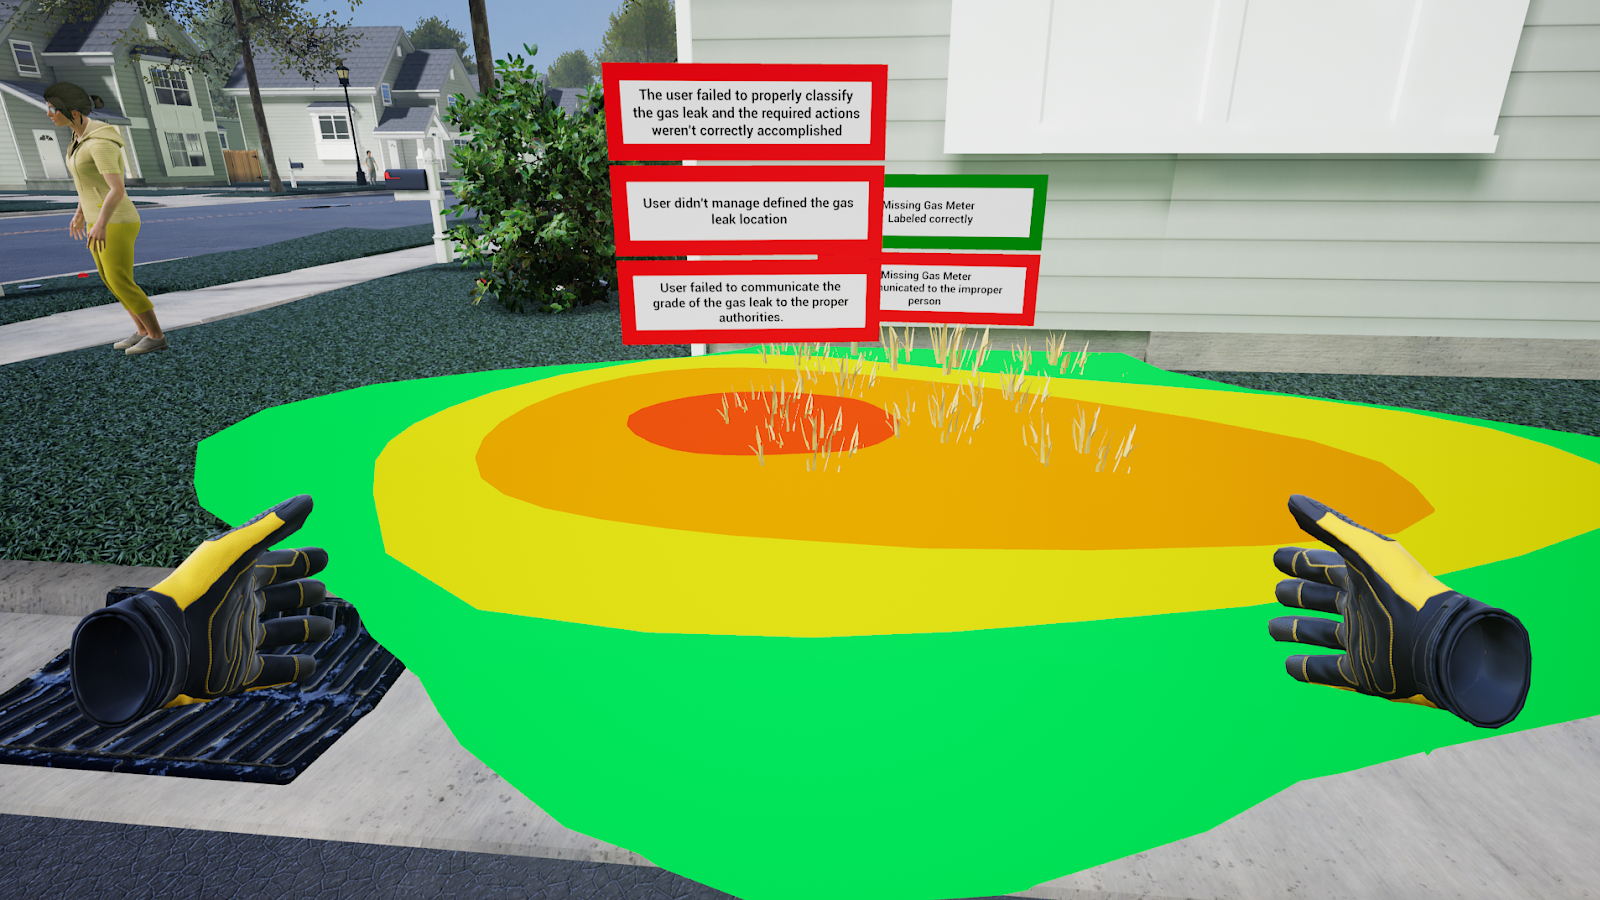
Review Mode
While in Review Mode, anything that you missed in your investigation with be highlighted:
-
Green — Found AOC
-
Red — Missed AOC
- Any gas leaks will be red, orange, yellow, and green with red being the center of the leak.
Questions and Support
If you have any issues, please contact our tech support team at [email protected]

