

Program Overview
In this experience, you will move through the construction site and identify hazards. Once a hazard has been identified, you will be asked to identify different possible mitigations for the hazard using the Hierarchy of Controls developed by OSHA. Hazard appearance is randomly determined, so each experience will be different.
Core Learning Objectives
The goal of this module is to instruct users in identifying and correctly rectifying potential hazards using the best methods possible:
-
Hazard Identification — identify, assess and prioritize both existing and potential hazards
-
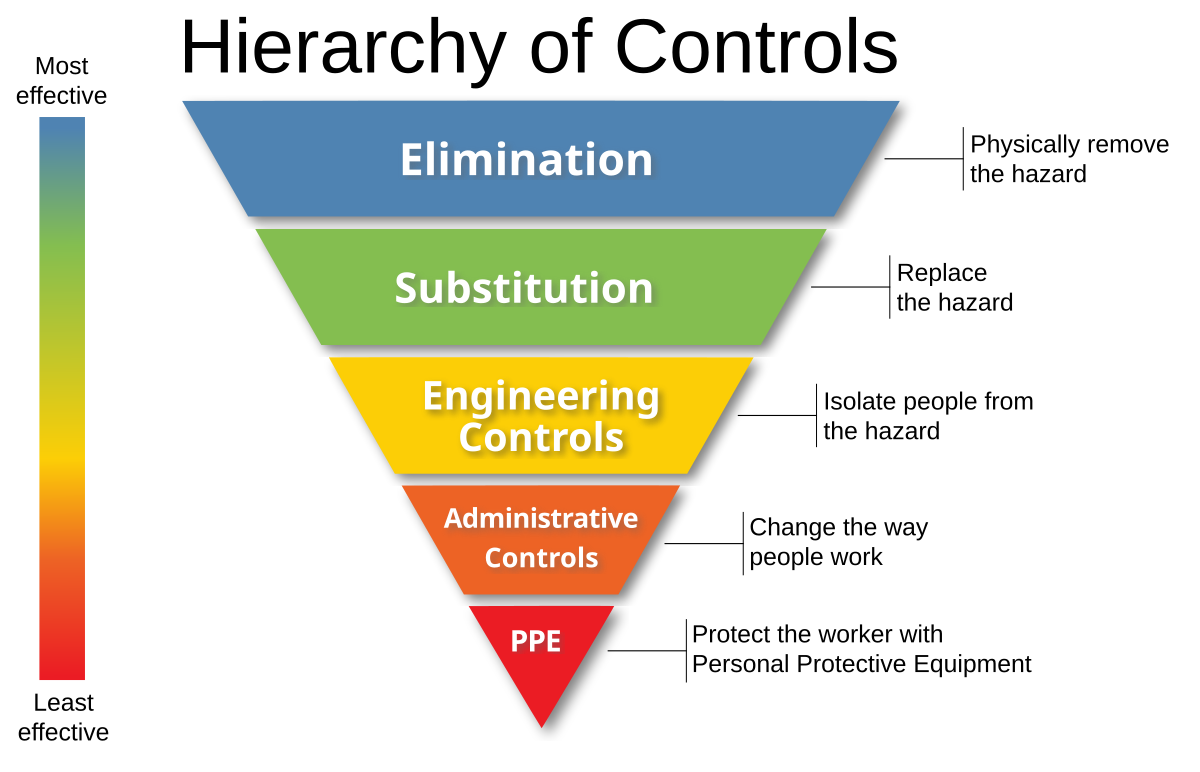
Hazard Prevention — identify, evaluate and control risks that could harm people, property, or the environment. This involves regular inspections, risk assessments, and implementing control measures such as elimination, substitution, engineering controls, administrative controls, and personal protective equipment.
Tools
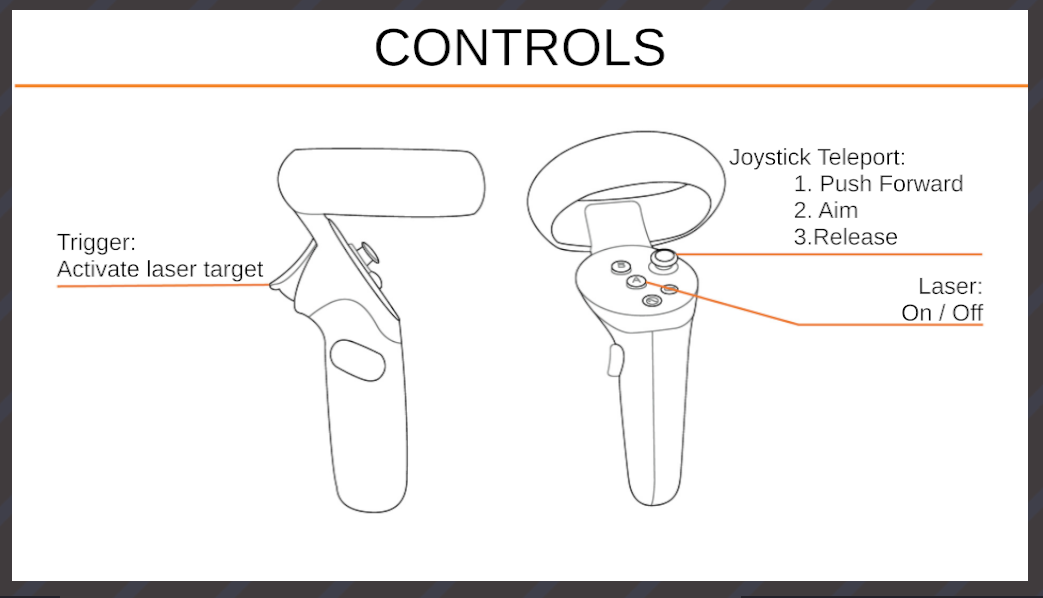
- Laser Pointer — To interact with menus and objects in this experience, aim your laser pointer at the item you wish to interact with and pull the trigger on your controller to select it.
User Controls
Pico Neo 3, Pico Neo 4, Quest 2 & Lenovo VRX Headsets
Entering the Experience
Tip: You must have both the PIXO Player and PIXOVR Hub App sideloaded to your headset in order to access the module.
Login and Authentication
To use this experience, you must log in using a PIXO account created by the organization’s administrator, or by a PIXO VR Representative. The login must be performed from a headset that is connected to the internet for authentication to work successfully.
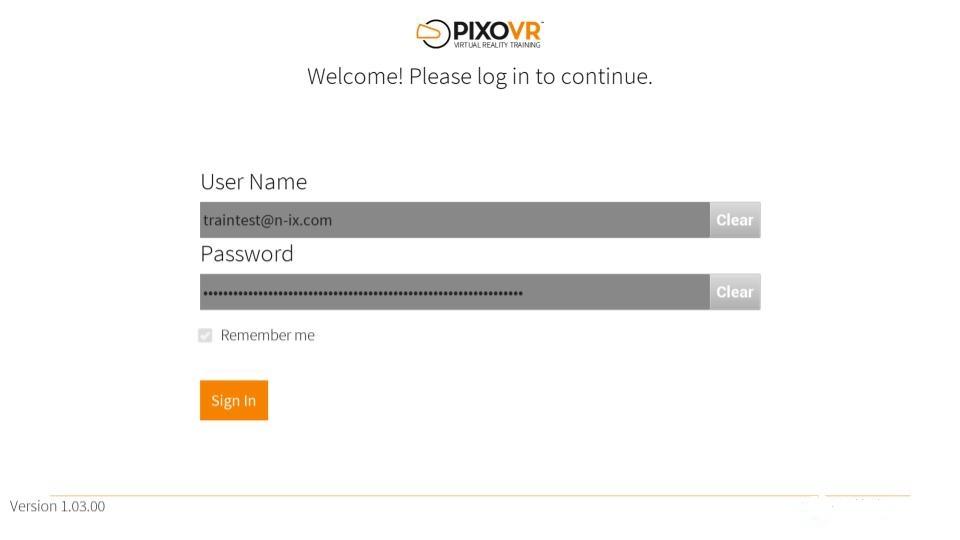
Tip: Select the Remember me flag to save your login credentials for your next session.
-
Enter your PIXO credentials in the corresponding fields, then select Sign In.
-
Once logged in, you will proceed to the lobby room.
Lobby
After logging in, you will proceed to the lobby, where you can choose between replaying the Tutorial or Assessment modes.
Onboarding Tutorial
Select the Tutorial button to proceed to the onboarding scenario. This will cover the basics of operation including teleportation, interaction within the environment, spotting a hazard, and identifying a solution.
Select the Return to Lobby button when finished.
Experience Walkthrough
To complete the scenario, follow the sequence below:
-
Move through the construction site and identify the ten hazards that are present. Hazards that still need identification will have a Blue Arrow marker placed above them:

-
Additionally, use the Assessment Status scoreboard to check on your progress throughout the scenario. The scoreboard will update to show which hazards have been interacted with and which hazards remain:

-
Once you see a hazard, select it with your Laser Pointer. A menu will pop up and you will need to identify the hazard that is present.

-
After identifying a hazard, select possible mitigations for the hazard. This may require selecting more than one option depending on the hazard.

See the Hierarchy of Controls developed by OSHA for hazard mitigation recommendations:
-
Once you are satisfied with your answers, select Done to close out the menu. If you realize that you selected the wrong hazard, you may use the Reselect Hazard button in the bottom left corner to go back and select a different hazard to report.
-
After making a selection, a Green Check Mark, Yellow Check Mark, or Red X marker will appear indicating whether or not you made the correct selection. If you made the wrong selection(s), the correct selections will be noted.

-
Continue until you have assessed all hazards within the environment.
List of Hazards
The following is a list of potential hazards:
Anywhere
-
Saw Cutting Lumber or Metal
-
Cord is Obstructing Access; Worker Still Proceeding
-
Sparks Traveling at Fuel Source
-
No PPE
-
-
No PPE / Missing PPE Appropriate to Task
-
“Danger” / “Do Not Enter” Signs Missing or Damaged
-
Moving Equipment
-
Workers Exposed to Heavy Equipment with No Safety Measures (barricades, warning signs, flagman)
-
Defective Crane Latches
-
Building Area

-
Trash Piles / Debris
-
Workers
-
No Masks (for dust)
-
Not Tied Off
-
Not Wearing Harness
-
Scaffold has Red Safety Tag / Missing Safety Tag
-
Not Wearing PPE
-
Exposed Sides / Rear
-
Material Unsecured on Scaffold, Near / Hanging from Edge
-
-
Breaker Panel — Front Panel Removed; Live Wires Present
-
Worker on Ladder
-
Only two points of contact (leaning out to work)
-
Ladder on Debris Pile or other Unstable Surface
-
-
Welding near Flammable Supplies (paint, fuel, etc)
-
Missing Fire Extinguisher
-
Missing Fire Watch
-
Missing Face Shield / PPE
-
Missing Hot Work Permit
-
Missing “Flammable” / “’No Open Flame” / “Welding in Progress” Signs
-
-
Extension Cords
-
Running through Liquid / Water; Visible Connections
-
Not Off Ground
-
-
Stairways
-
Concrete Stairway
-
No Temp Railing
-
Temp Railing
-
-
Second Floor Balcony
-
No Railing
-
Temp Railing
-
Overhanging Supplies
-
Supplies Not Overhanging
-
-
-
Material Placed Near Wall — Material is Leaning Directly Against the Wall
-
Scaffolding Work near Roof Girders
-
Untethered / No PPE
-
Open Scaffolds
-
Unsafe Material (overhang, not secured)
-
-
Open/Unprotected Wiring Emerging from Ground Conduit
Trenching Area

-
No Barricades
-
Workers in Trench while Crane Suspended Load Overhead
-
No Egress in Trench
-
Crane not Properly Emplaced
-
Unsecured Material too Close to Trench
-
Spoil Pile too Close to Trench
-
Crane too Close; not Properly Shored
-
No Trench Wall Supports
Material Storage Area

-
Unsecured Supplies (oxygen tanks, fuel, etc.)
-
Spilled Chemicals
-
Learning Materials
-
Debris Piles; Large Materials (pallets, lumber, etc.)
-
Welding / Cutting Area throwing Sparks into Ignition Source (paper, wood debris, fuel)
-
Worker Resting under a Shaded Area where Gases are Entrapped; Lack of Signs/Barricades in the Area
-
Permit Box Displayed within the Immediate Work Area to Showcase Missing Permit
Roadway Area

-
Forklift with No Driver, but Carrying Load
-
Crane Operator Operating without a Rigger or with Faulty Latches
Experience End
Once all hazards have been identified, the scenario will end and you can return to the review area. You can exit at any time; but any unfinished hazards will be counted as failures.

For more details regarding your results, see the Assessment Status scoreboard to the right of the Result Screen.

Select the Return to Lobby button to exit when finished reviewing your results.
Questions and Support
If you have any issues, please contact our tech support team at [email protected]

