

Program Overview
The goal of this module is to identify and rectify any hazards, leaks, or incorrect/improper safety procedures and warnings. If a leak is found, you will report and/or fix said leak in the proper method for its leak grade.
Core Learning Objectives
-
Receive Work Order
-
Find Leak
-
Classify Leak
-
Note/Label all Abnormal Operation Conditions (AOCs)
-
Respond properly to AOCs and Hazards
-
Document / Report
Tools
How to use each tool in the Toolbox: (open Wrist Menu > Toolbox to access)
- Laser Pointer — To interact with menus and objects, aim the laser pointer at the item and pull the trigger on the controller to select it.
-
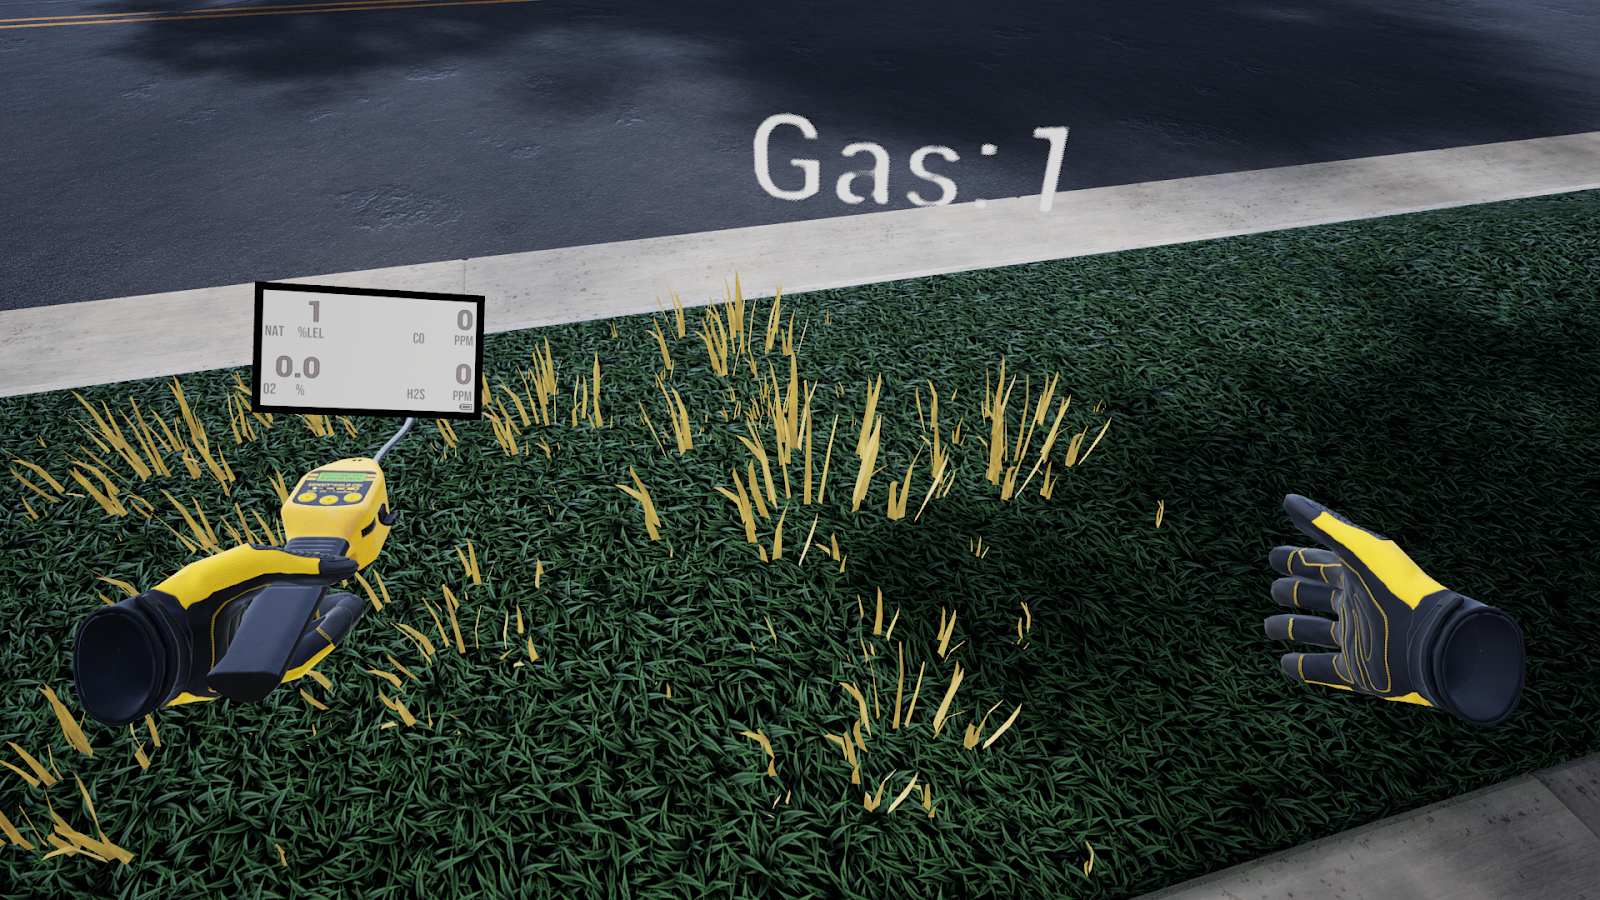
CGI Tool — To take a reading, aim the tool and pull the trigger on the controller.
-
Plunger Bar — To place the probe and create bar holes, pull the trigger on the controller.
User Controls
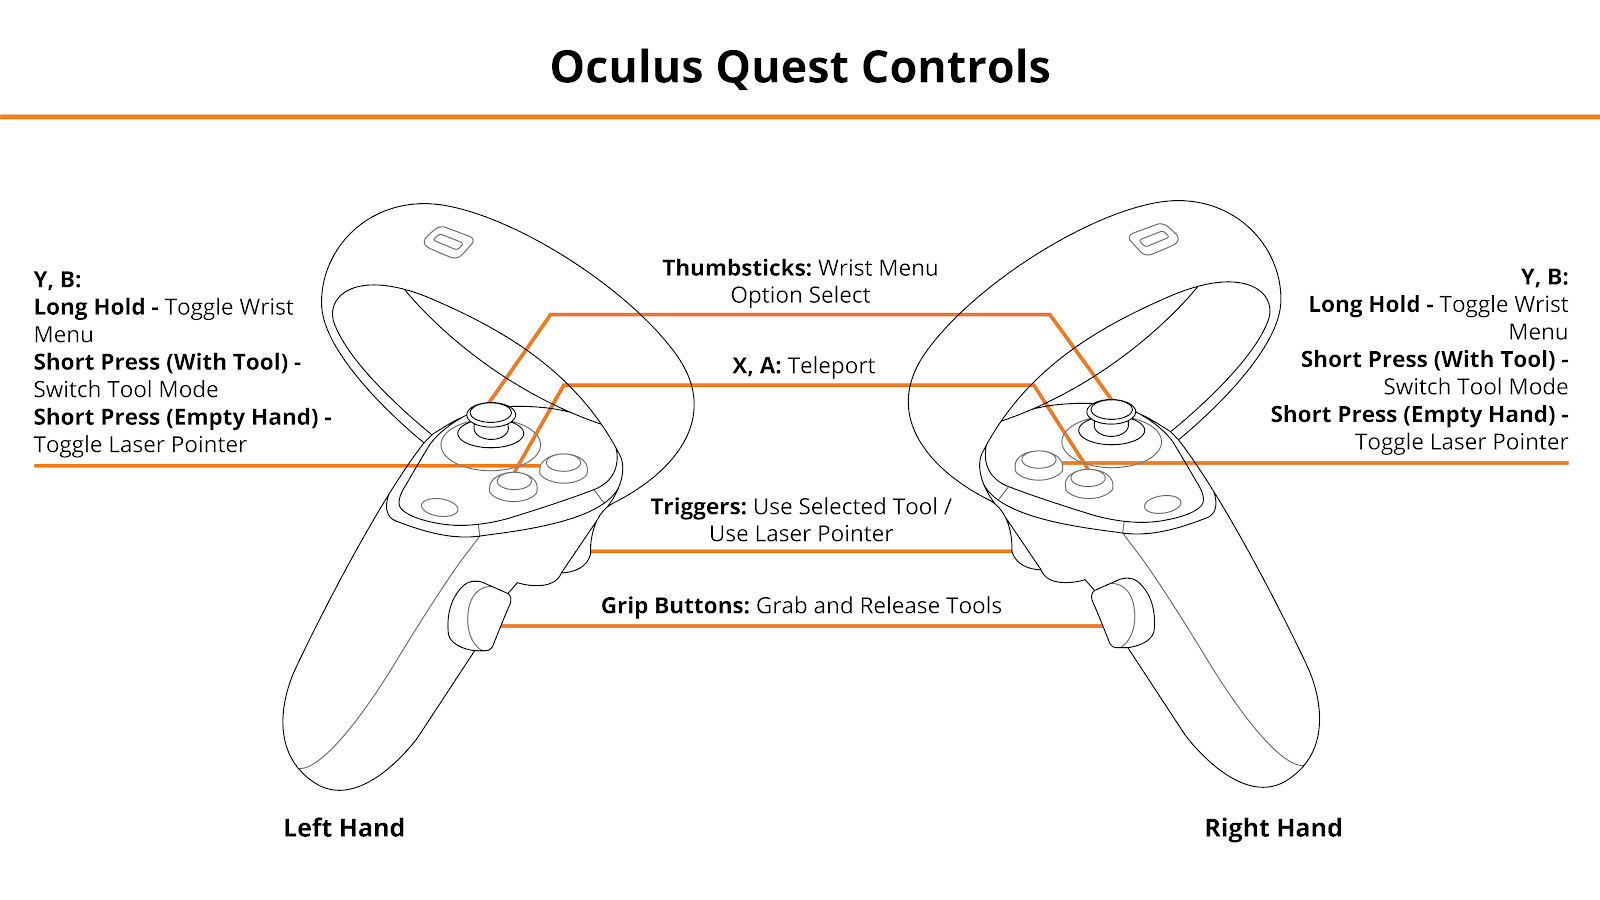
PICO & Meta Quest Headsets
- Trigger — Use Equipped Object, Use Laser Pointer
- Grip Buttons — Grab / Release Object
- X,A — Teleport
- Y,B
-
Long Hold — Toggle Wrist Menu
-
Short Press with Empty Hand — Toggle Laser Pointer
- Short Press while Holding Tool — Switch Tool Mode
-
- Thumbsticks — Select Option in Wrist Menu
See below for button positions on Meta Quest controllers.
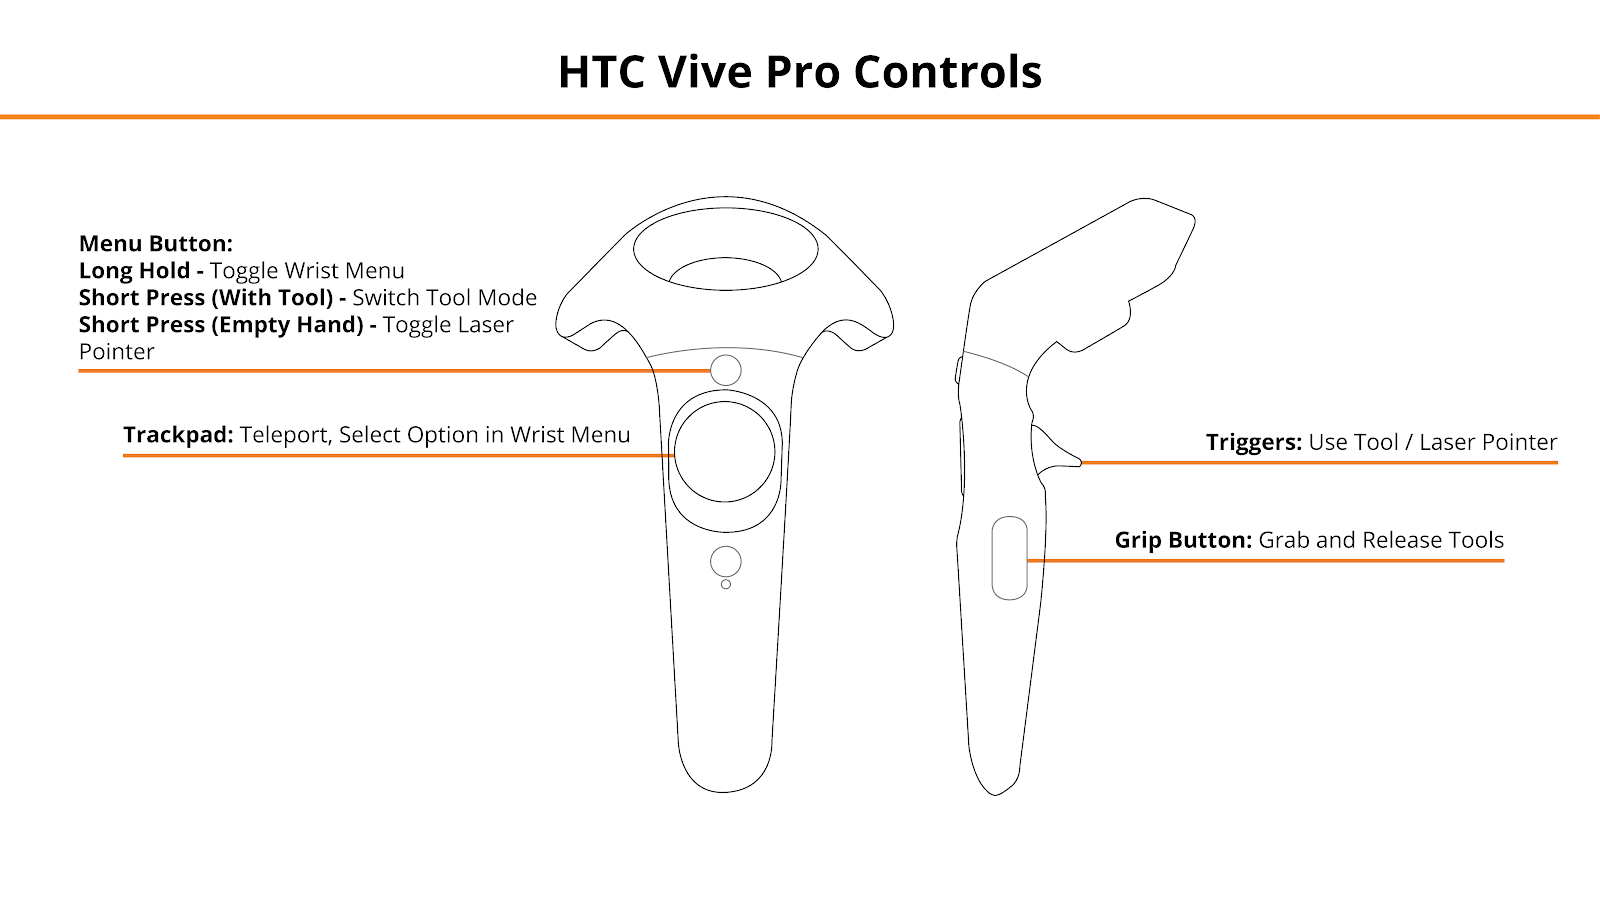
HTC Vive Pro and Focus Plus Headsets
- Menu Buttons
-
Long Hold — Toggle Wrist Menu
-
Short Press with Empty Hand — Toggle Laser Pointer
- Short Press while Holding Tool — Switch Tool Mode
-
- Trackpads — Teleport, Select Option in Wrist Menu
- Grip Buttons — Grab / Release Tools
- Triggers — Use Selected Tool / Laser Pointer
See below for button positions on HTC Vive Pro controllers.
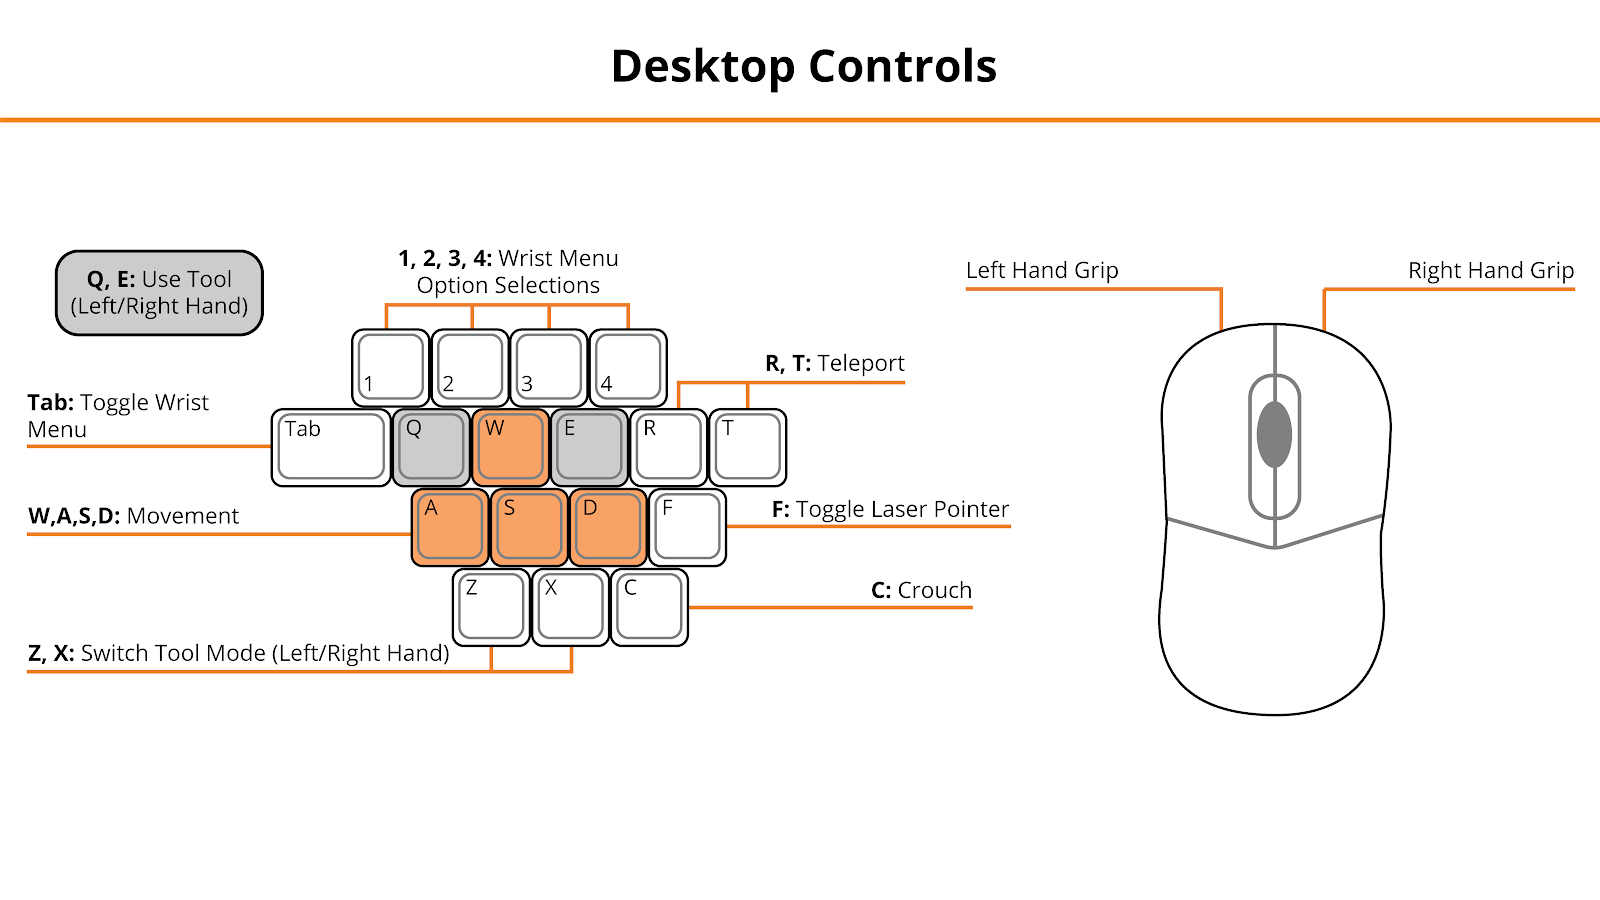
Desktop
- Mouse Left Click, Right Mouse Click — Left Hand Grip / Right Hand Grip
- Q, E — Engage Tool
- Tab — Open/Close Wrist Menu
- 1, 2, 3, 4 — Select Option in Wrist Menu
- R, T — Teleport
- F — Toggle Laser Pointer
See below for the desktop diagram.
Entering the Experience
Login and Authentication
To use this experience, you must log in using a PIXO account created by the organization’s administrator, or by a PIXO VR Representative. The login must be performed from a headset that is connected to the internet for authentication to work successfully.
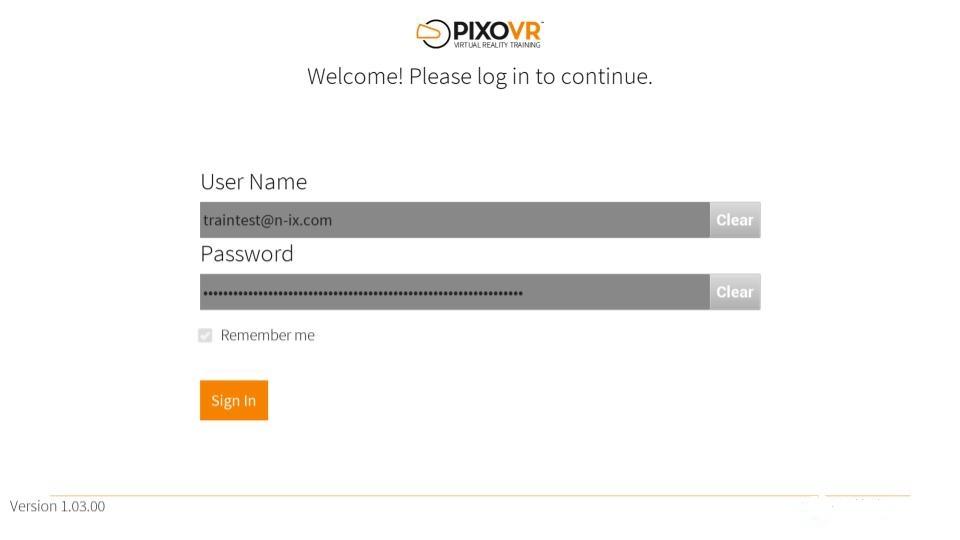
Tip: Select the Remember me flag to save your login credentials for your next session.
-
Enter your PIXO credentials in the corresponding fields, then select Sign In.
-
Once logged in, you will proceed to the tutorial.
Tutorial
After logging in, you will complete an initial onboarding video. This will cover the basics of operation including teleportation, motion controllers, and using buttons.
After completing the tutorial, you will proceed to the lobby.
Lobby
After completing the tutorial, you will proceed to the lobby, where you can choose between Evaluation 1, Evaluation 2, or a Random Scenario.
Experience Walkthrough
To complete the scenarios, follow the sequence below:
- Read and Answer the following Question: “What is the Sensit Gold's Calibration requirement for performing an Outside Meter Inspection?”
- Select Weekly.
- Review the Work Order to find the Customer’s Address (select Show Facility Location to find where the customer’s house is)
-
Locate the Customer’s House. Once you arrive, the customer will speak with you about the leak.
- Investigate for Leak Points
- Check the centerline, storm drains, cracks, service lines, main lines, and foundation wall.
- Use the CGI and Plunger Bar tools to locate the leak (Wrist Menu > Toolbox)
-
Find the Leak at its Highest Concentration (use the Barhole tool to zero out from the leak in four directions)
-
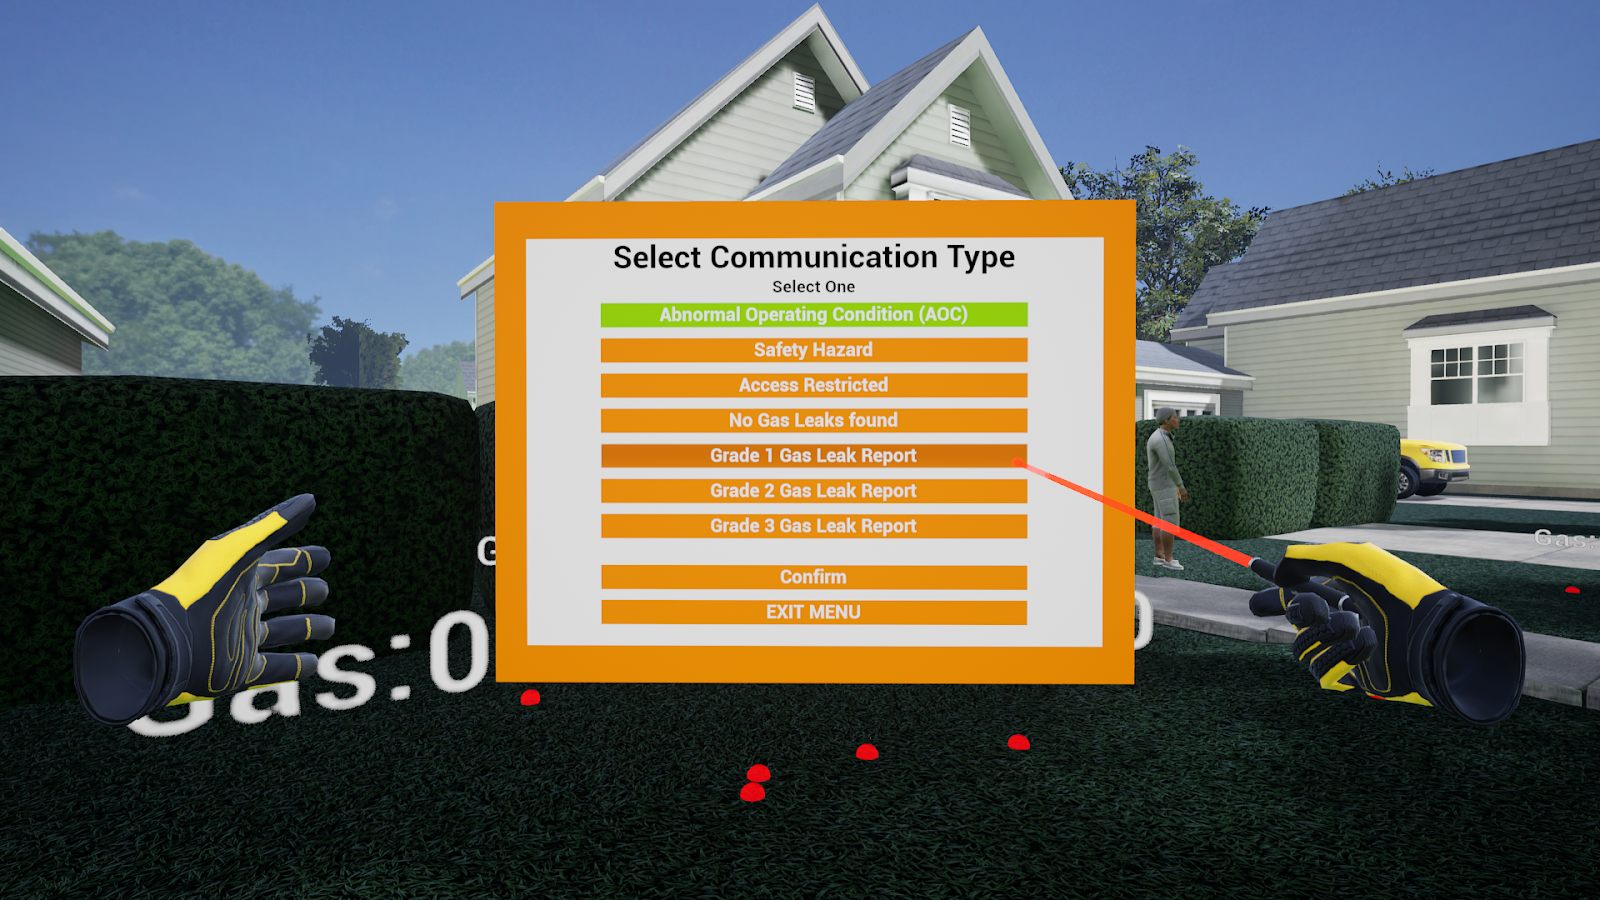
Classify the Leak Grade through Wrist Menu > Communication Menu
-
Classification Options:
- No Leaks Found
- Grade 1 — Immediate response
- Grade 2 — 30-day follow-up
- Grade 3 — 90-day follow-up
-
- Report the Leak to the Appropriate Person(s) and Choose a Submission Time
- Identify and Report any AOCs through the Communication Menu
- Lastly, Report and Select the Follow-up Actions (Wrist Menu > Leak Reporting Menu)
-
Response Options:
- Immediate Action Required
- Company Follow-Up for Recheck/Repairs
- Evacuate Premises
- Request Dispatch to Send Repair Crew to Repair Leak
-
-
Once you report the leak, you will exit the scenario and be sent to the grading room.
Review Performance
After finishing a scenario, you are shown your results and given a passing or failing score. If you wish to, you can revisit the scenario to review what you missed in Review Mode.
Otherwise, you can choose to play the next scenario or return to the HUB.
Review Mode
-
In Review Mode, AOCs will be highlighted in red (missed) and green (found)
-
Any gas leaks that are present will be highlighted as red, orange, yellow, and green with red being the center of the leak

Questions and Support
If you have any issues, please contact our tech support team at [email protected]

