

Program Overview
In this scenario, you will focus on inspecting multiple types of gas appliances in order to determine if they are safe to be lit or not.
Core Learning Objectives
Inspecting and defining the status of the key categories of each appliance present inside the experience area, such as:
- Venting
- Combustion Scoring
- Piping
- Documentation
- Work Completion
- AOC Recognition
- Proper Documentation after all inspections are accomplished
- Documentation
- Overall Score (combination of all other learning objectives shown as passed/failed)
Tools
- Laser Pointer — to interact with menus and objects in this experience, aim your laser pointer at the item you wish to interact with and pull the trigger on your controller to select it.
-
Voltage Pen — to inspect a meter for electric current, place the pen tip near the meter to detect if it is electrified. If present, the tip will light up red and beep.
-
Matches — to conduct a Flame Test, move the matches near the appliances’ draft hood component and pull the trigger on your controller.
-
If smoke moves towards draft hood — the test has passed
-
If smoke moves away from draft hood — the test has failed
-
-
Thermometer — to conduct a thermometer test, make sure that the gas valve is turned on. The thermometer will then start filling with a red color from the bottom to the top:
-
If red color fills up to 70 or 80 percent full — the test has passed
-
If thermometer does not fill up — the test has failed
-
User Controls
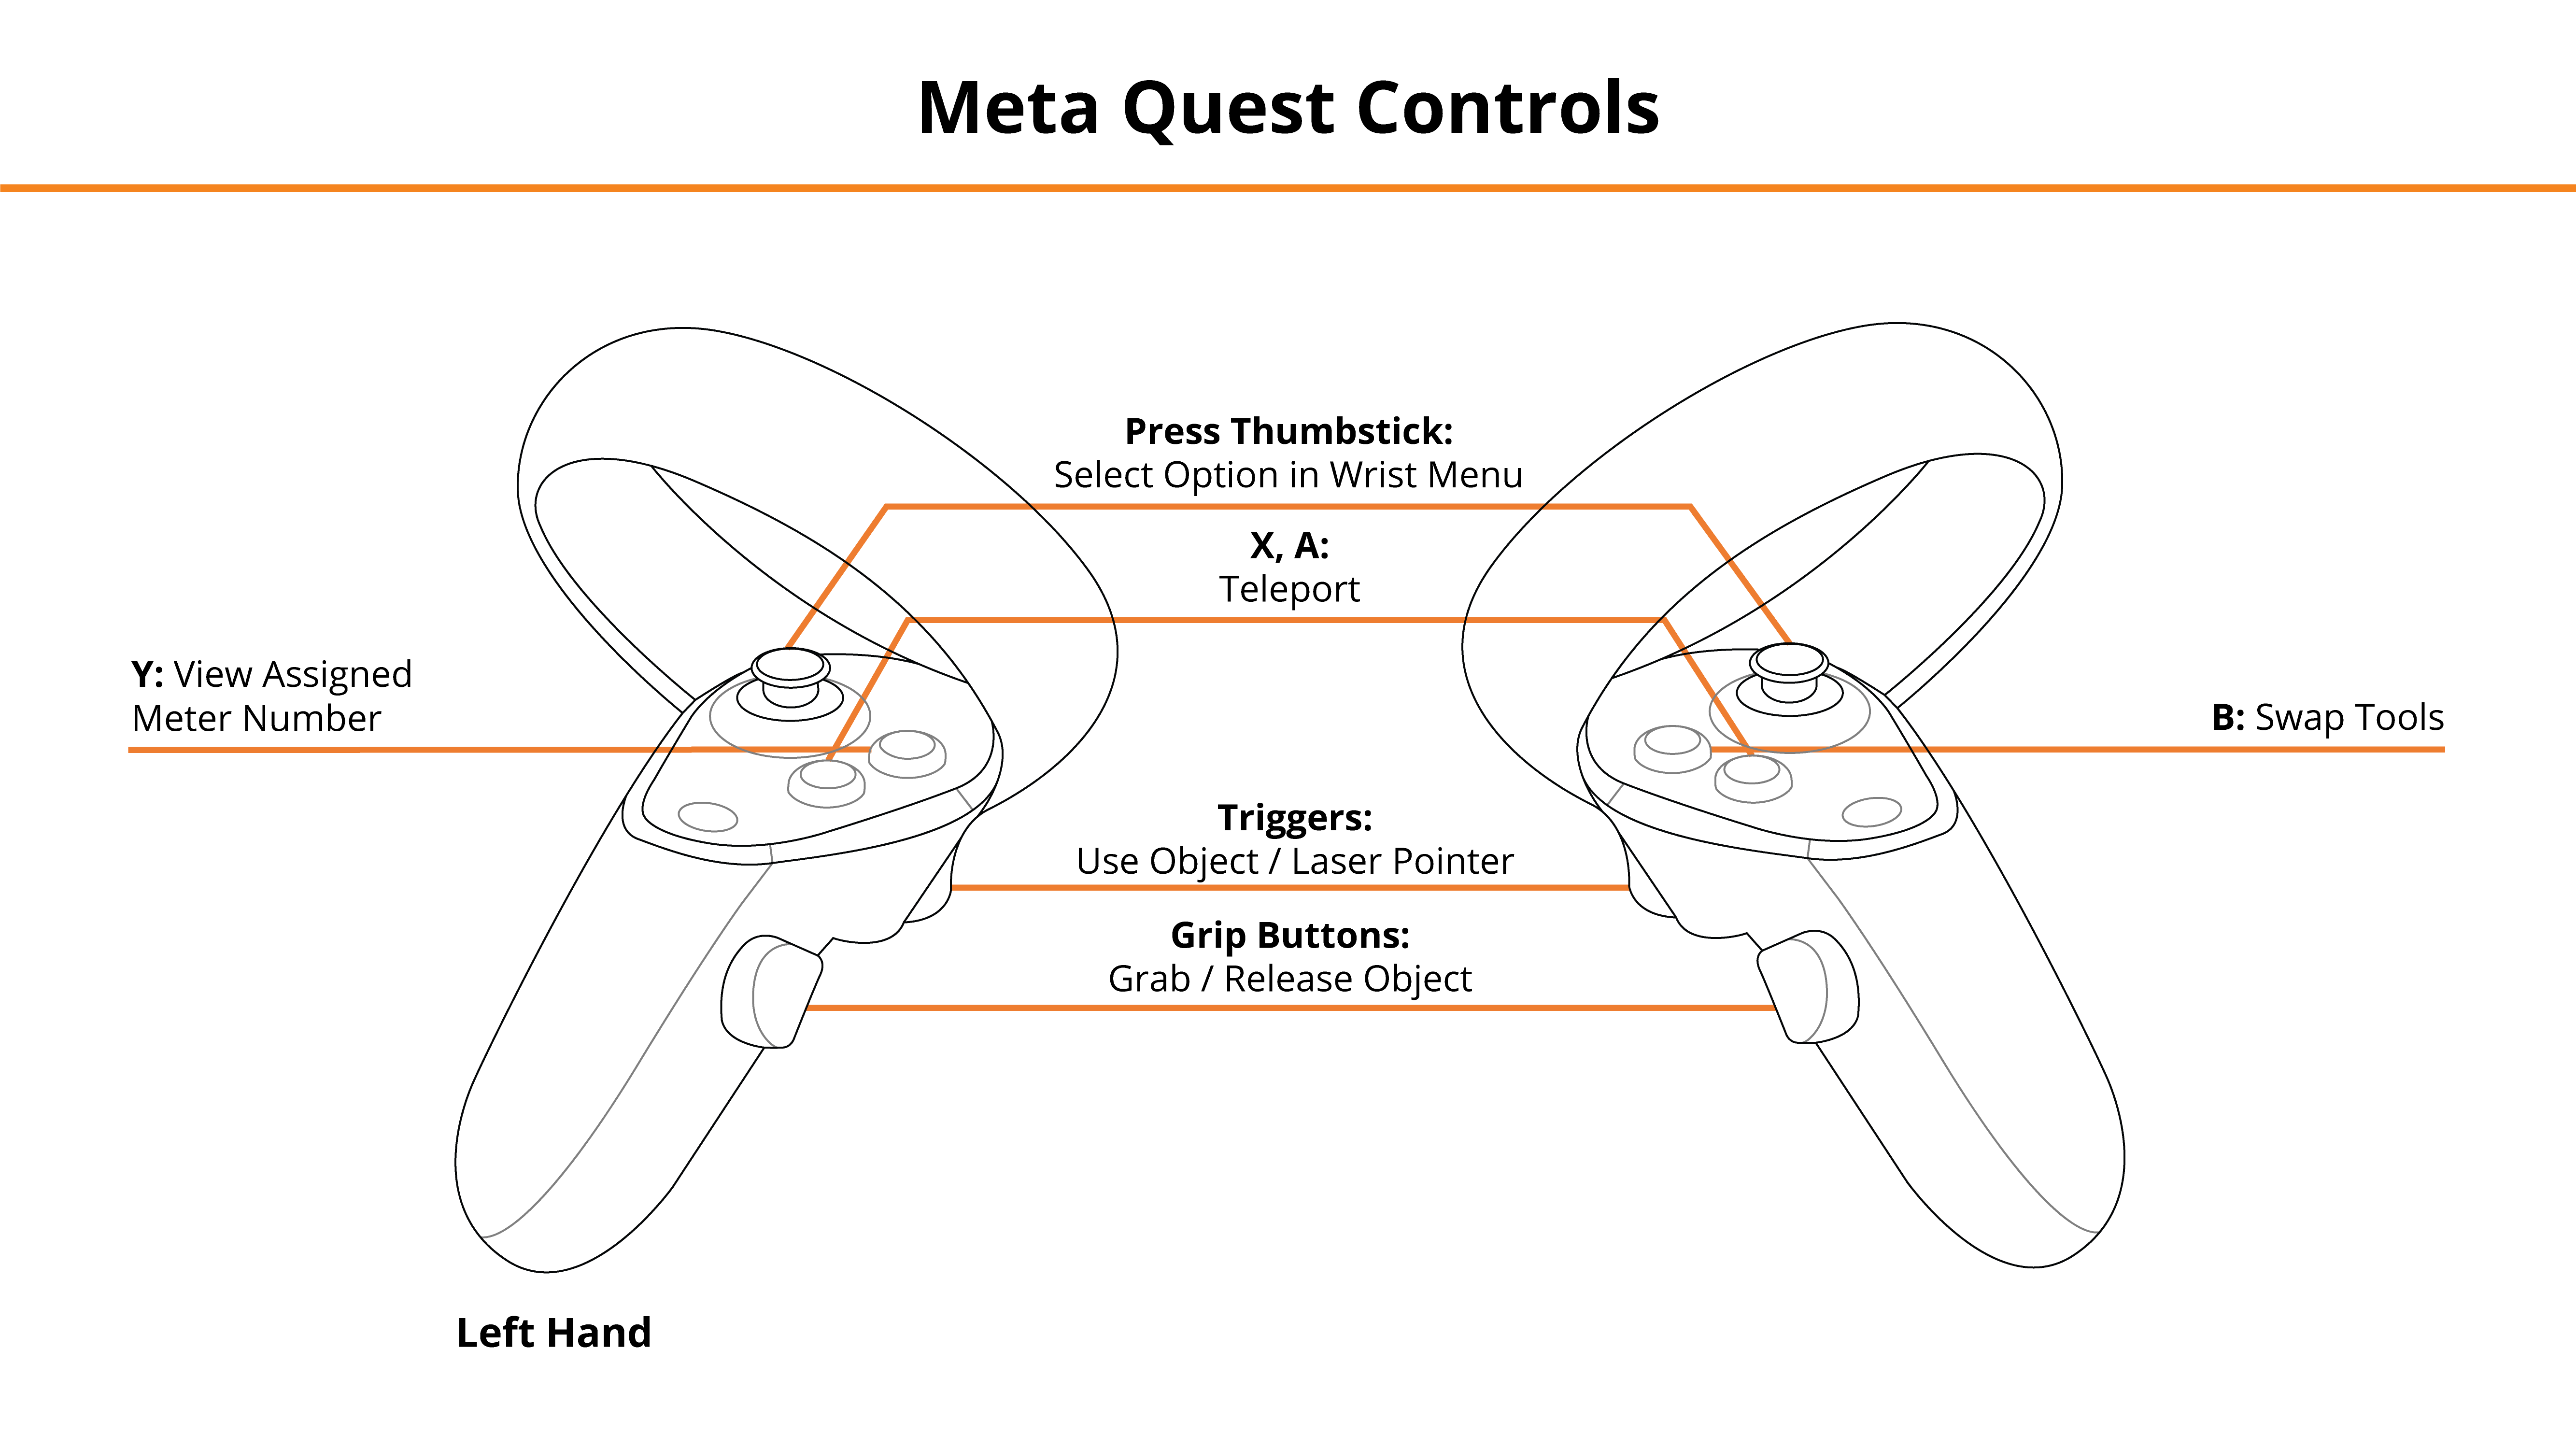
PICO & Meta Quest Headsets
- Triggers — Use Equipped Object, Use Laser Pointer
- Grip Buttons — Grab / Release Object
- X, A — Teleport
- Y — View Assigned Meter Number
- B — Swap Tools
- Thumbsticks — Select Option in Wrist Menu
See below for button positions on Meta Quest controllers.
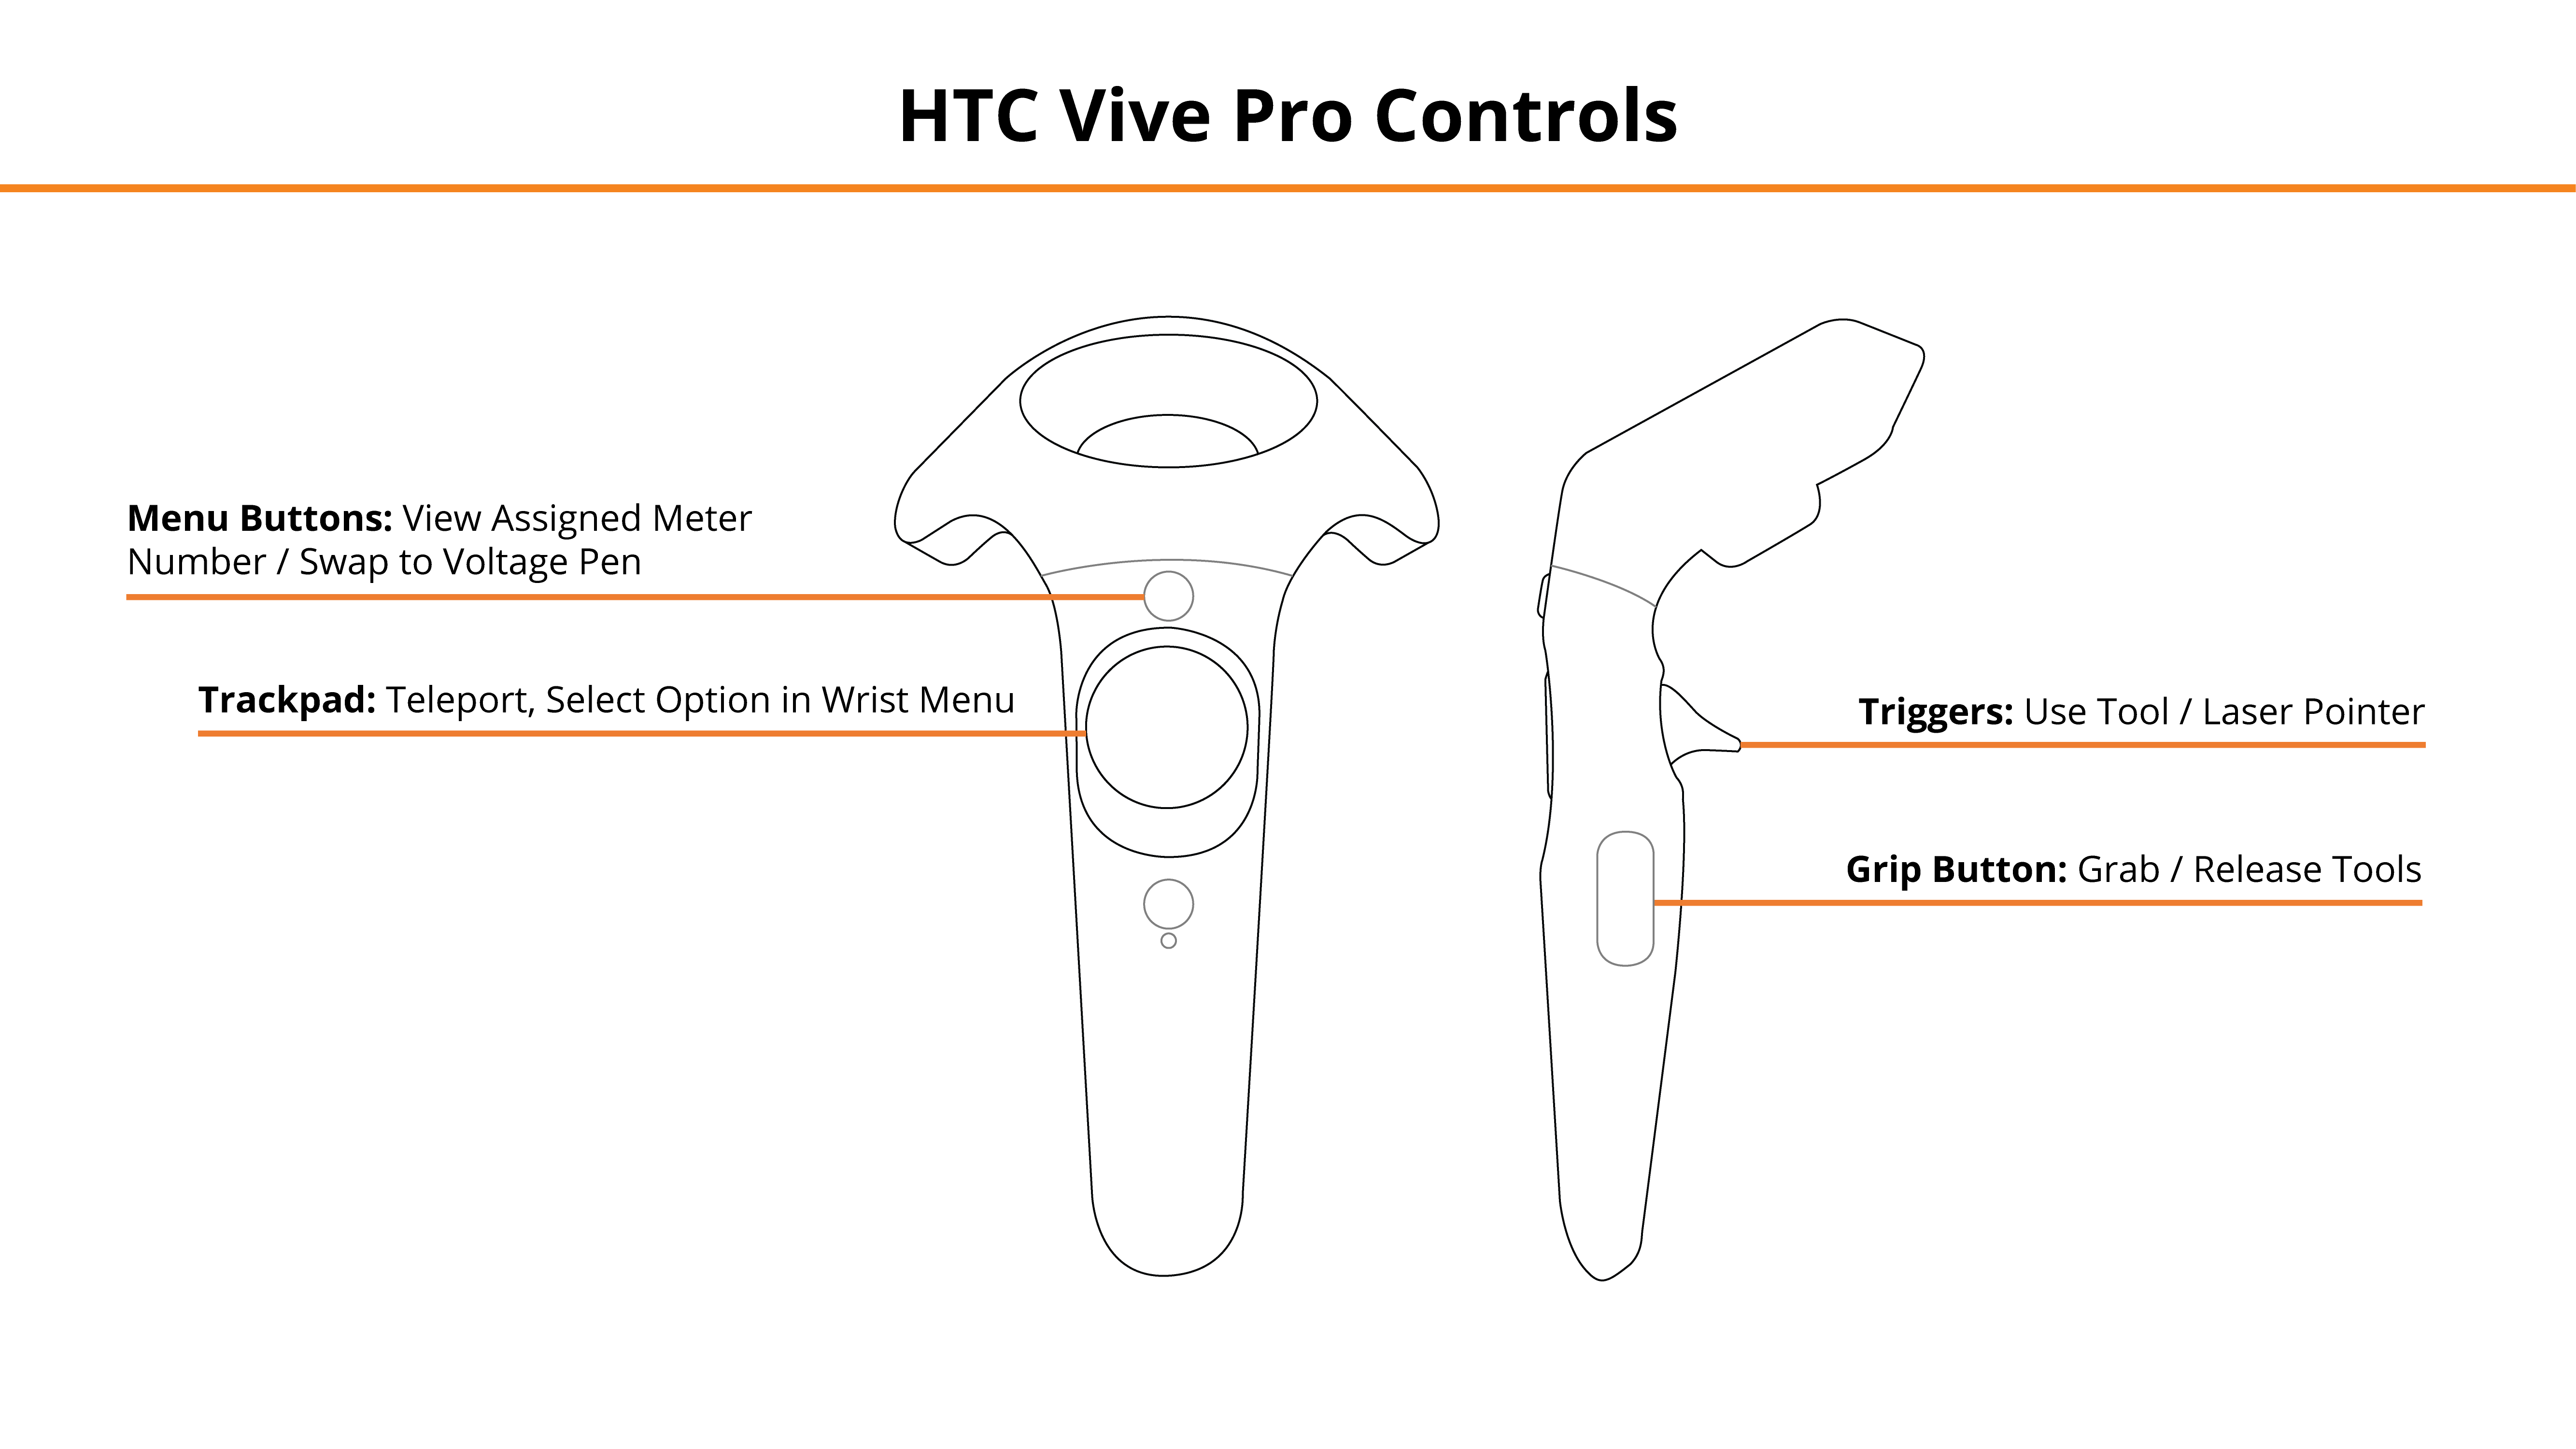
HTC Vive Pro and Focus Plus Headsets
- Menu Buttons — View Assigned Meter Number / Swap to Voltage Pen
- Trackpads — Teleport, Select Option in Wrist Menu
- Grip Buttons — Grab / Release Tools
- Triggers — Use Selected Tool / Laser Pointer
See below for button positions on HTC Vive Pro controllers.
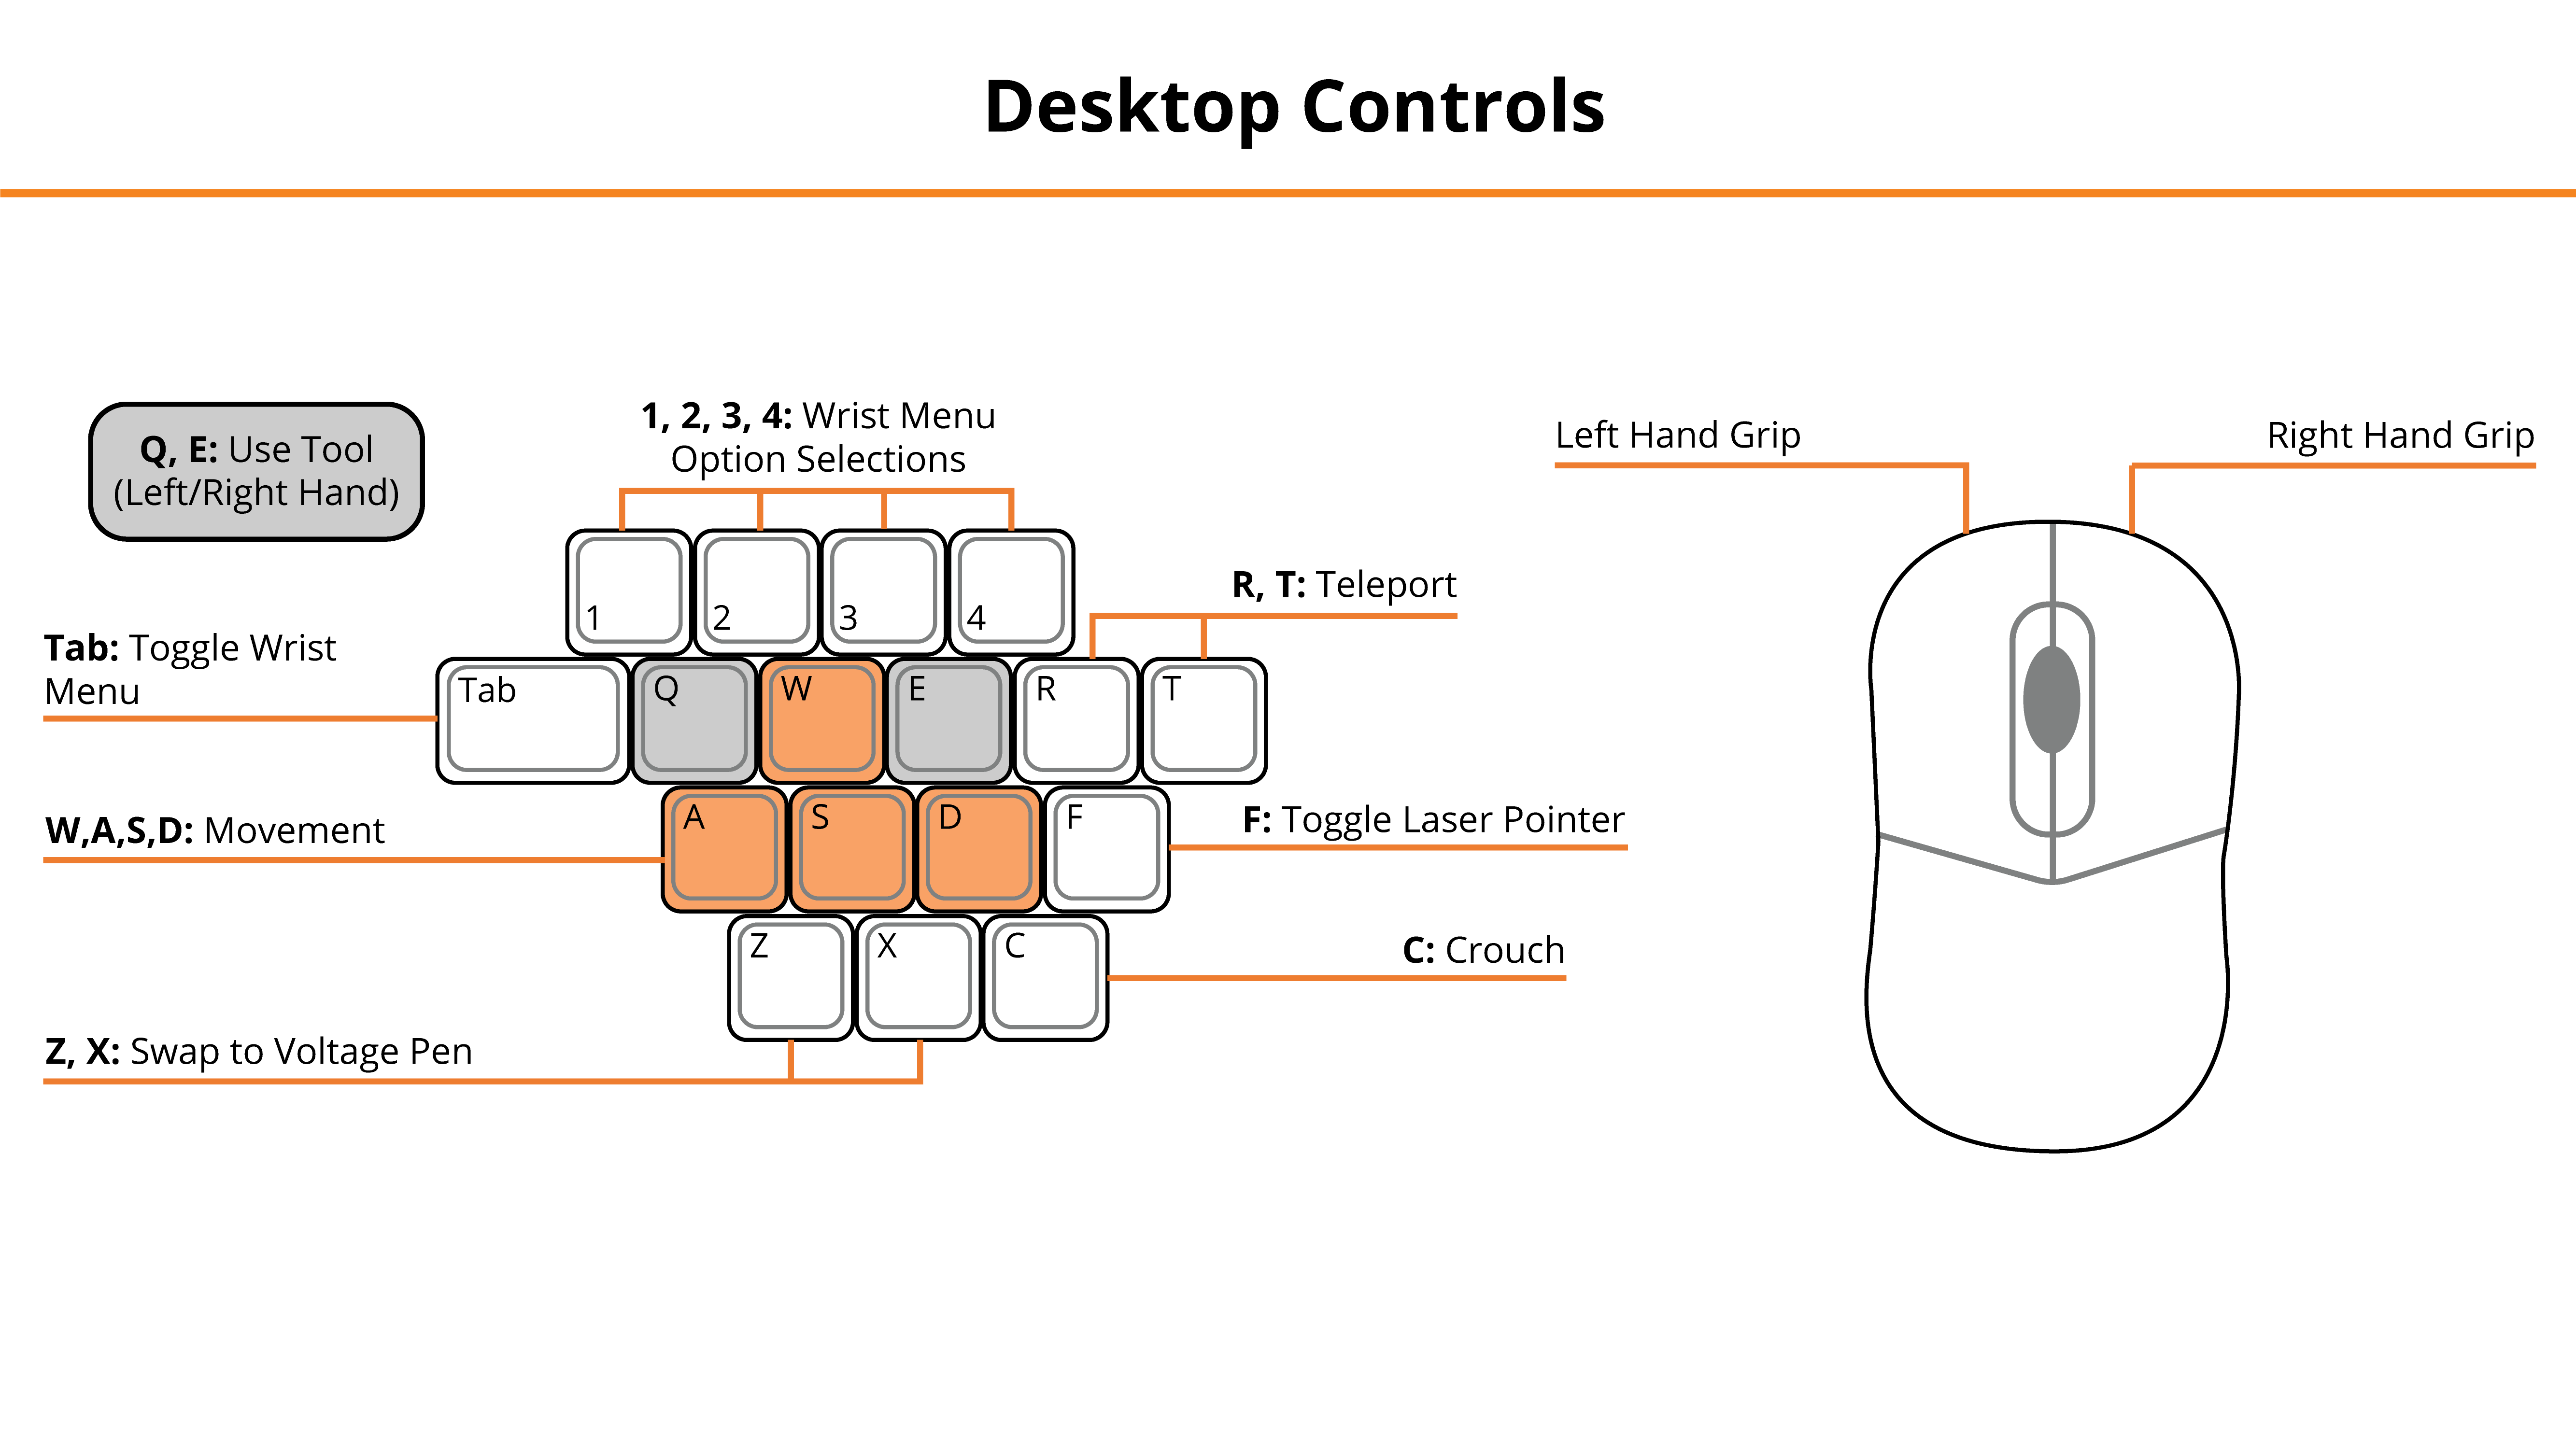
Desktop
- Mouse Left Click, Right Mouse Click — Left Hand Grip / Right Hand Grip
- Q, E — Select, Engage Tool
- Tab — Toggle Wrist Menu
- 1, 2, 3, 4 — Select Option in Wrist Menu
- R, T — Teleport
- Z, X — Swap to Voltage Pen
- F — Toggle Laser Pointer
See below for the desktop diagram.
Entering the Experience
Login and Authentication
To use this experience, you must log in using a PIXO account created by the organization’s administrator, or by a PIXO VR Representative. The login must be performed from a headset that is connected to the internet for authentication to work successfully.
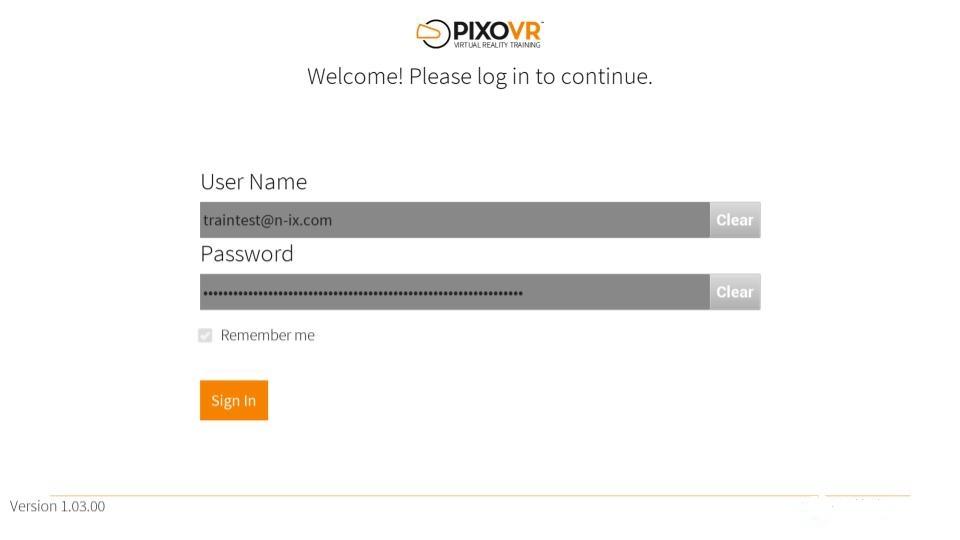
Tip: Select the Remember me flag to save your login credentials for your next session.
-
Enter your PIXO credentials in the corresponding fields, then select Sign In.
-
Once logged in, you will proceed to the lobby.
Lobby
After logging in, you will proceed to the lobby, where you can select between Tutorial, a Single Player, or Join Multi-User:
-
Tutorial — covers the basics of operation including teleportation, motion controllers, and using buttons.
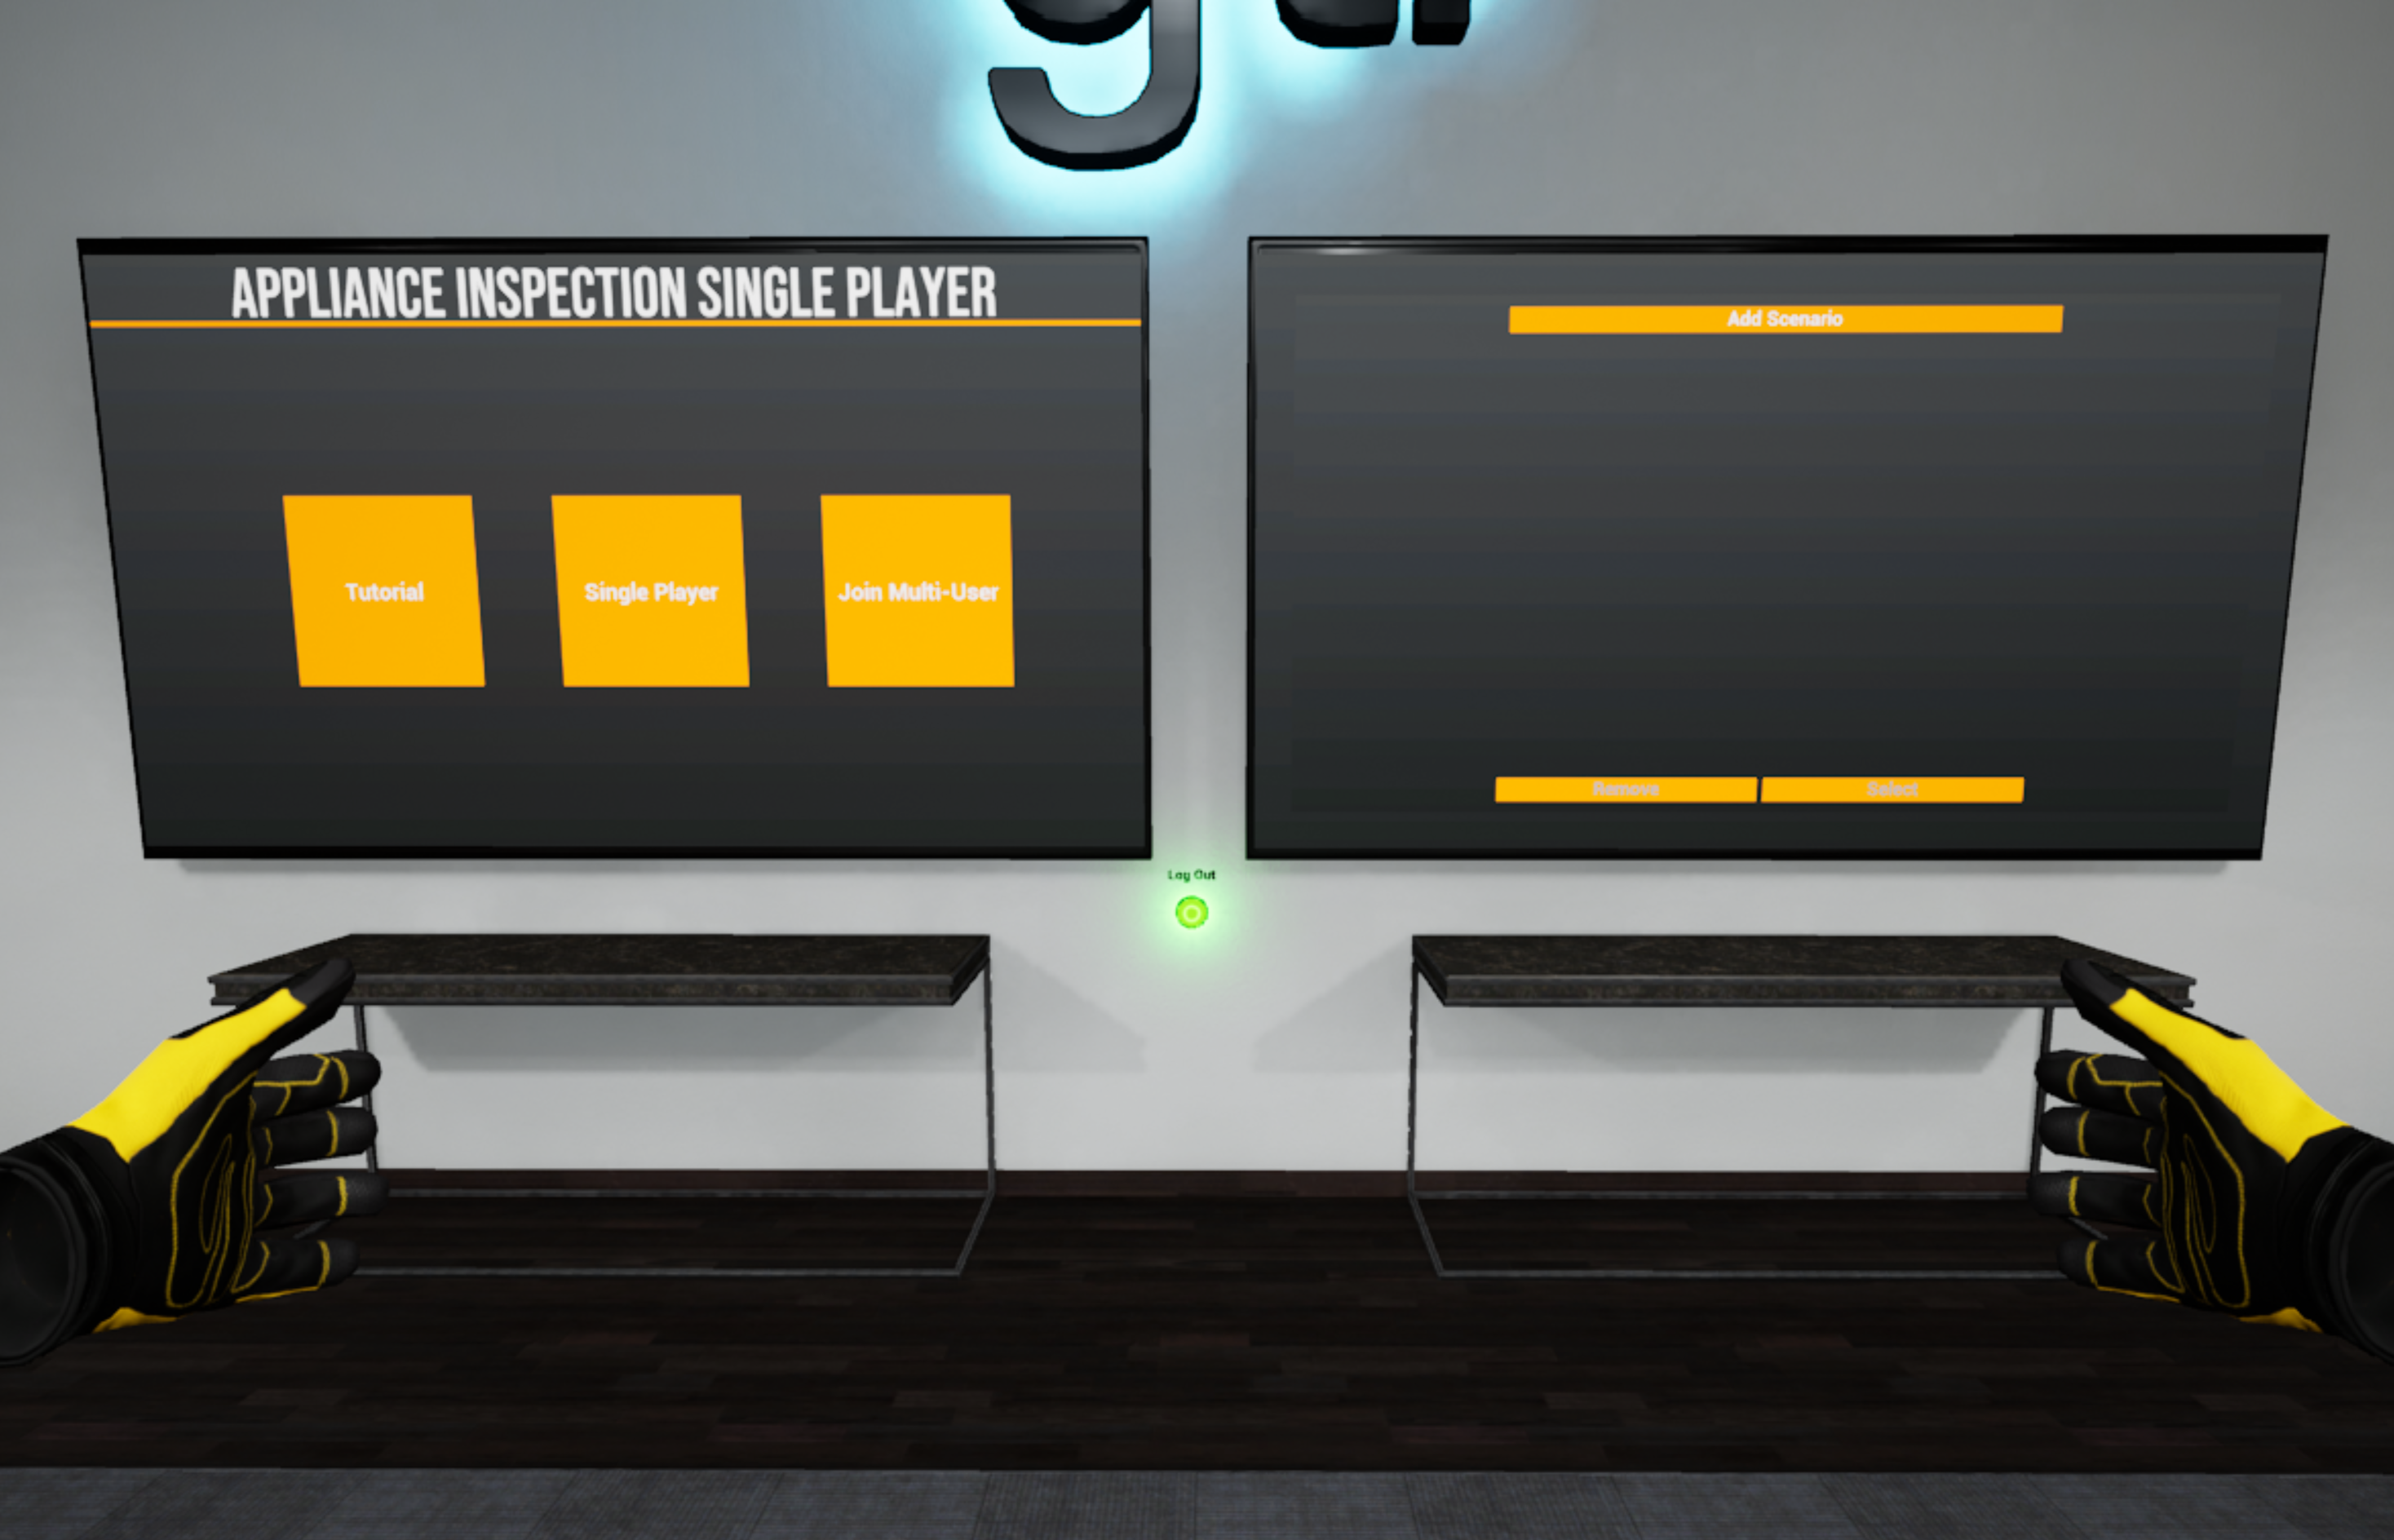
Alternatively, Trainers can use the "Add Scenario" screen on the right to build a specific scenario. See the Gas Appliance Inspection Trainer Guide for more information.
Experience Walkthrough
A Work Order will appear instructing you to inspect and light the appliances in the room. The core scenarios either involve a meter change or a new customer turn on.
In each case, you will have to inspect all appliances in the basement (except for the electric models of those appliances). The scenario is randomized, meaning the specific appliances spawned and their problems will vary.
-
First, before checking any appliances, make sure the sink has water. If the sink does not have water, any water-using gas appliances (Water Heaters, Boilers) cannot be lit and must be tagged out.
-
Next, check for any AOCs that are in the area:
-
Select AOCs that are close to appliances with your laser pointer.
-
Ask the Customer to remove them, then issue a hazard tag.
-
In addition to checking for AOCs, check for uncapped pipes.
-

-
Throughout the module, carefully inspect each Appliance and all relevant parts.
-
To inspect appliances, hover over selectable objects with the laser pointer and press the controller trigger to select. Selectable objects will have pop-up menus.
-
In the pop up menu, you will see reporting options to potentially choose from. Select all options that apply to report them, then select Back.
-

-
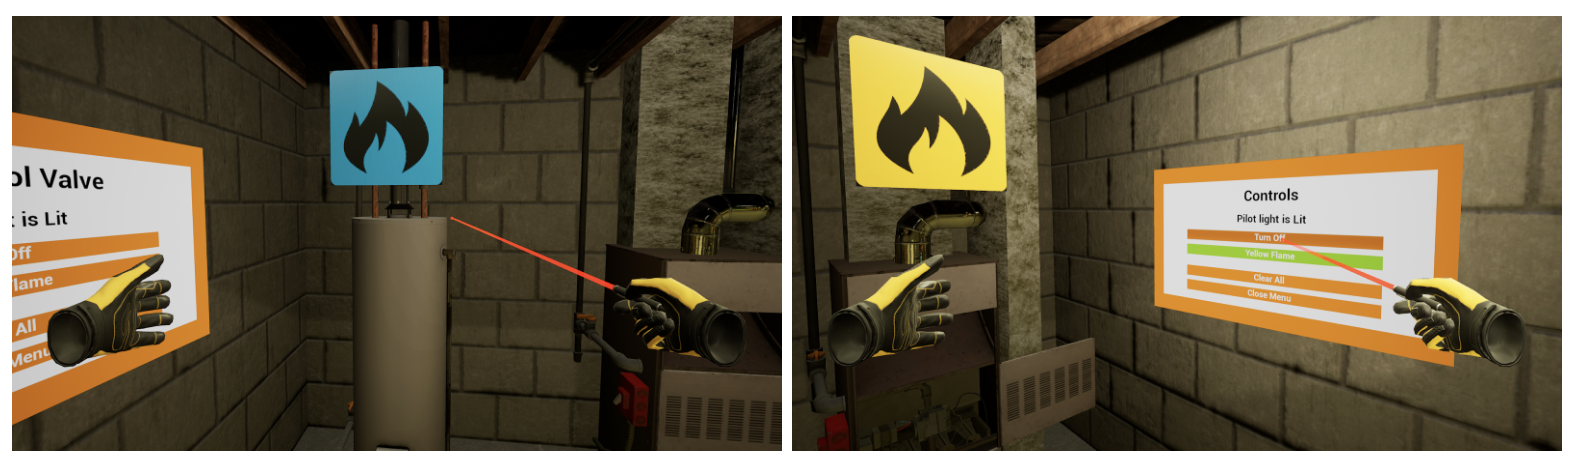
Once an Appliance has been inspected, perform the Light Test:
-
To perform the light test, turn on the customer’s piping through the gas valve.
-
If the gas valve is missing, report it in the appliance’s menu.
-
-
Run the unit, such as running a dryer cycle by powering it on, or heating up the oven (depending on the Appliance type).
-
Select Appliances’ components (gas control valve, burners, oven control, pilot light holes) in order to open their menus.
-
Select “Light Unit”, then make a selection based on the flame color and if any defects are present.
-
In the case of Ranges, there are further tests:
-
Turn on all burners by using the burner control. All burners will turn on at the same time and show a blue or yellow flame:
-
Blue — the test passed, there are no defects
-
Yellow — the test failed
-
-
-
-
Depending on what Appliance you are inspecting, you may have to perform a Flame test or Thermometer test.
-
Flame Test — for appliances such as boilers, water heaters, and central heating units/furnaces
-
Thermometer Test — for appliances such as ranges and dryers
-
-
To conduct a Flame Test: (applicable to atmospheric appliances only)
-
Grab the Match Tool from the Tool Box (this can be accessed through the Wrist Menu on your left wrist)
-
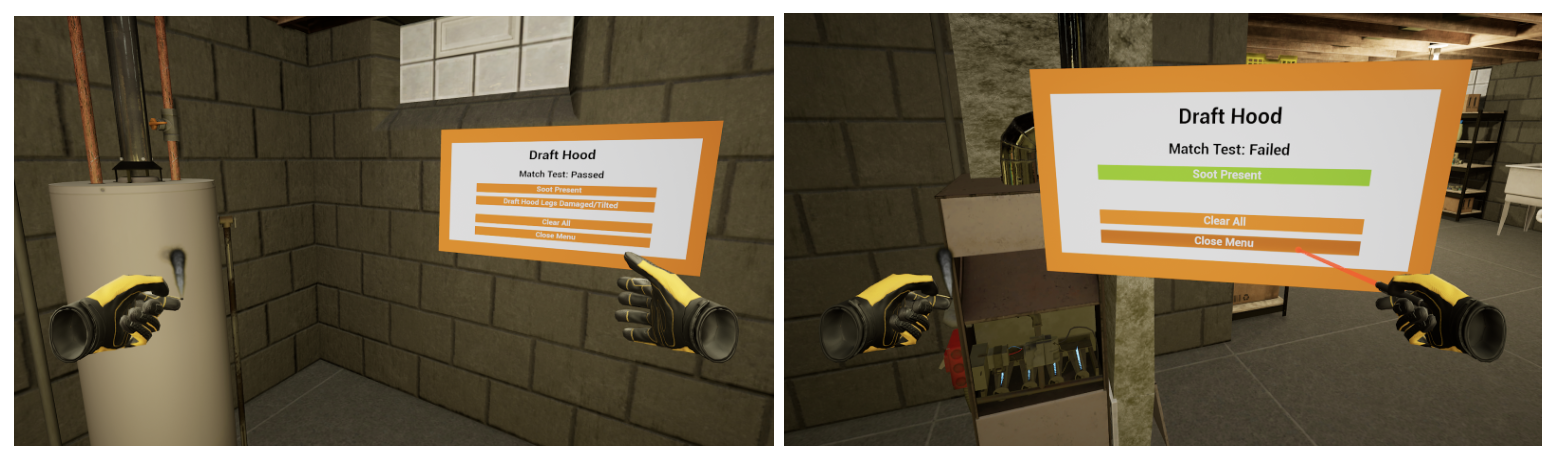
Hold the matches to the Appliances’ draft hood component.
-
Next, observe the smoke emitting from the match.
-
Hint: Check the draft hood’s menu to check if the match test passed or failed. It will clearly state “Match Test: Passed” or “Match Test: Failed” after the test is performed.
-
If Smoke Moves:
-
Towards draft hood — the test has passed, continue inspection
-
Away from draft hood — the test has failed, report it as needed in the appliance's menu
-
-
-
-
To Conduct a Thermometer Test:
-
Turn on the Gas Valve
-
Pilot Light type Appliances — light the Pilot Light
-
For central heating units (boilers / furnaces) — the correct order is to open the gas valve, turn on its electrical component, and then light the pilot
-
-
Non-Pilot Light type Appliances — turn on the button/knob on the control panel of the appliance
-
-
If the flame is:
-
Blue — proceed to the next step
-
Yellow — do not proceed with the thermometer test and instead proceed with the pilot light flow for yellow flame
-
-
Next, the thermometer will start filling with a red color from the bottom to the top:
-
Red color fills up to 70 or 80 percent full — the test has passed
-
Thermometer does not fill up — the test has failed
-
Report as needed in the appliance's menu
-
-
-

-
Once all Appliances have been lit or shut down, open your Wrist Menu (located on your left wrist) and select Communication. Choose the most accurate diagnosis in the window based on the inspection.
Review Performance
When finished with a scenario, you are taken to a grading room and shown your results.
You can also select the Tabs on the left hand side of the menu (General, Furnace, Range, Dryer, Water Heater) to see what aspects of the inspection were correct and which were missed.

If you wish to, you can revisit the scenario to review what was missed in Review Mode. Areas that were not correct will be highlighted red.

When finished reviewing, you can either play another scenario or select the Exit to Lobby button to finish the module.
Questions and Support
If you have any issues, please contact our tech support team at [email protected]

