

Program Overview
Arrive on the scene of an active gas leak emergency, where you must employ your investigation techniques and safety protocol correctly to preserve life and property quickly, accurately, and efficiently. Work alone or with an instructor to complete four common emergency scenarios.
To see a video of the module, click this link: ERS Walkthrough
Core Learning Objectives
-
Recognize emergent hazardous conditions using sense of sight, simulated smell, and hearing.
-
Identify and eliminate all ignition sources.
-
Know when to evacuate and how to ventilate occupied buildings.
-
Apply proper investigation techniques to monitor changing conditions and properly escalate any relevant changes.
-
Develop strong communication patterns during emergency situations
Tools
-
Laser Pointer — to interact with menus and objects in this experience, aim your laser pointer at the item you wish to interact with and pull the trigger on your controller to select it.
-
Soap Spray — to test for a leak, aim the spray and pull the controller trigger:
-
If bubbles appear, there is a leak
-
If there are no bubbles, the leak is coming from somewhere else
-
-
Adjustable Wrench — to turn off gas meters, aim and pull the controller trigger.
-
CGI Tool — to take gas readings on any interactive object where gas might be present, aim and pull the controller trigger. After pulling the trigger, floating percentages will appear.
-
Valve Key — to turn off gas flow at mainline valves:
-
Select the Valve with your laser pointer
-
Select Open Valve Box Lid
-
Open Wrist Menu > Toolbox
-
Select the Valve Key with your laser pointer to equip it
-
Physically place the valve key near valve box and it will snap into place
-
-
Traffic Cone — to block off the street and mark opened manhole covers, pull the controller trigger to drop/place cones.
-
Rock Drill — to drill holes in the concrete or asphalt to check for gas, aim and pull the controller trigger. After pulling the trigger, floating percentages will appear.
-
Shovel — no functionality in ERS Module.
-
Plunger Bar — to create a bar hole, use the red circle to aim, then pull the controller trigger to drop the probe.
-
Red Cone — to mark off the Incident Command Center at the end of the road, place four cones in a square formation around the command center. To place cones, aim and pull the trigger on your controller.
-
Heath Sensor — additional gas detector.
-
Anemometer — to see the cardinal direction that you're facing, wind speed, and wind direction, pull the controller trigger.
User Controls
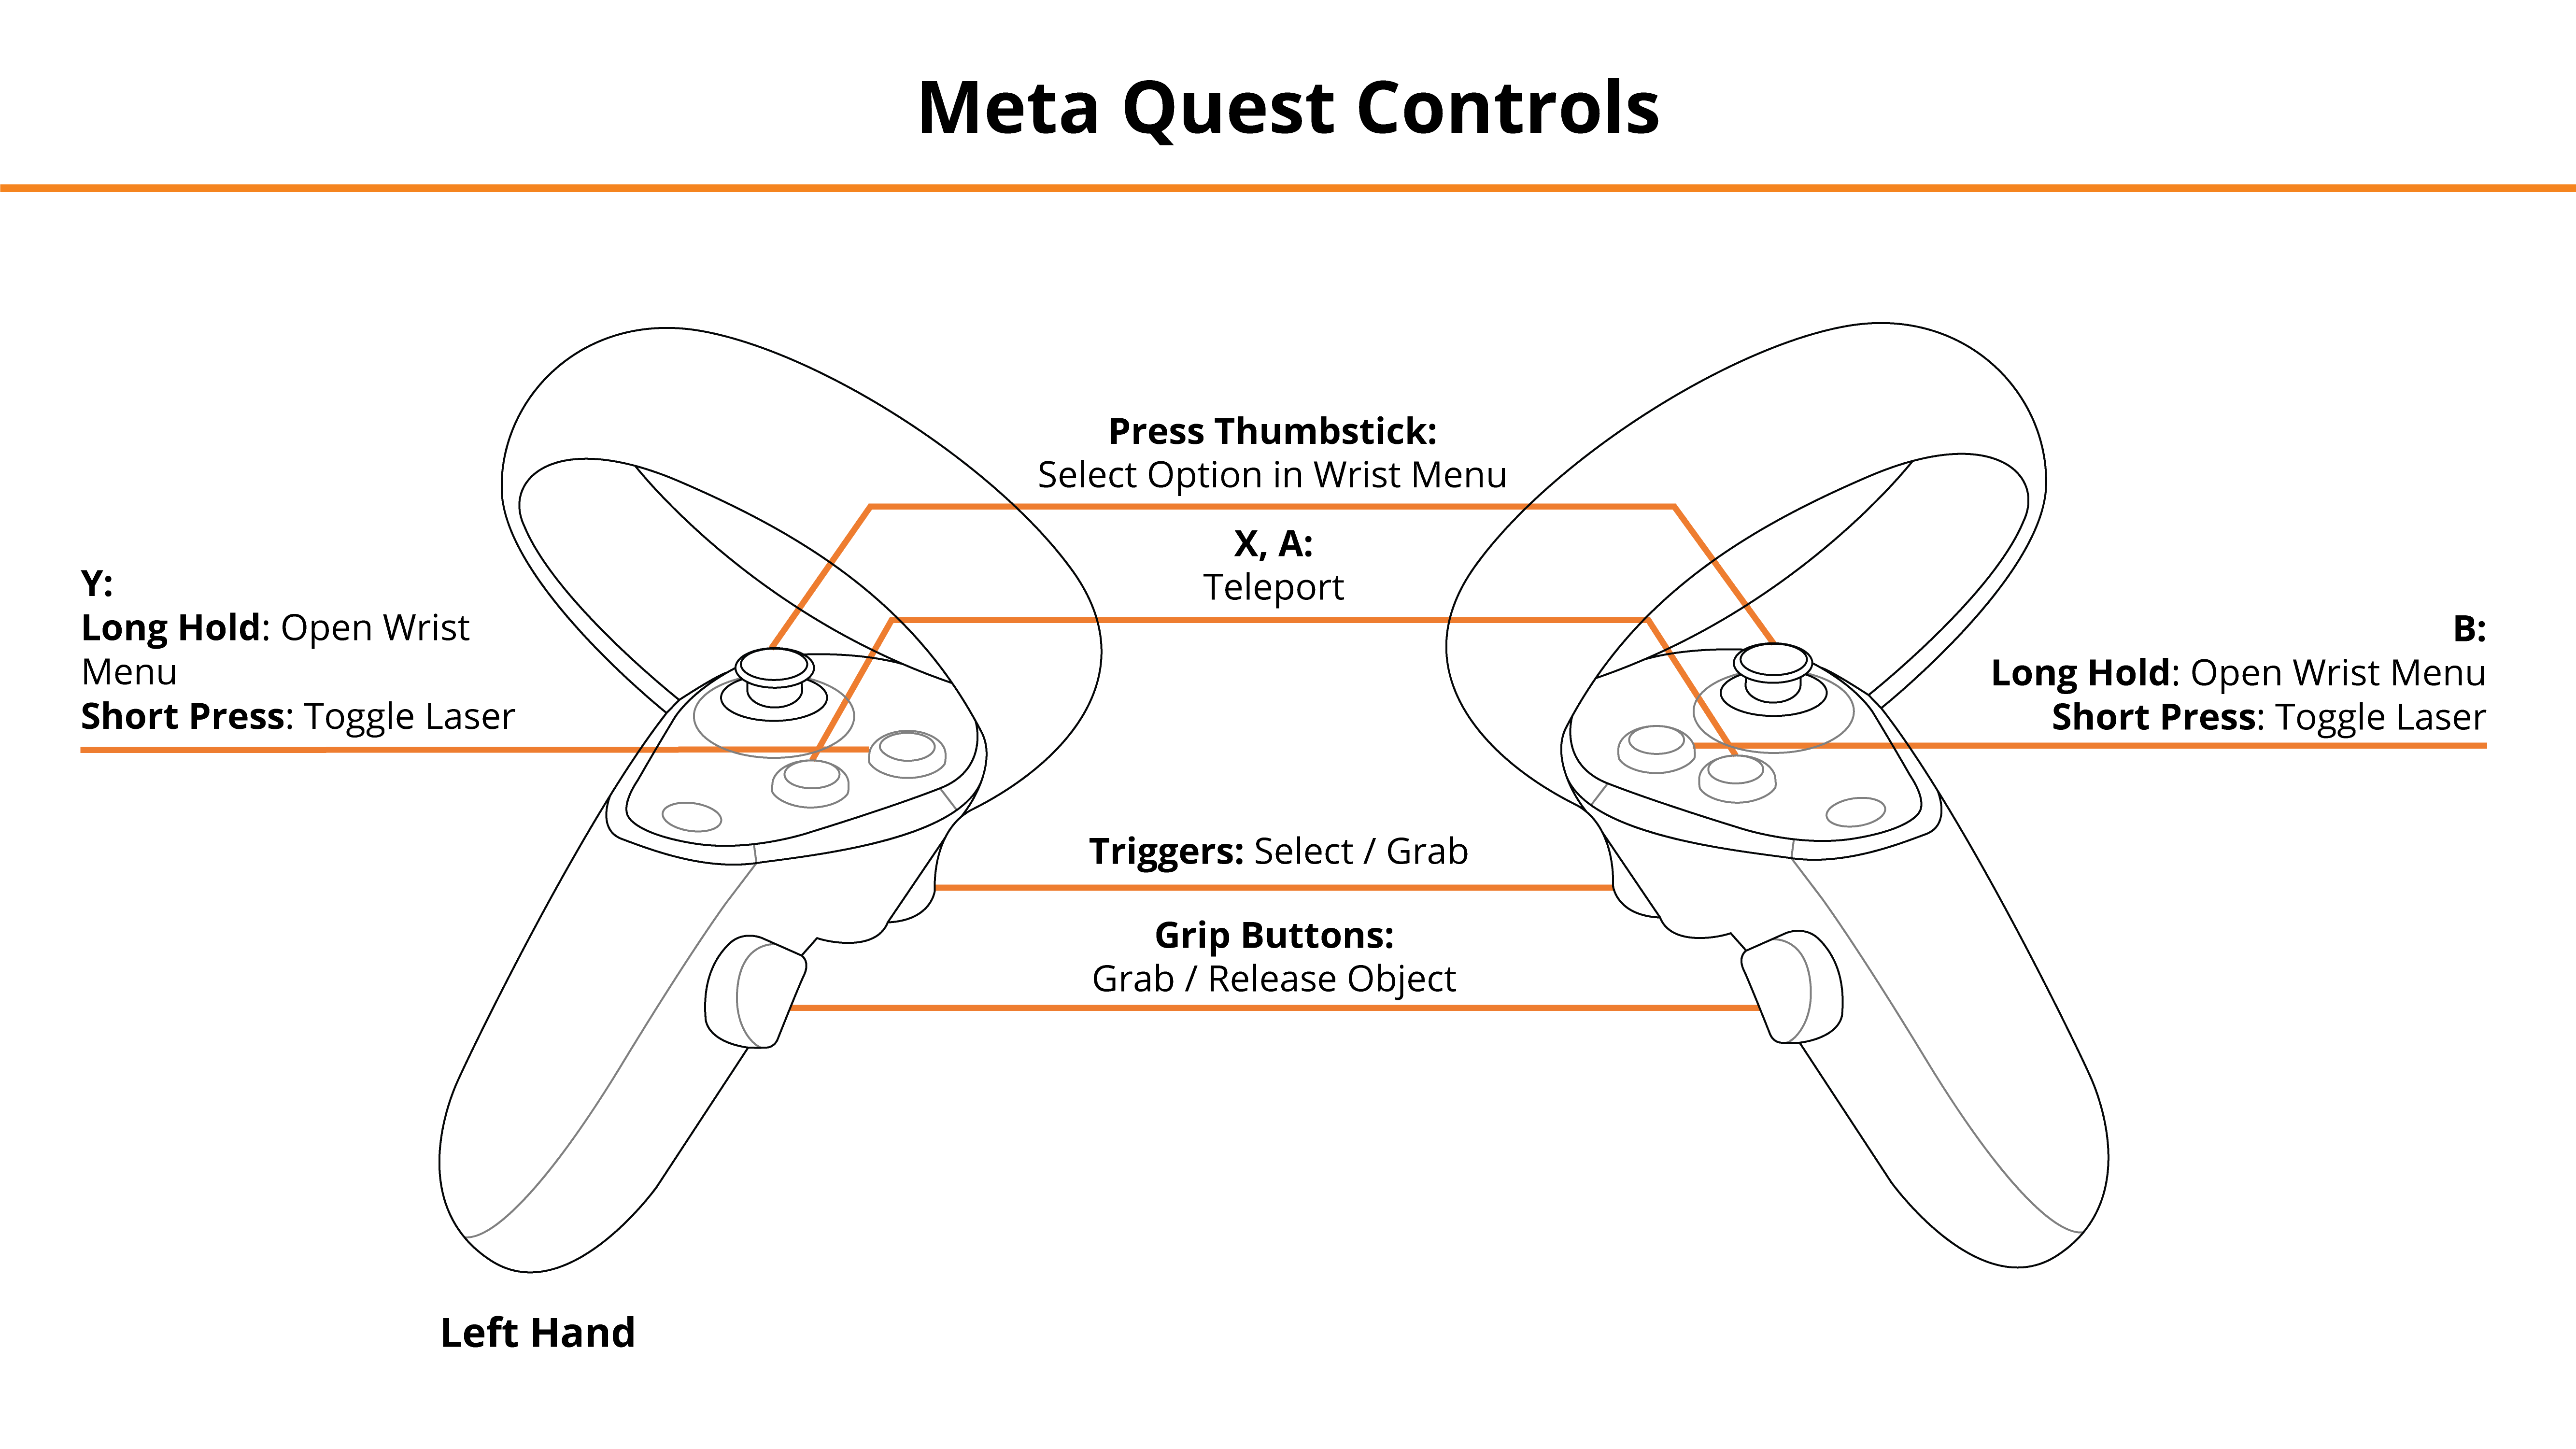
PICO & Meta Quest Headsets
- Triggers — Use Equipped Object, Use Laser Pointer
- Grip Buttons — Grab / Release Object
- X, A — Teleport
- Y, B
- Long Hold — Toggle Wrist Menu
- Short Press w/ Empty Hand — Toggle Laser Pointer
- Thumbsticks — Select Option in Wrist Menu
See below for button positions on Meta Quest controllers.
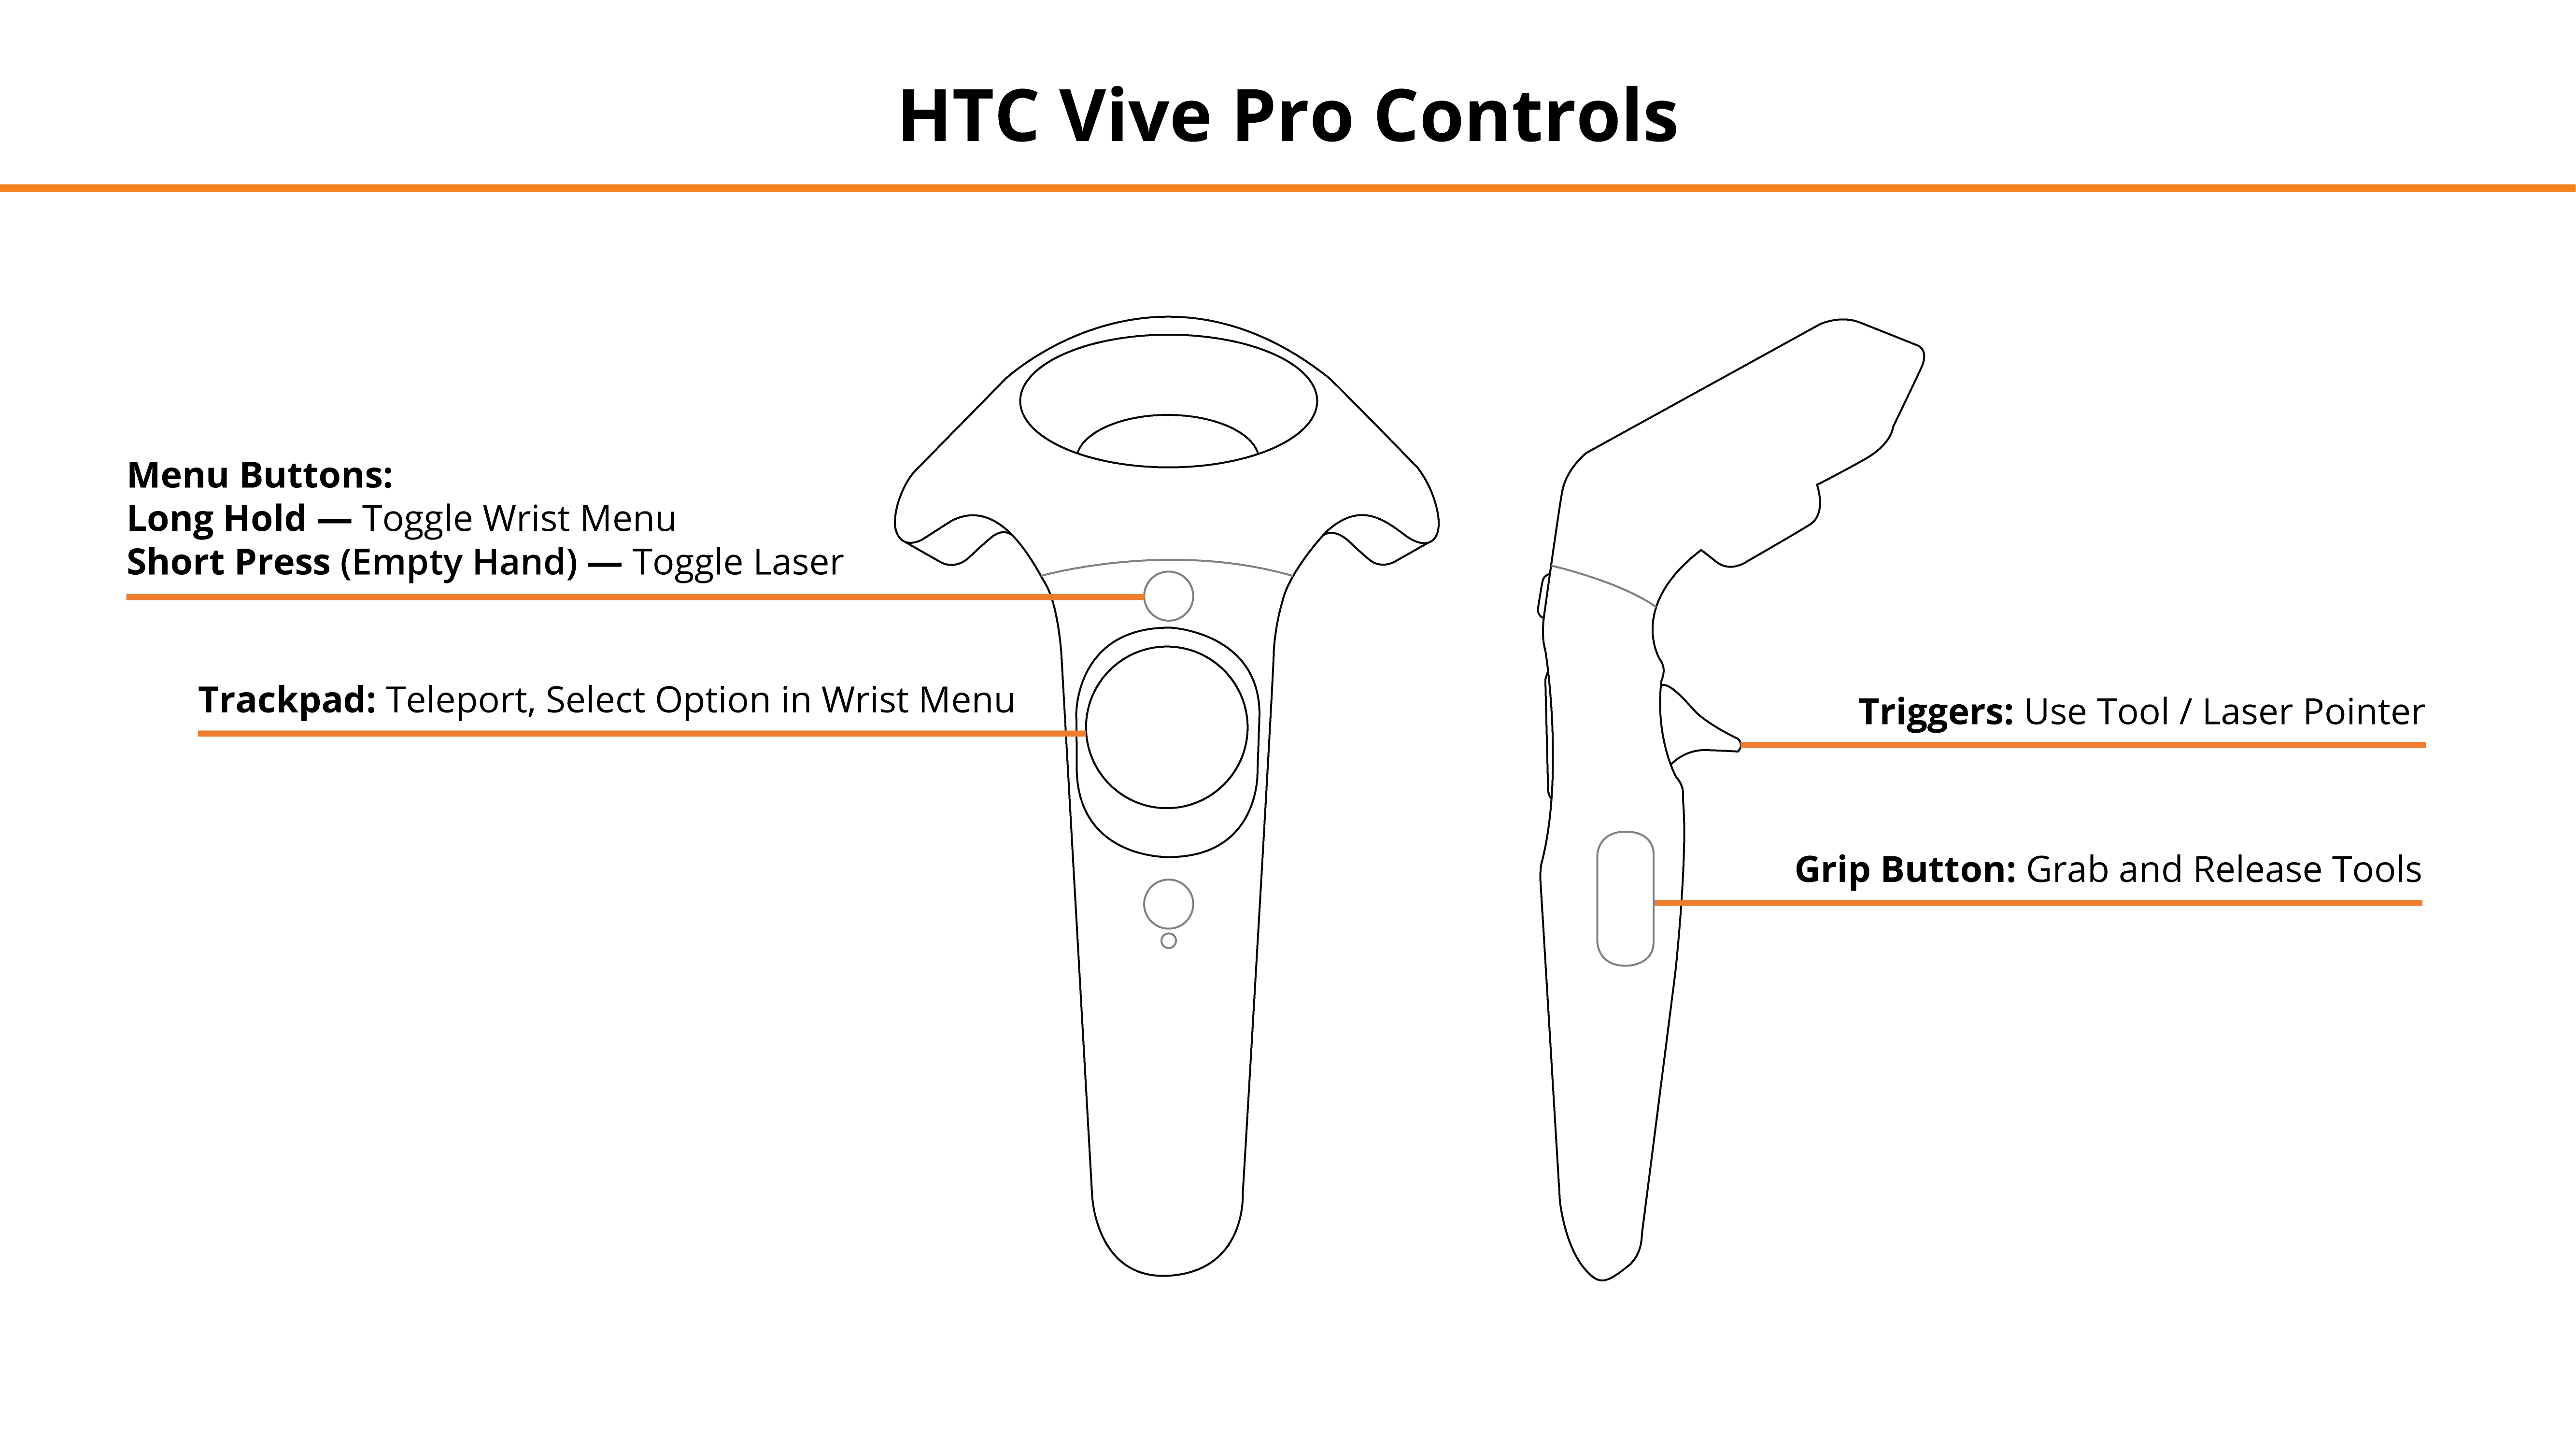
HTC Vive Pro and Focus Plus Headsets
- Menu Buttons
- Long Hold — Toggle Wrist Menu
- Short Press w/ Empty Hand — Toggle Laser Pointer
- Trackpads — Teleport, Select Option in Wrist Menu
- Grip Buttons — Grab / Release Tools
- Triggers — Use Selected Tool / Laser Pointer
See below for button positions on HTC Vive Pro controllers.
Desktop
- Mouse Left Click, Right Mouse Click — Left Hand Grip / Right Hand Grip
- Q, E — Select, Engage Tool
- Tab — Toggle Wrist Menu
- 1, 2, 3, 4 — Select Option in Wrist Menu
- R, T — Teleport
- Z, X — Switch Tool Mode (Left/Right Hand)
- F — Toggle Laser Pointer
See below for the desktop diagram.

Entering the Experience
Login and Authentication
To use this experience, you must log in using a PIXO account created by the organization’s administrator, or by a PIXO VR Representative. The login must be performed from a headset that is connected to the internet for authentication to work successfully.
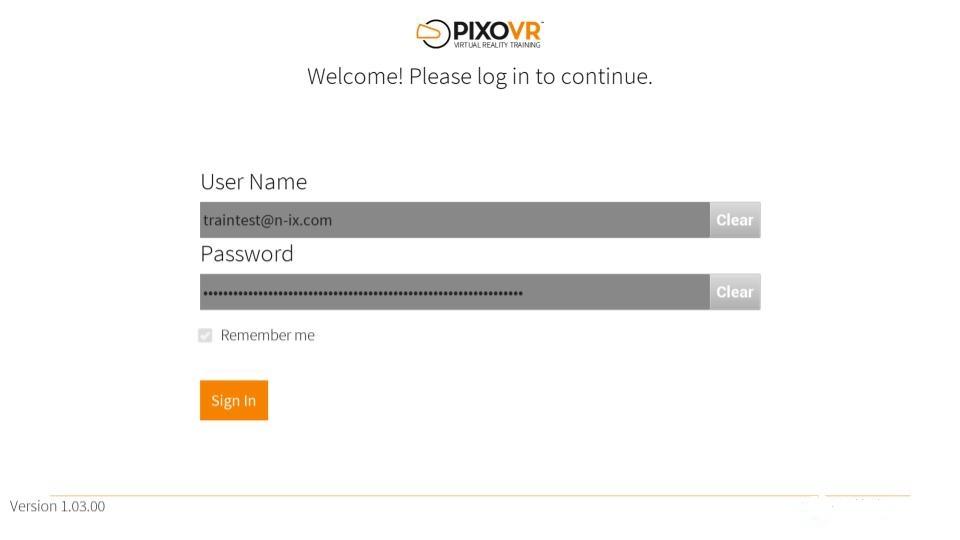
Tip: Select the Remember me flag to save your login credentials for your next session.
-
Enter your PIXO credentials in the corresponding fields, then select Sign In.
-
Once logged in, you will proceed to the lobby.
Lobby
After logging in, you will proceed to the lobby. Select between Tutorial, Random Module, or Choose a Scenario. To scroll between the options, select the left and right arrows with your laser pointer.
-
Tutorial — covers the basics of operation including teleportation, motion controllers, and using buttons
-
If you want to train in a specific module, you can select between:
-
Centerline Leak
-
Excavation Ignition
-
Excavation Blowing
-
Excavation Burning
-
-
Otherwise, select “Random Module”
Once you select which module you would like to play, choose between Single User or Multi User.

Experience Walkthrough
The core scenarios for this module are as follows:
-
Centerline Gas Leak
-
Excavation Ignition
-
Excavation Blowing
-
Excavation Burning
All Scenarios
At the beginning of each scenario, a Work Order will appear providing you with an initial understanding of the situation, and assist in getting the investigation started.
Use the Wrist Menu for additional help within the module:
-
Communication — contact various personnel to communicate status
-
Tip: Press the "Next" button to see additional communication options.
-
-
Map — quick reference guide showing gas lines in the neighborhood
-
Work Order — references Work Order
-
Toolbox — access various tools that will assist you in completing the scenario. see the Tools section for steps on using each tool
-
Tip: Make sure to close the Toolbox after each use by opening your Wrist Menu and selecting the "Toolbox" button again. If you don't close the Toolbox after using it, you will need to select Wrist Menu > Toolbox twice before it appears the next time you try to use it.
-

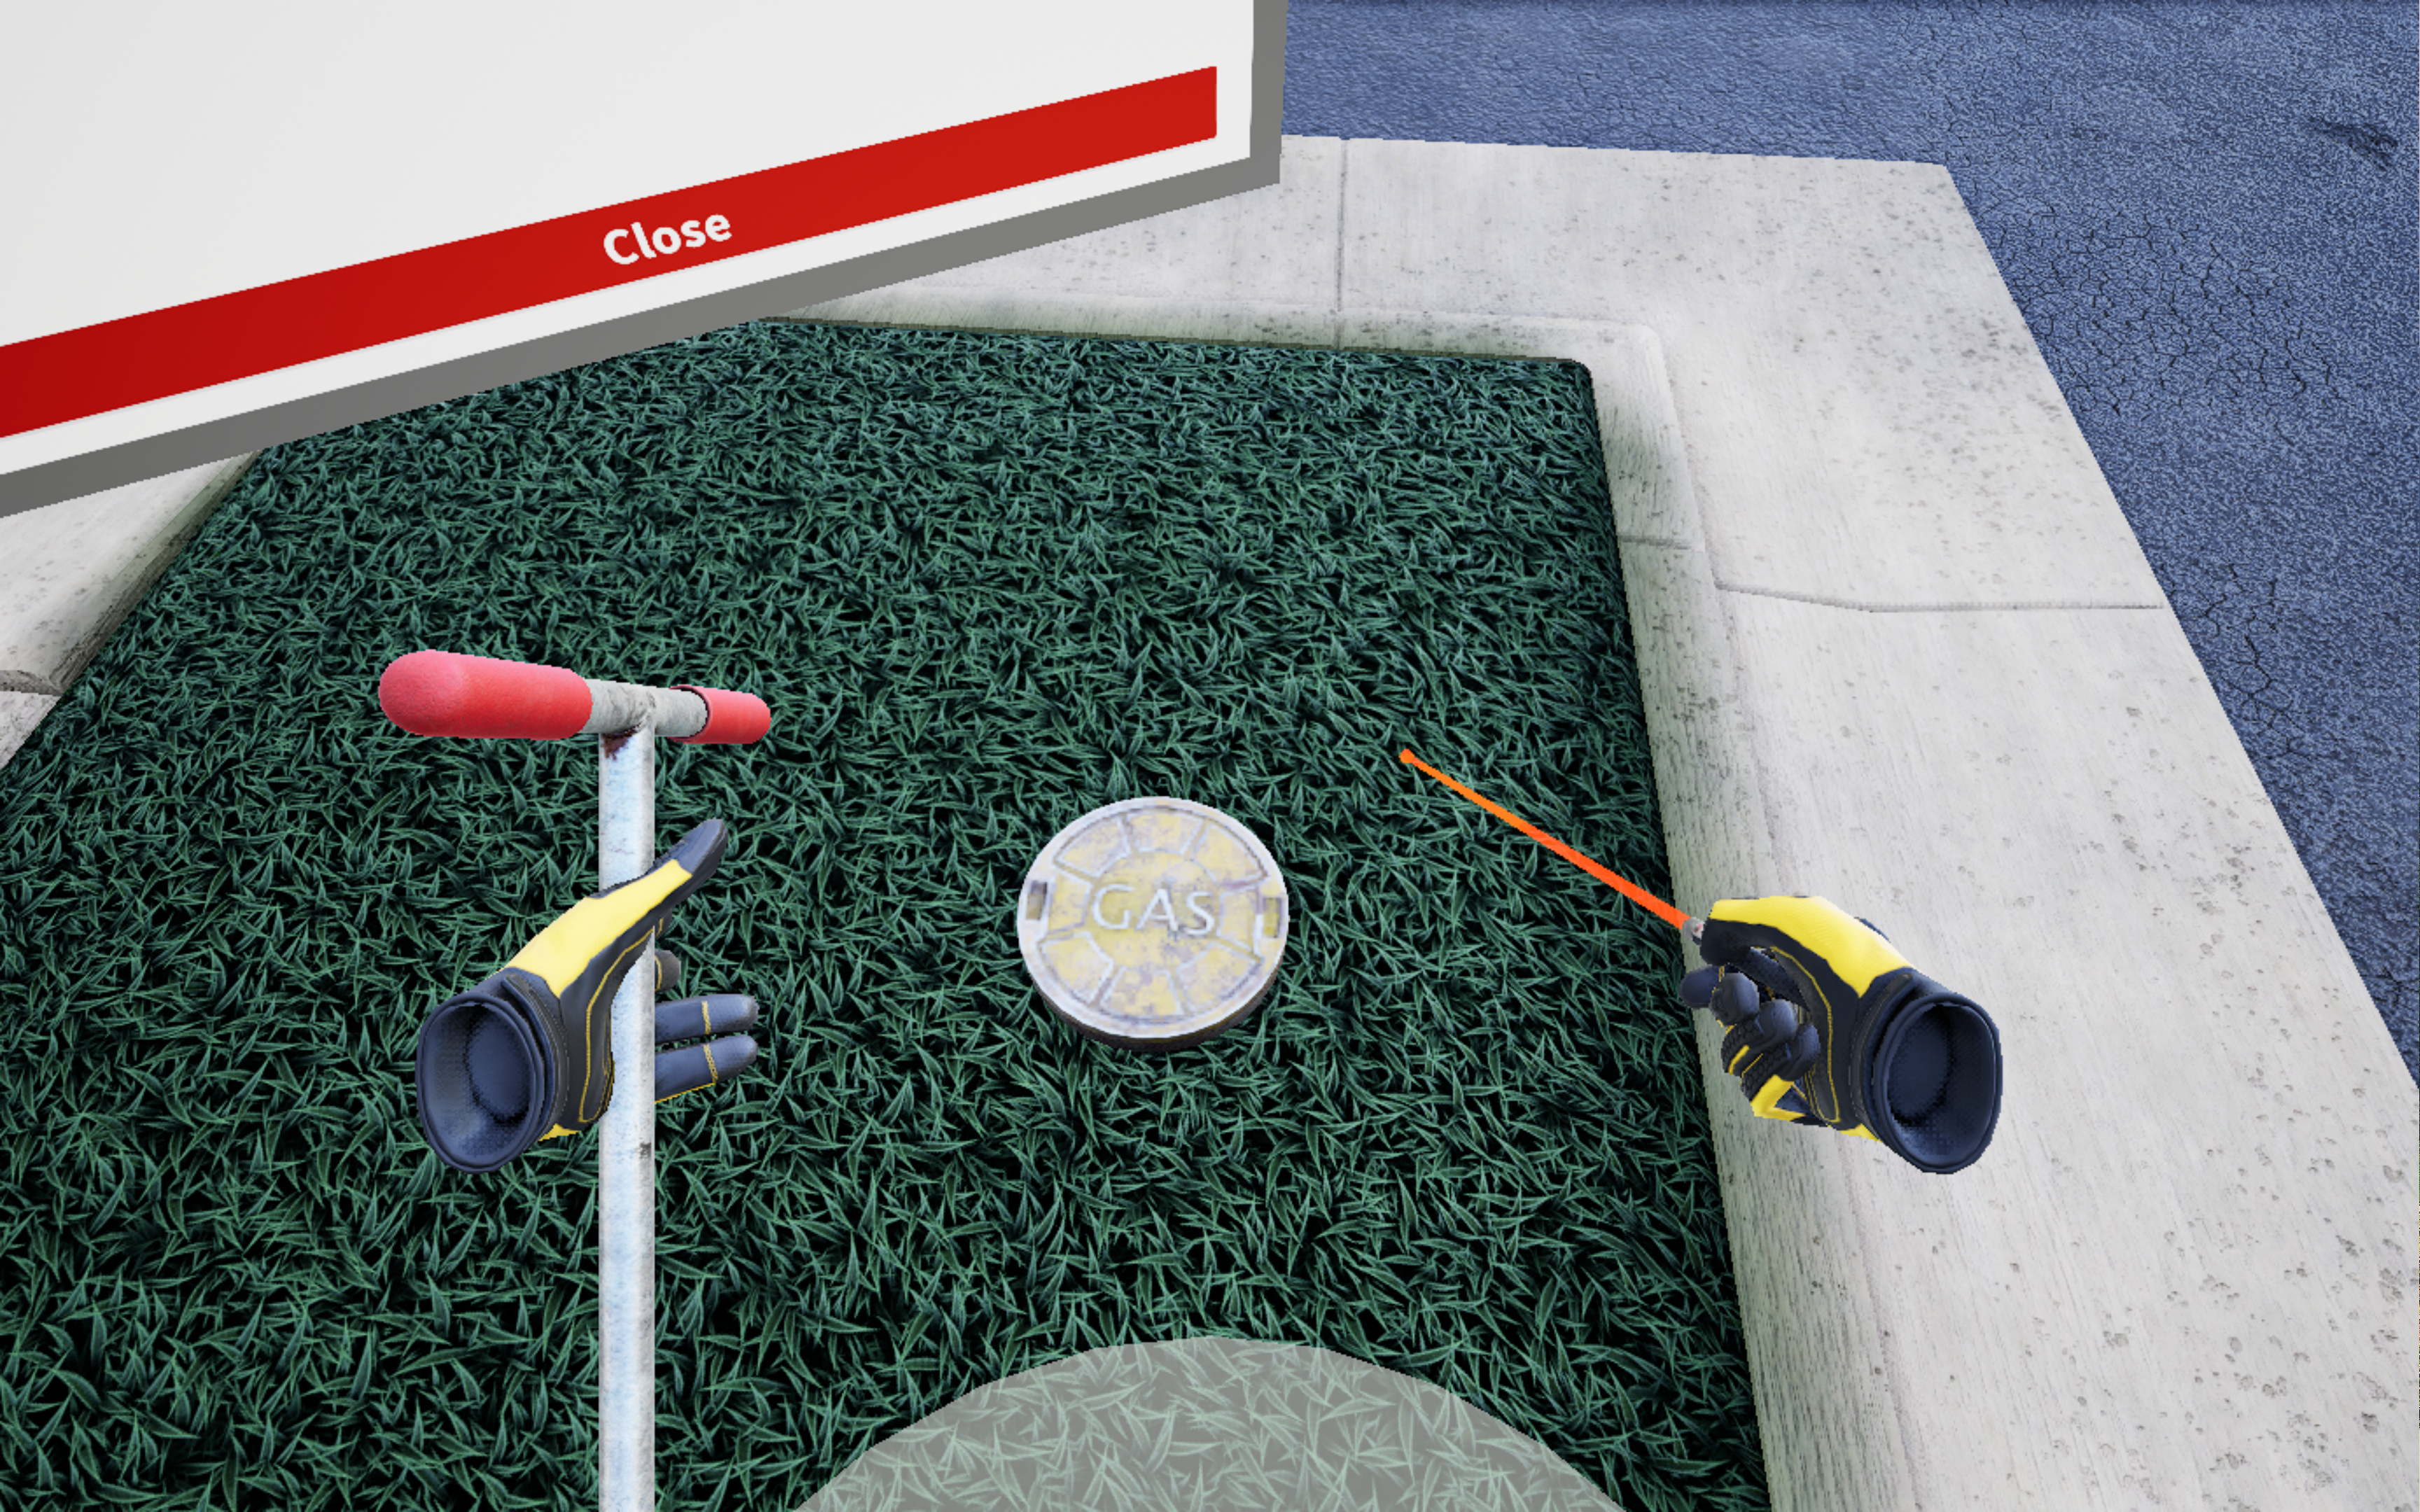
Centerline Gas Leak Scenario
You are spawned into a neighborhood where you are expected to evacuate people from buildings, locate gas leaks in structures if there are any present, and vent the home if gas is present.
-
Read and close the Work Order (use laser pointer to open/close menus).
-
Equip PPE from PPE selection van (see Wrist Menu > Map for location).
-
To equip PPE, select each PPE icon with your laser pointer.
-
-
Use the address from the Work Order and the Facility Map (Wrist Menu > Map) to find the Customer's home.
-
Knock on the Customer’s door by physically touching the door with your virtual hands, then select "I need to check your doorway for gas concentrations".
-
Scan the front door using CGI Tool (open Wrist Menu > Toolbox to equip).

-
Test surrounding area for any evidence of gas leaks.
-
This includes checking manholes, sewers, grates, valve boxes, and home doorways.
-
If a leak is found, perform necessary actions based on the amount of gas detected and location of the leak. This may include:
-
Evacuating the Customer
-
Terminating Service to the House
-
Ventilating the House
-
Contacting all Customers and Testing their Front Doors
-
Reporting any Actions to the Correct Personnel
-
Tip: Press "Next" button to see additional communication options when communicating statuses.
-
-
-
-
After customers have been contacted or evacuated, return to the home with a leak.
-
Turn off service and report any evacuations to the correct personnel.
-
After reporting, test every customer’s service using the CGI and Plunger Bar tools to find the leak source. Be sure to check:
-
Front of all homes (in flower beds, service lines, etc.)
-
Parkway in front of all homes
-
Along service line with highest concentration found until leak is discovered
-
-
Find 0% in four directions (zero-out) from the highest concentration.
-
Re-scan manholes and storm drains.
-
Re-check leak spots for any changes.
-
Contact the correct personnel when finished through Wrist Menu > Communicate.

- End the session through Wrist Menu > End session.
Excavation Ignition Scenario
Note: The correct person to report actions varies by organization. Confirm with your supervisor who you should report to.
-
Read and close the Work Order (use laser pointer to open/close menus).
-
Equip PPE from PPE selection van (see Wrist Menu > Map for location).
-
To equip PPE, select each PPE icon with your laser pointer.
-
-
If Media is present, notify the correct personnel and evacuate them.
-
Contact the correct personnel about Blowing Gas through Wrist Menu > Communication > Communicate Status.
-
Tip: Press the "Next" button to see additional communication options.
-
-
If the Fire Department is not already on site, request them and the Gas Crew through Wrist Menu > Communication > Ask for support.
-
Once the Fire Department is on site, communicate that they have arrived to the correct personnel.
-

-
If the Fire Department has not coned off the road, grab Traffic Cones from the Toolbox and place them at the end of the road.
-
You can also request that the fire department complete either of these tasks for you.
-
-
Set up an incident command post for the Fire Chief using the Red Cones from the Toolbox.
-
Note: The incident command post may automatically appear depending on what your org has requested. If it has already appeared, proceed to the next step.
-

-
Report to the Fire Chief so houses can be evacuated.
-
Notify the correct personnel after each evacuation.
-
-
Report to the correct personnel that the Incident Commander has been contacted.
-
When Ignition Occurs:
-
Houses that have not been evacuated need to be.
-
The correct personnel needs to be contacted about the ignition.
-
-
Select all Ignition Sources in the neighborhood. Ignition sources can include:
-
Vehicles
-
People Smoking or Mowing the Lawn
-
Additional action – evacuate
-
-
People near a Blowing or Burning Gas Line
-
Additional action – evacuate
-
-
Lights and Lantern Posts (not lawn lights)
-
Excavator
-
Air Conditioner (on side of house)
-

-
Go to mainline valve boxes and turn off the mainline using the Valve Key from the Toolbox.
-
Note: Depending on your organization, you may need to squeeze the pipe instead.
-
-
Report the main line shutoff to the correct personnel.
-
End the session through Wrist Menu > End session.
Excavation Blowing Scenario
Note: The correct person to report actions varies by organization. Confirm with your supervisor who you should report to.
-
Read and close the Work Order (use laser pointer to open/close menus).
-
Equip PPE from PPE selection van (see Wrist Menu > Map for location).
-
To equip PPE, select each PPE icon with your laser pointer.
-
-
Contact Dispatch about Blowing Gas through Wrist Menu > Communication.
-
Tip: Press "Next" button to see additional communication options.
-
-
If Media is present, notify the correct personnel and evacuate them.
-
If the Fire Department is not already on site, request them and the Gas Crew through Wrist Menu > Communication > Ask for support.
-
Once the Fire Department is on site, communicate that they have arrived to the correct personnel.
-
If Fire Department has not coned off road, grab Traffic Cones from the Toolbox and place them at the end of the road.
-
Additionally, you can request that the fire department complete either of these tasks for you.
-
-
Set up the Incident Command Post for the Fire Chief using Red Cones from the Toolbox.
-
Note: The incident command post may automatically appear depending on what your organization has requested. If it has already appeared, proceed to the next step.
-
-
Report to the Fire Chief so houses can be evacuated.
-
Notify the correct personnel after each evacuation.
-
-
Report to the correct personnel that the Incident Commander has been contacted.
-
Select all Ignition Sources in the neighborhood. Ignition sources can include:
-
Vehicles
-
People Smoking or Mowing the Lawn
-
Additional action – evacuate
-
-
People near a Blowing or Burning Gas Line
-
Additional action – evacuate
-
-
Lights and Lantern Posts (not lawn lights)
-
Excavator
-
Air Conditioner (on side of house)
-
-
Go to the mainline valve boxes and turn off the mainline using the Valve Key from the Toolbox.
-
Note: Depending on your organization, you may need to squeeze the pipe instead.
-
-
Report the main line shutoff to the correct personnel.
-
End the session through Wrist Menu > End session.
Excavation Burning Scenario
Note: The correct person to report actions varies by organization. Confirm with your supervisor who you should report to.
-
Read and close the Work Order (use laser pointer to open/close menus).
-
Equip PPE from PPE selection van (see Wrist Menu > Map for location).
-
To equip PPE, select each PPE icon with your laser pointer.
-
-
If Media is present, notify the correct personnel and evacuate them.
-
If the Fire Department is not already on site, request them and the Gas Crew.
-
Once the Fire Department is on site, communicate that they have arrived to the correct personnel.
-
-
If the Fire Department has not coned off the road, grab Traffic Cones from the Toolbox and place them at the end of the road.
-
You can also request that the fire department complete either of these tasks for you.
-
-
Set up an Incident Command Post for the Fire Chief using Red Cones from the Toolbox.
-
Note: The incident command post may automatically appear depending on what your organization has requested. If it has already appeared, proceed to the next step.
-
-
Report to the Fire Chief so houses can be evacuated.
-
Notify the correct personnel after each evacuation.
-
-
Report to the correct personnel that the Incident Commander has been contacted.
-
Select all Ignition Sources in the neighborhood. Ignition sources can include:
-
Vehicles
-
People Smoking or Mowing the Lawn
-
Additional action – evacuate
-
-
People near a Blowing or Burning Gas Line
-
Additional action – evacuate
-
-
Lights and Lantern Posts (not lawn lights)
-
Excavator
-
Air Conditioner (on side of house)
-
-
Go to mainline valve boxes and turn off the mainline using the Valve Key from the Toolbox.
-
Note: Depending on your org, you may need to squeeze the pipe instead.
-
-
Report the main line shutoff to the correct personnel.
-
End the session through Wrist Menu > End session.
Review Performance
When finished with a scenario, you are taken to a grading room and shown your results.

If you wish to, you can revisit the scenario to review what was missed in Review Mode. Interactable objects in the scene are highlighted:
-
Green — Completed Correctly
-
Yellow — Completed with Partial Defects / Errors
-
Red — Missed / Incorrectly Completed Items
Select highlighted items to learn more information about incorrectly completed items.

To exit Review Mode, return to the three green buttons near the PPE selection van and press the Return to Scoring button:

When finished reviewing, you can either restart the scenario or select the Back to Hub button to exit the module.
Questions and Support
If you have any issues, please contact our tech support team at [email protected]

