

Overview: This guide will walk you through everything that you can do as a Manager within the PIXO Platform.
Related Articles:
-
Full PIXO Platform Guide (covers all Platform tabs + user roles)
-
Platform Guides for other User Roles (folder)
Permissions
User Role Breakdown
-
Student — trains in headset and only uses the Platform to change their password
-
User — trains in headset and uses the Platform to view their own session data
-
Manager — uses the Platform to view their organization’s session data
-
Admin — uses the Platform to view their organization’s session data, manage users, create organization units/groups, and provision access to training titles
-
Superadmin — an admin who can view session data, manage users, create organization units/groups, and provision access to training titles in their own organization and in their sub organizations
Initial Login
The first step is to sign in with your credentials. These credentials will be provided to you by a PIXO Sales Representative.
Assisted Login
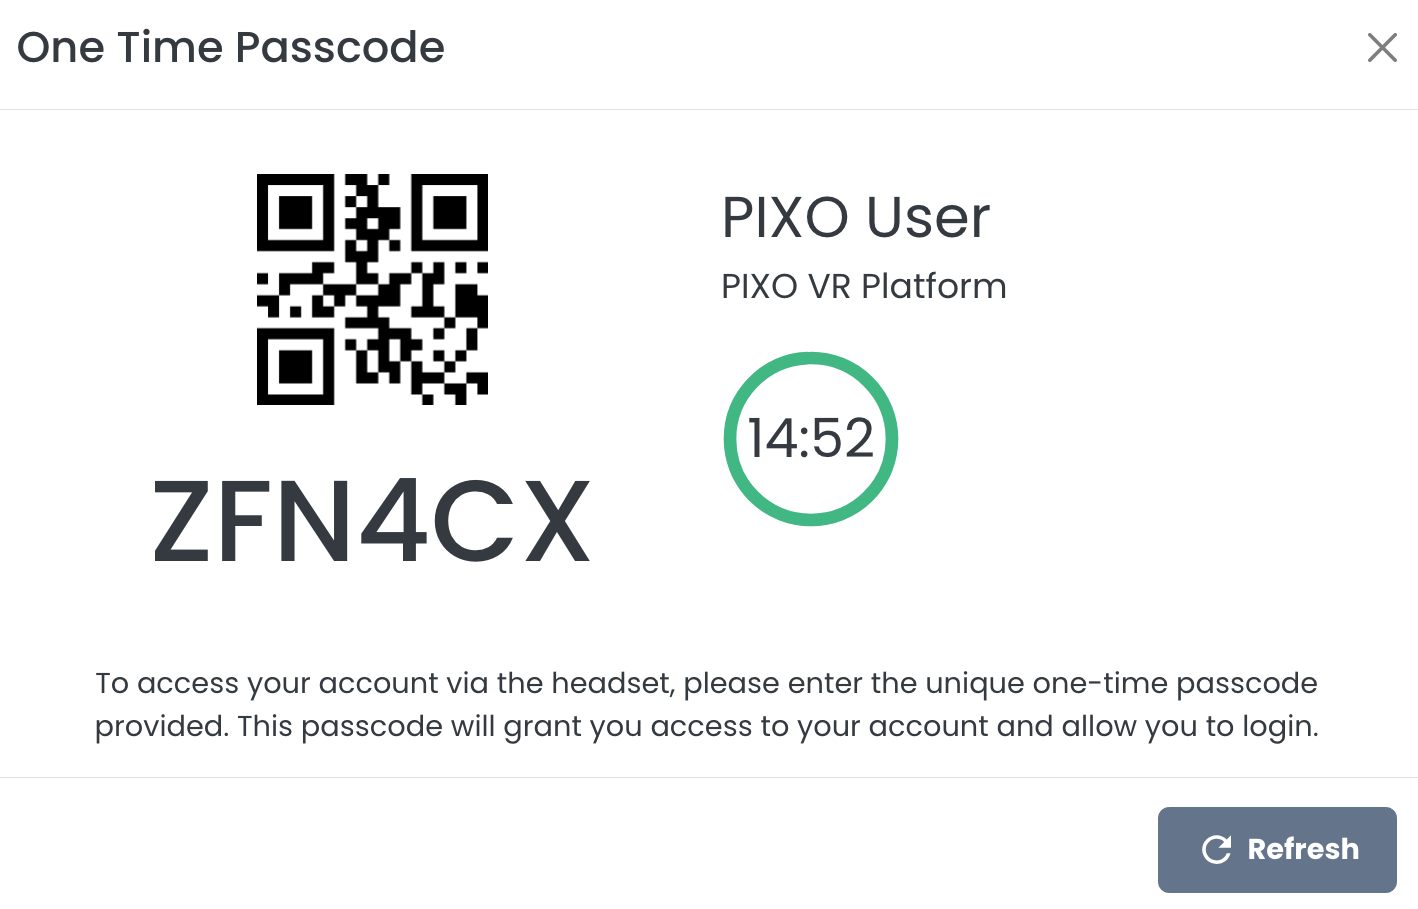
To generate a one-time passcode that you can use to login in VR without needing to type your full login credentials, select "Assisted Login" under the "Hi, Name" greeting menu:
You will have 15 minutes to enter the provided one-time passcode into the username field of the PIXO login screen in headset:
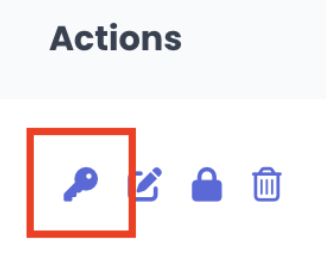
Generate a One-Time Passcode for Another User
To generate a one-time passcode for another user (such as a trainee), navigate to the "Users" tab or "Training Roster" tab and select the Key icon next to the user or trainee’s name:
The APIs Tab
The APIs tab provides tools to developers in order to send/receive data from PIXO VR through the External API and Webhooks secondary tabs.
External API
Our External API provides a structured and consistent way for you to send and receive data from PIXO VR. Developers can refer to this page for documentation on how to generate and configure API keys, GraphQL queries and mutations, and common errors/troubleshooting tips.
Webhooks
Through the Webhooks page, admins can register webhook endpoints for organizations to receive real time notifications when new sessions are completed. As a Manager role, you can view your organization's existing webhooks from this page.
The Analytics Tab
The Analytics tab contains the Sessions and Leaderboard tabs. These tabs allow you to access your organization's session data.
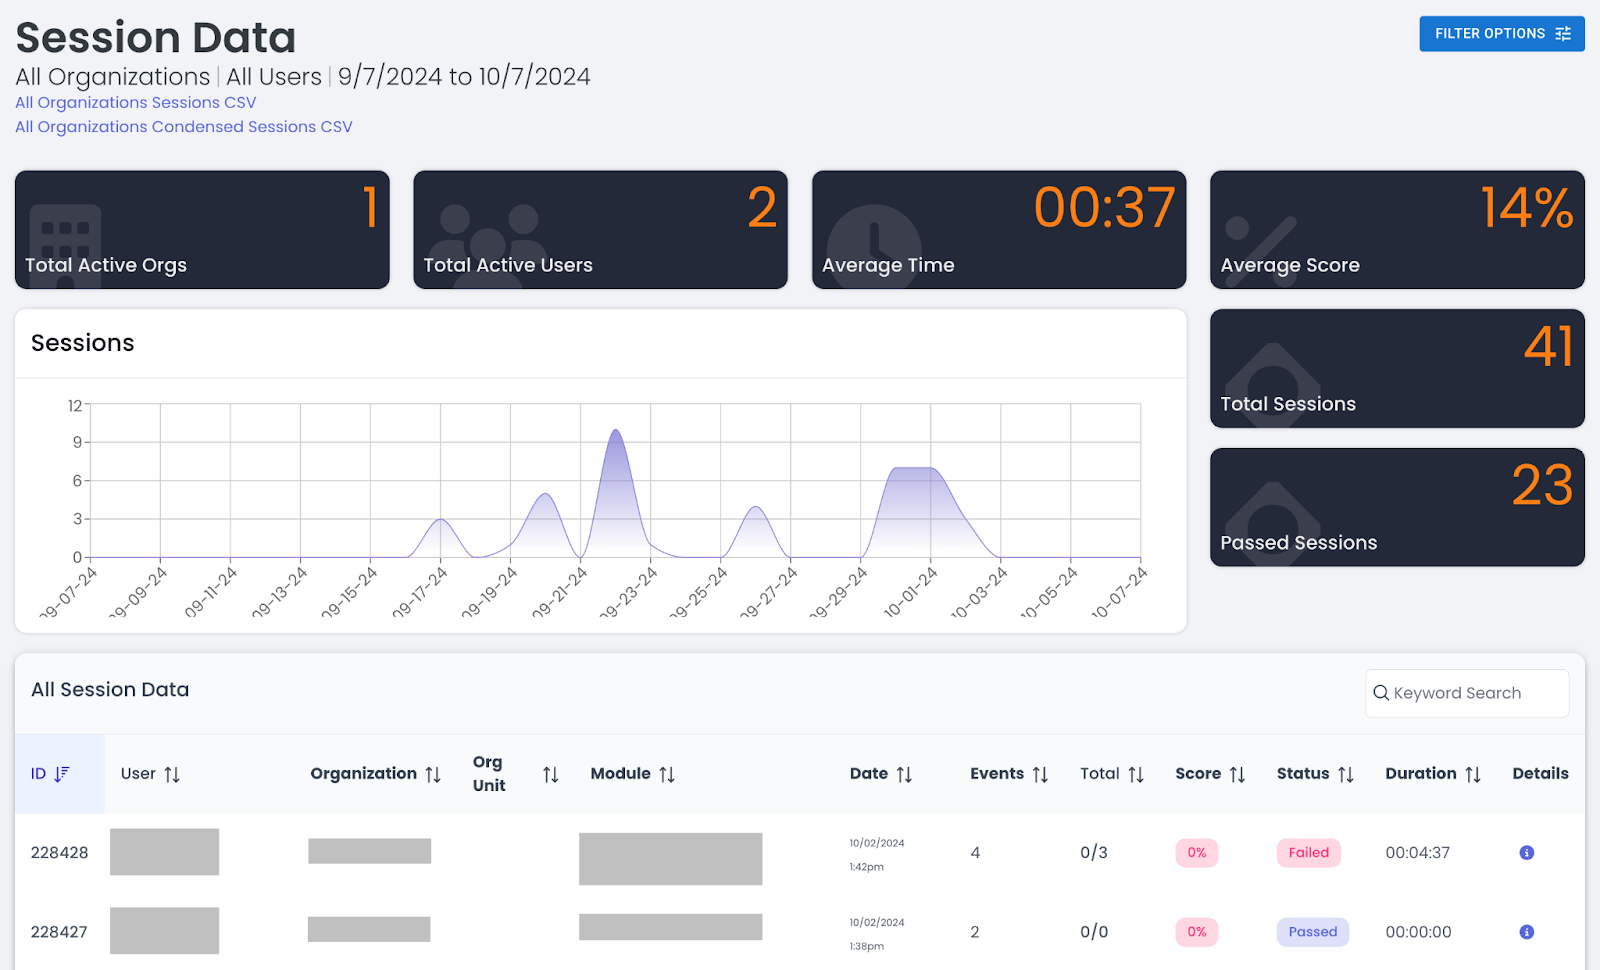
The Sessions Tab
The Sessions tab allows you to see how users are doing with the content, time spent doing training, scores from training assessments, and a host of other data points. This information can be filtered by user, group, organization, or across all of your programs.
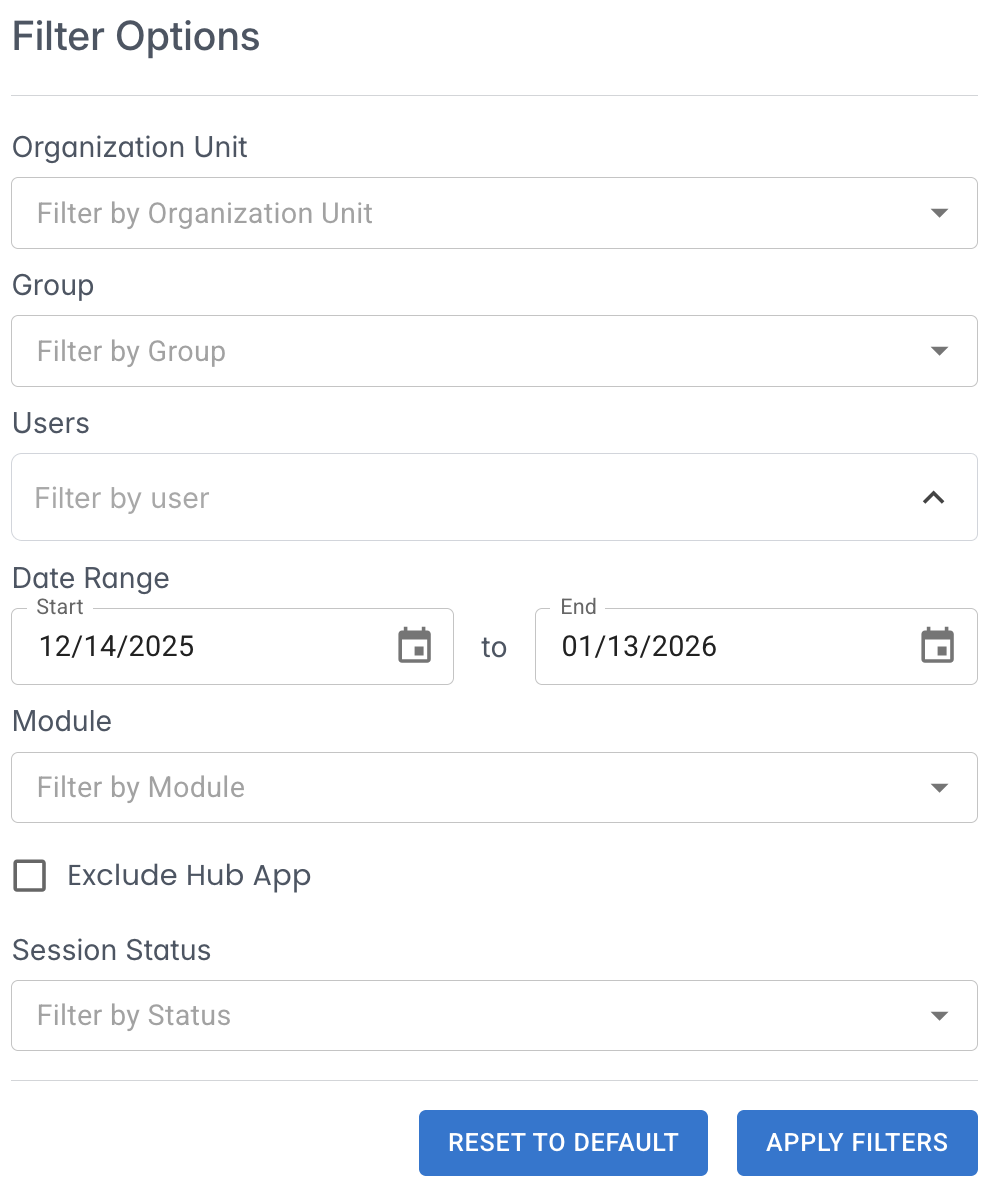
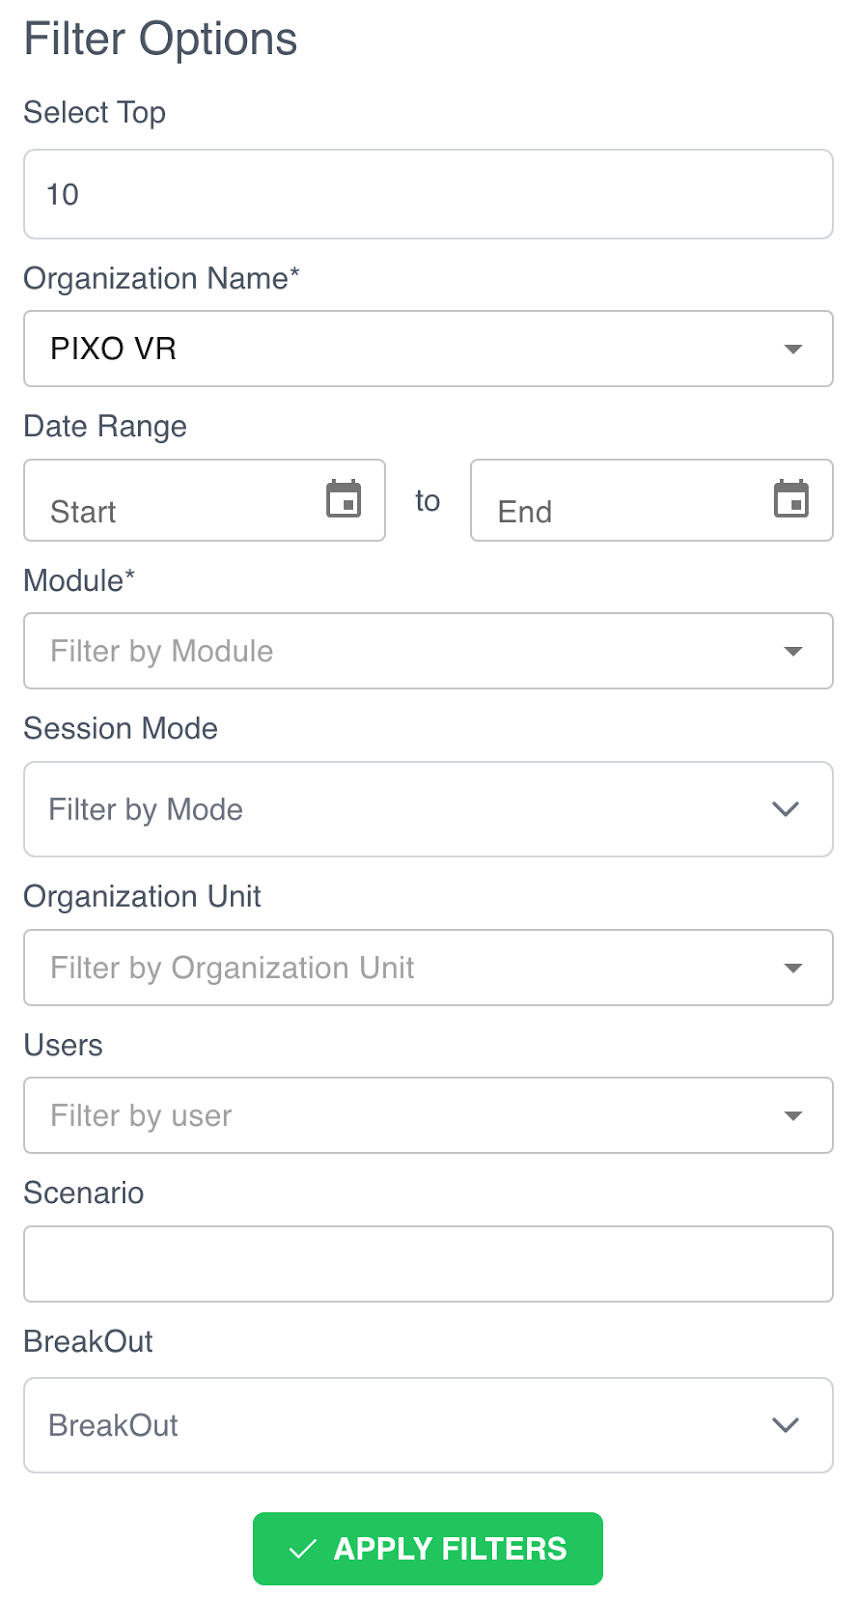
Filter Session Data
-
Click the "Filter Options" menu in the upper right corner:

-
Fill out the relevant fields, then click "Apply Filters":
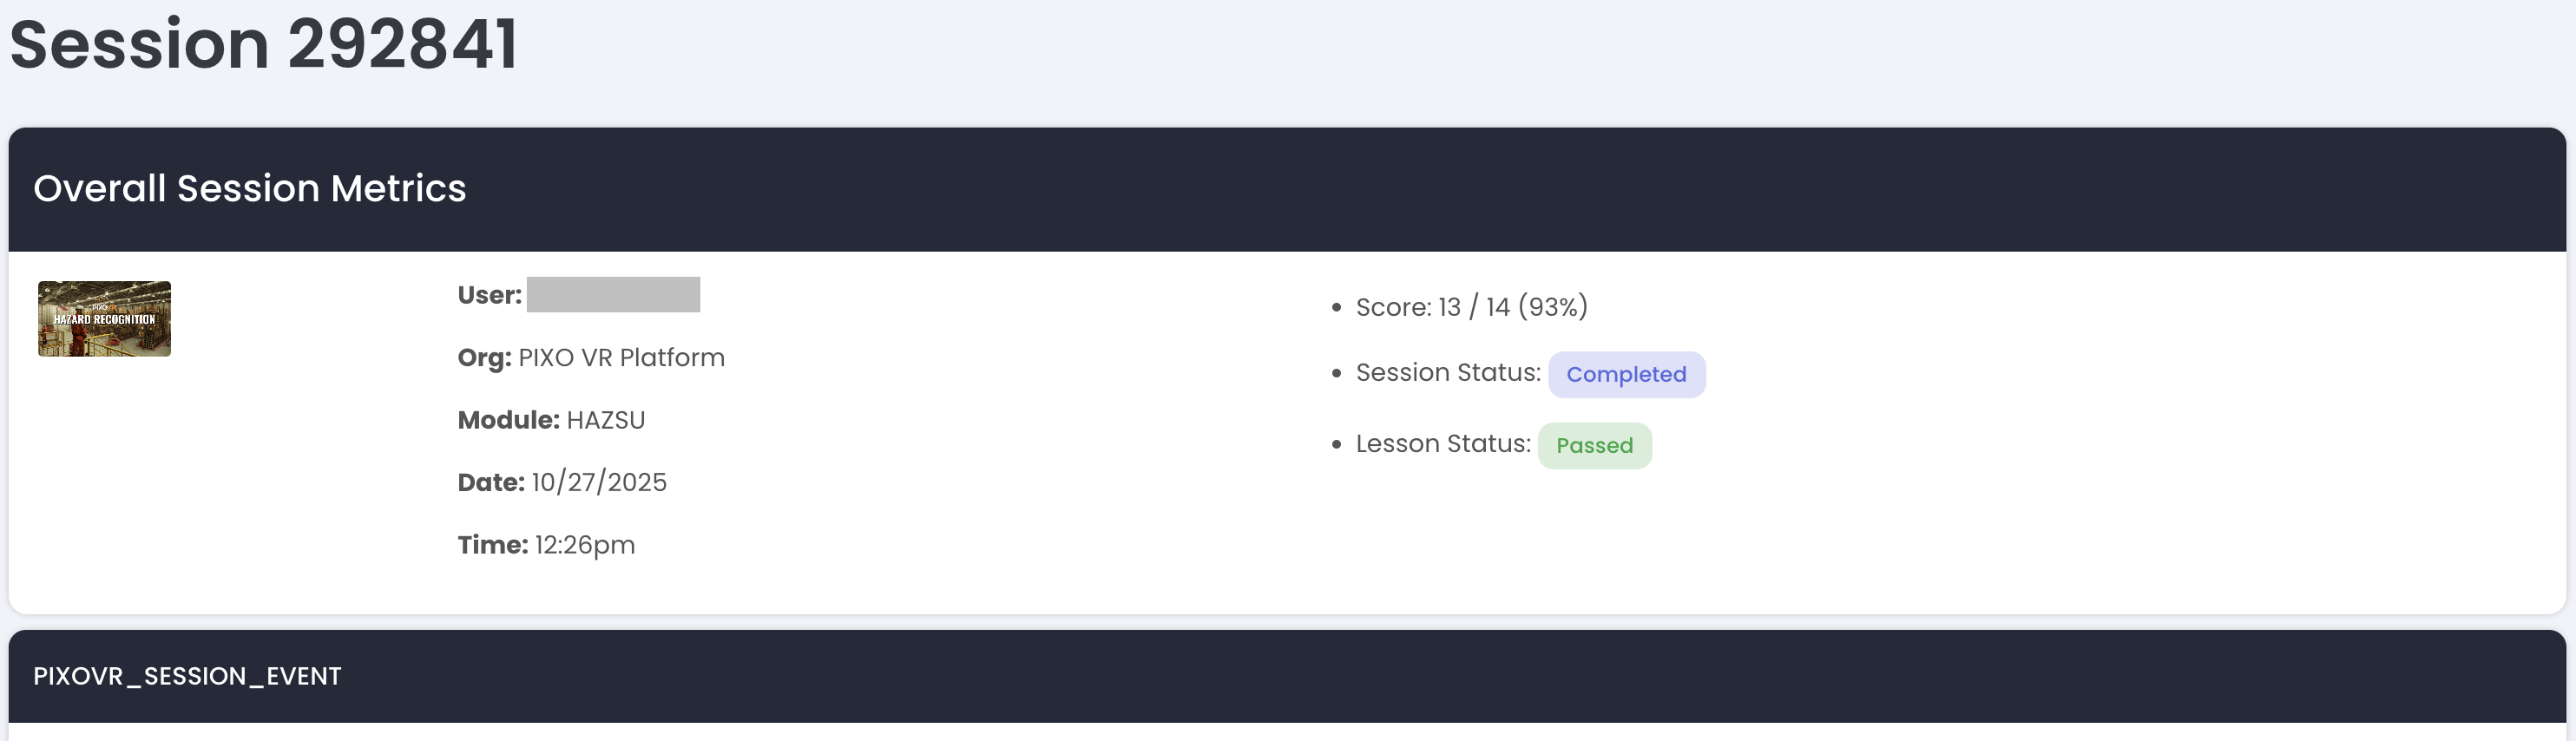
View Session Details
-
Locate your desired session from the "All Session Data" section.
-
Next to the desired session, click the "Details" icon.
-
You can then view the overall session metrics (user, org, date/time, score, session status and lesson status) and event data for the session:
The Leaderboard Tab
The Leaderboard tab gamifies training sessions by adding a fun, competitive element by encouraging engagement and a bit of friendly competition.
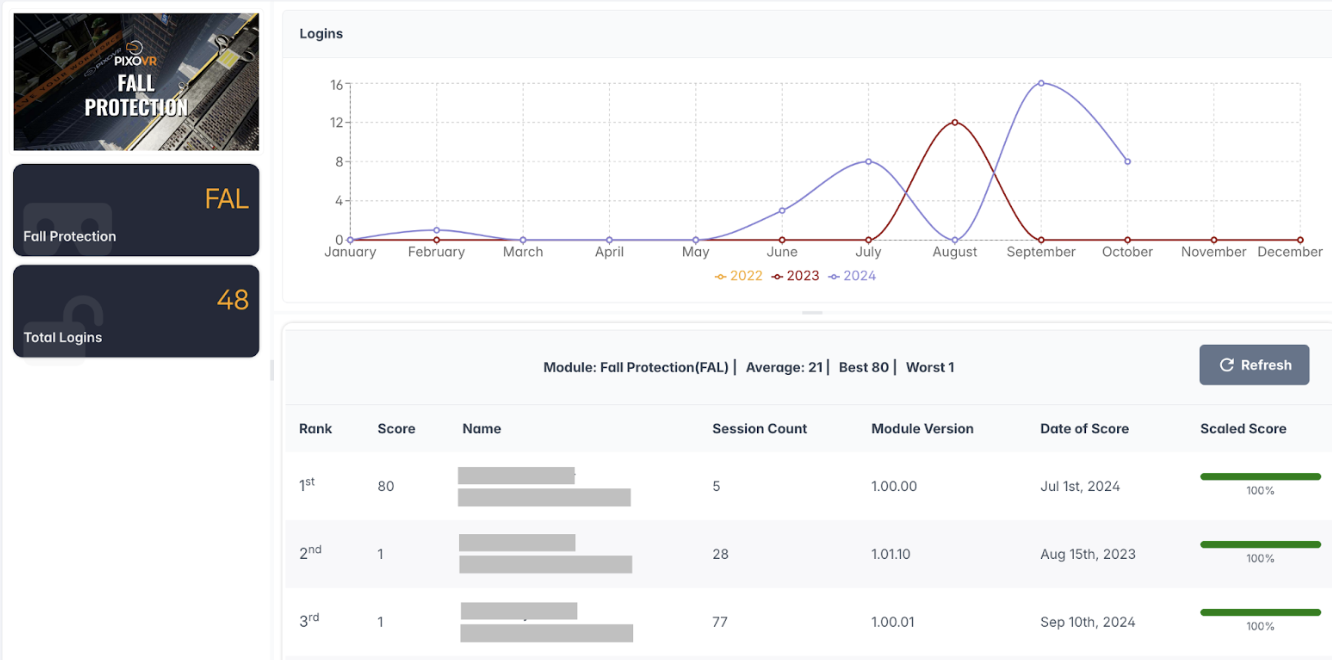
Create a Leaderboard
-
Click the "Filter Options" menu:
![]()
-
Fill out the relevant fields.
-
Click the "Apply Filters" button at the bottom of the form when finished.
The Users Tab
The Users Tab contains the Users, Groups, and Groups List tabs.
Users
In the Users tab, you can keep track of the users in your organization as well as the users in your sub organizations.
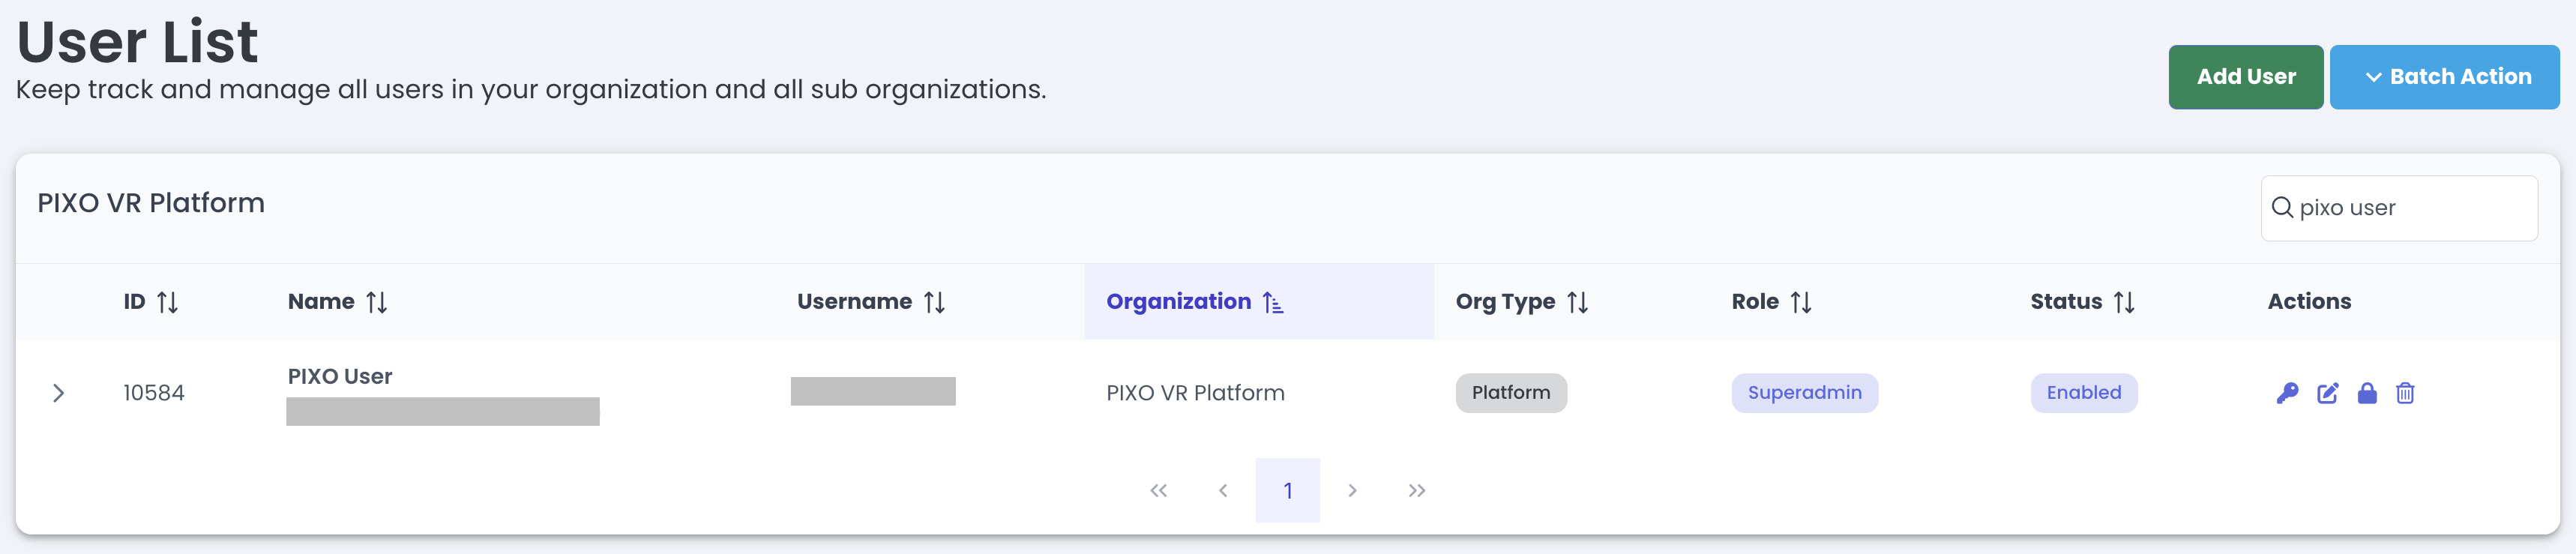
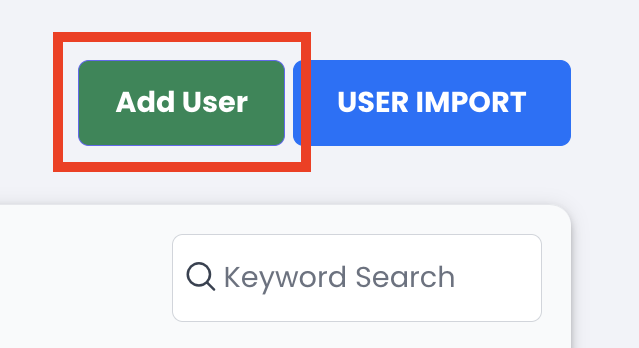
In addition to viewing your current users here, you can also add users on this page:
-
Click the "Add User" button in the upper right corner:
-
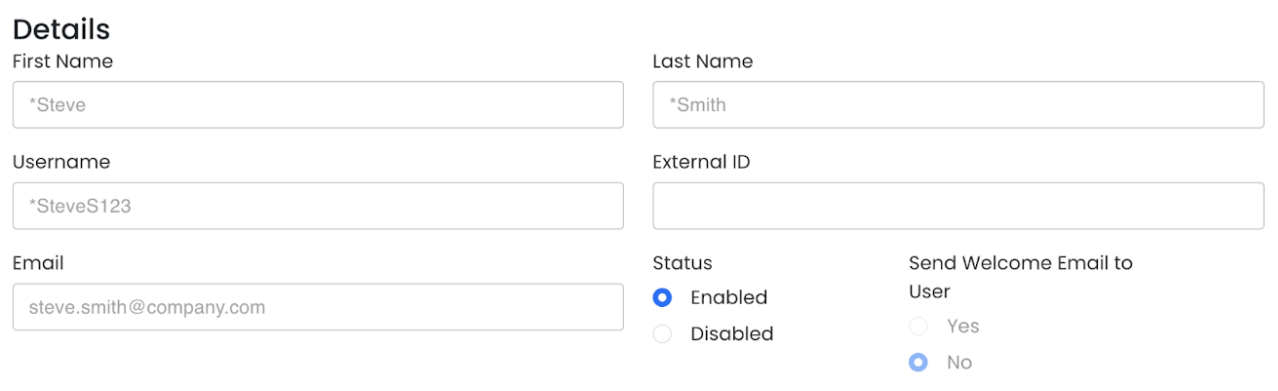
Enter the user's name and email, along with a few other optional customizations such as username and external ID.
-
If you wish to send a Welcome Email to the user, click the "Yes" toggle:

-
Next, set a password for the user. If you have a specific password in mind, type it in the password fields. Otherwise, select the "Generate Password" button to generate a random password.

-
Lastly, select the user’s role from the dropdown. If you are an Affiliate, you will also need to select what organization the user is a part of and their organization unit.
User Role Breakdown:
-
Student — trains in headset and only uses the Platform to change their password
-
User — trains in headset and uses the Platform to view their own session data
-
Manager — uses the Platform to view their organization’s session data

-
Once you have entered all of the required information, click "Save".
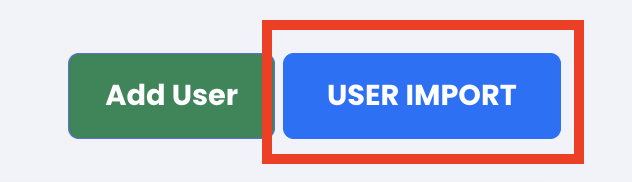
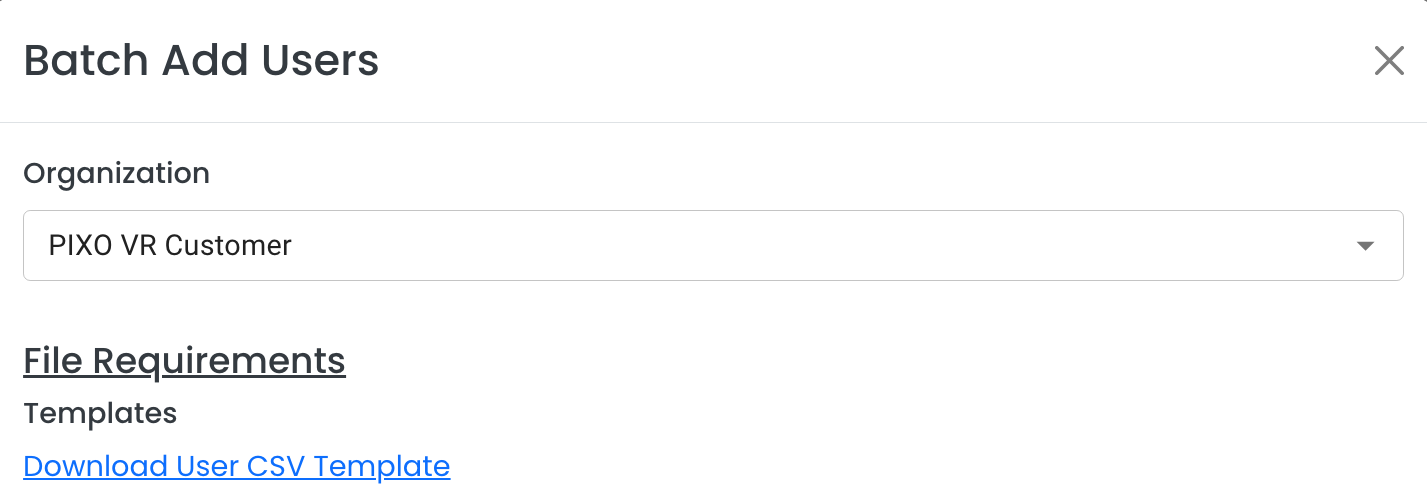
User Import
-
Select the "User Import" menu to import multiple users at a time or update passwords:
-
Select the Organization that you would like to add users to.
-
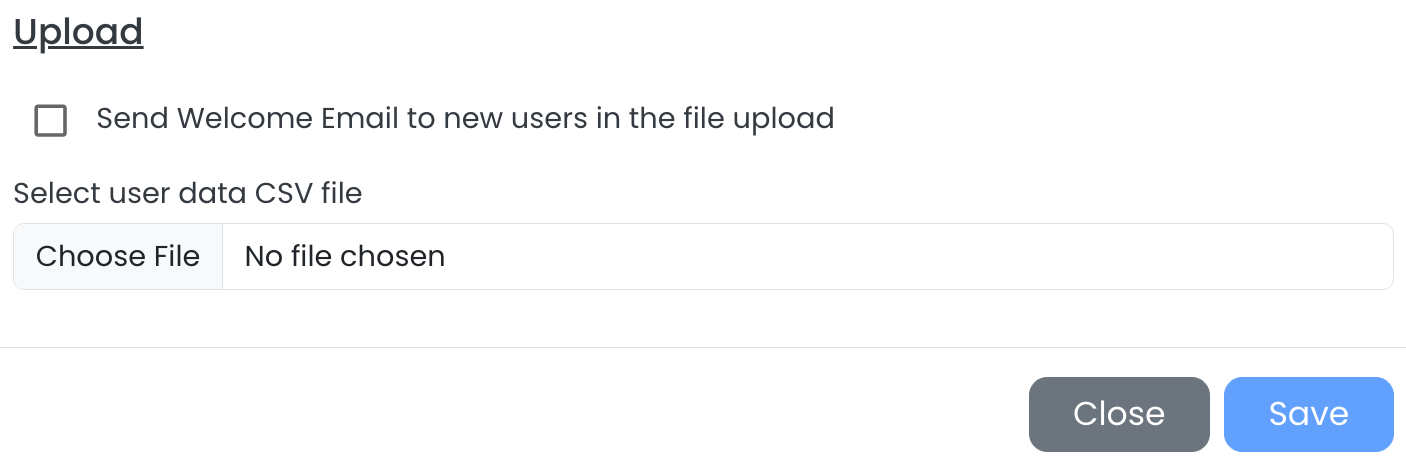
Download the User CSV Template.
-
Fill out the template.
-
Re-upload the CSV file and press "Save".
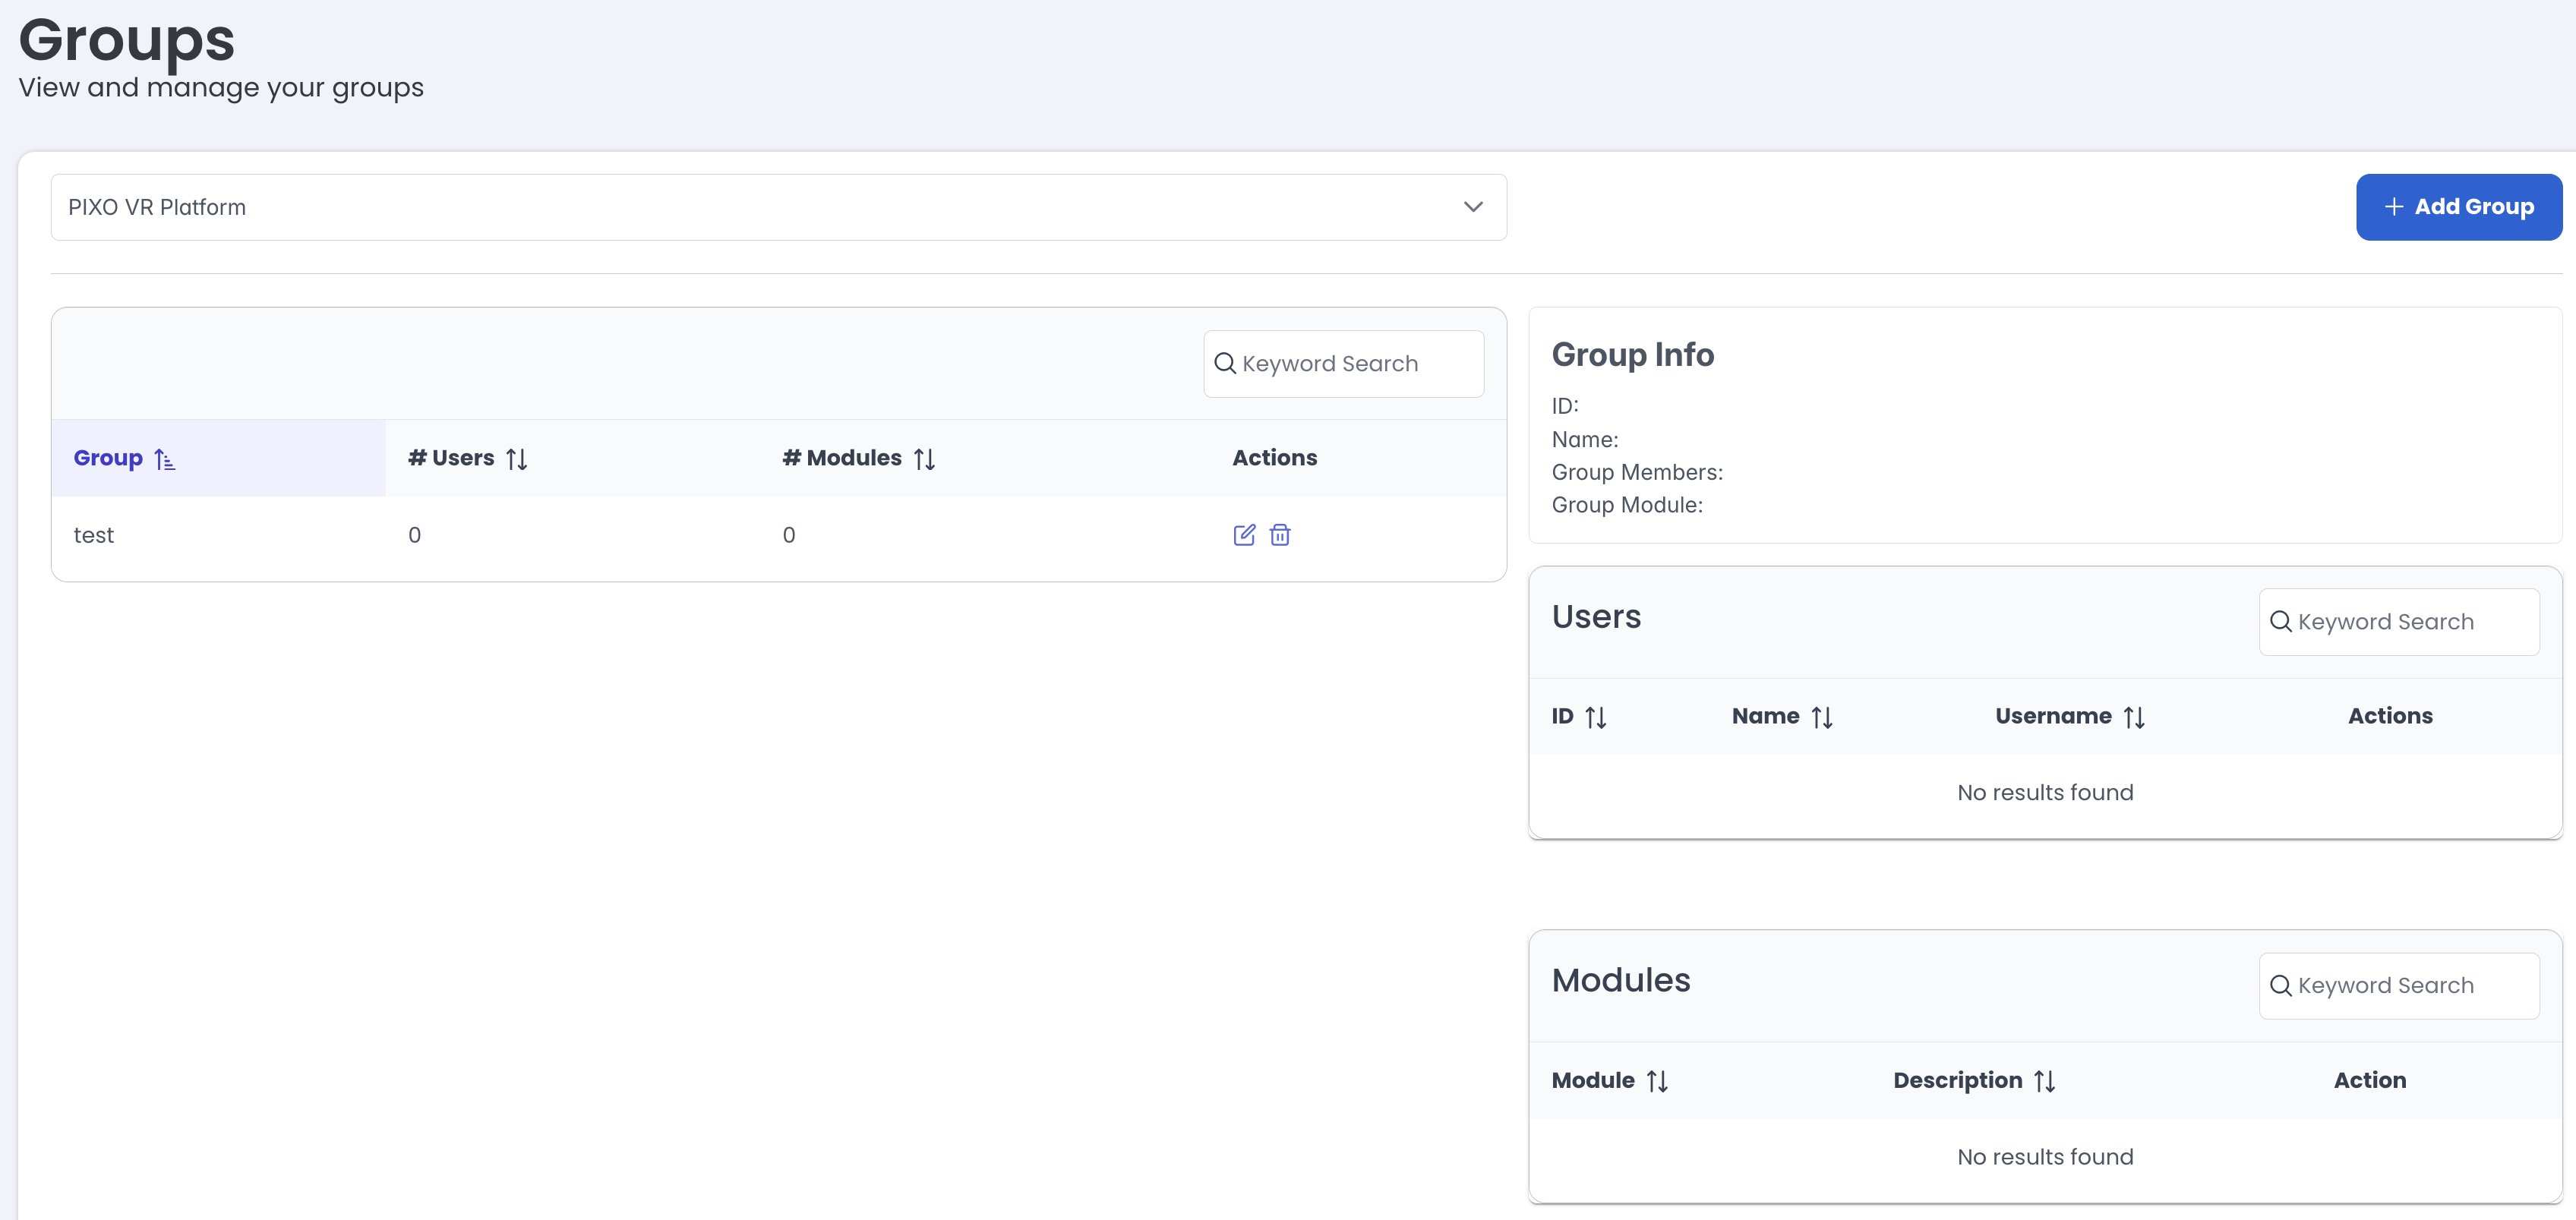
Groups
Use the Groups tab to create, add, and modify users in groups.
Add a New Group
-
Click the "Add Group" button:

-
Select the Organization.

-
Type the Group Name.
-
Click the "Add" button under the "Modules" section, then select from the available modules.
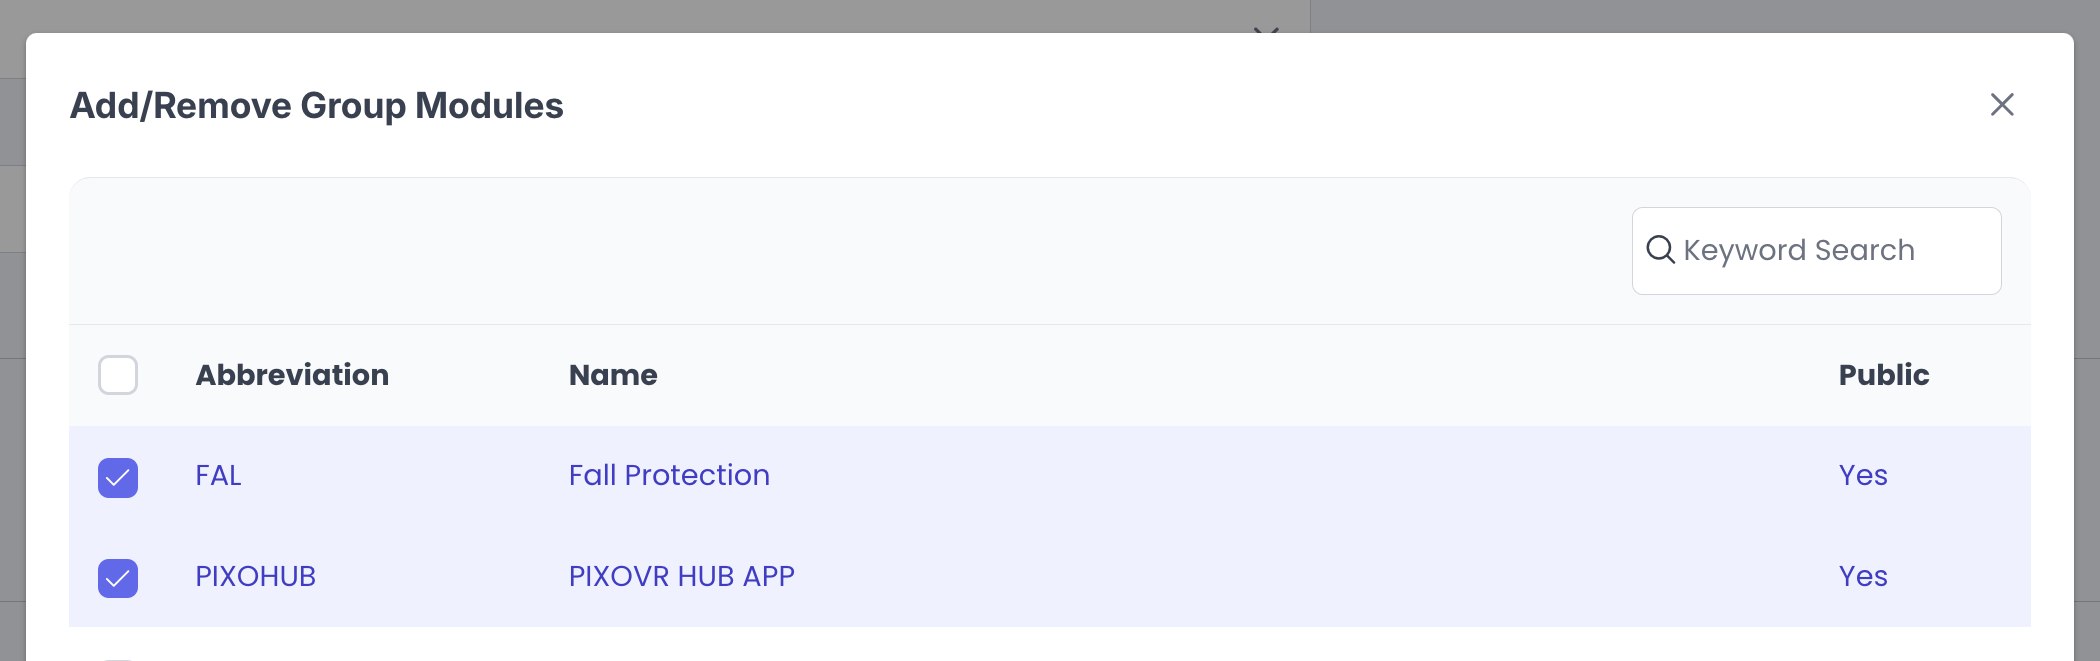
-
When finished selecting the modules, click the "Add" button:
![]()
-
Click the "Add" button under the "Members" section, then select from the available users. When finished, click the "Add" button again.
Groups List
The Groups List tab allows you to keep track of and manage all of your Affiliates.
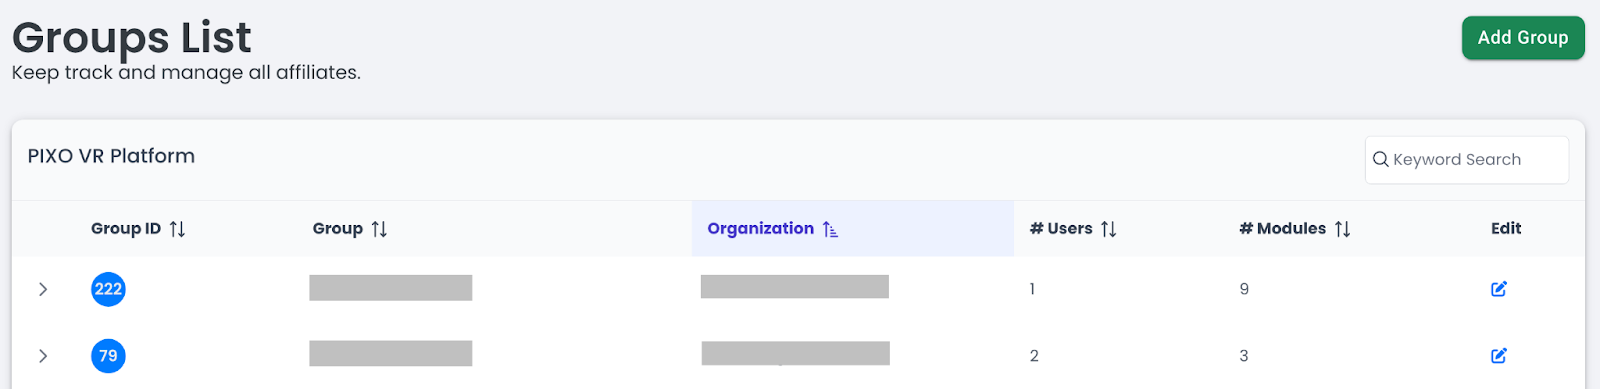
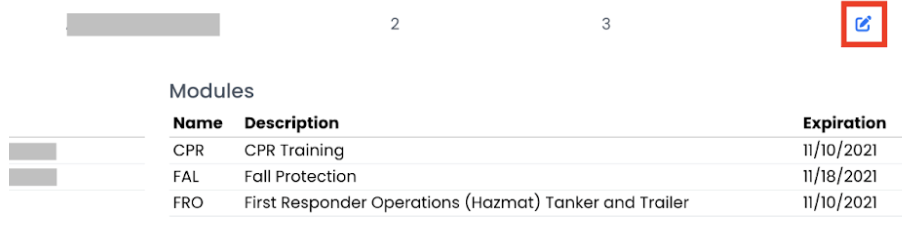
To view a group’s users and modules, select the Dropdown Arrow next to the desired group:

To edit a group, click the "Edit" icon next to your desired group. This will send you to the User Groups page for the selected group, where you can edit the group’s name, users and modules.
The Training Tab
The Training tab contains the Training Roster, Assign Courses and Courses tabs.
Training Roster
Use the Training Roster tab to plan training sessions for a group of users and view their progress.
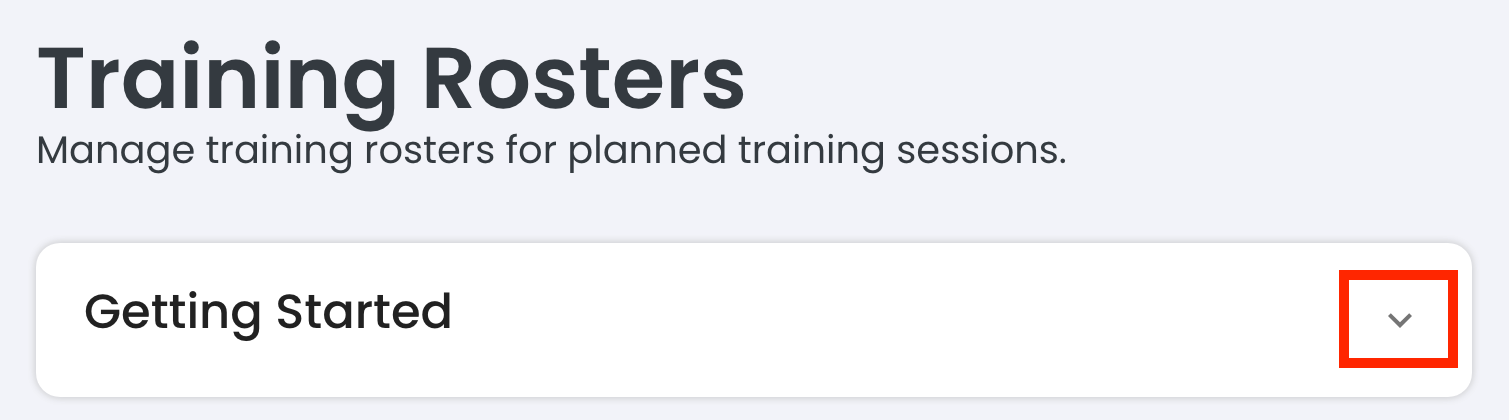
Note: When creating a training roster for the first time, we recommend opening the "Getting Started" dropdown menu to read through the instructions:
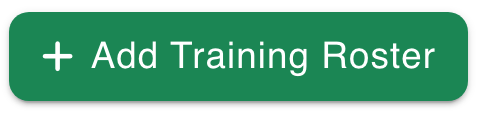
Add a New Training Roster
-
Click the "Add Training Roster" button.
-
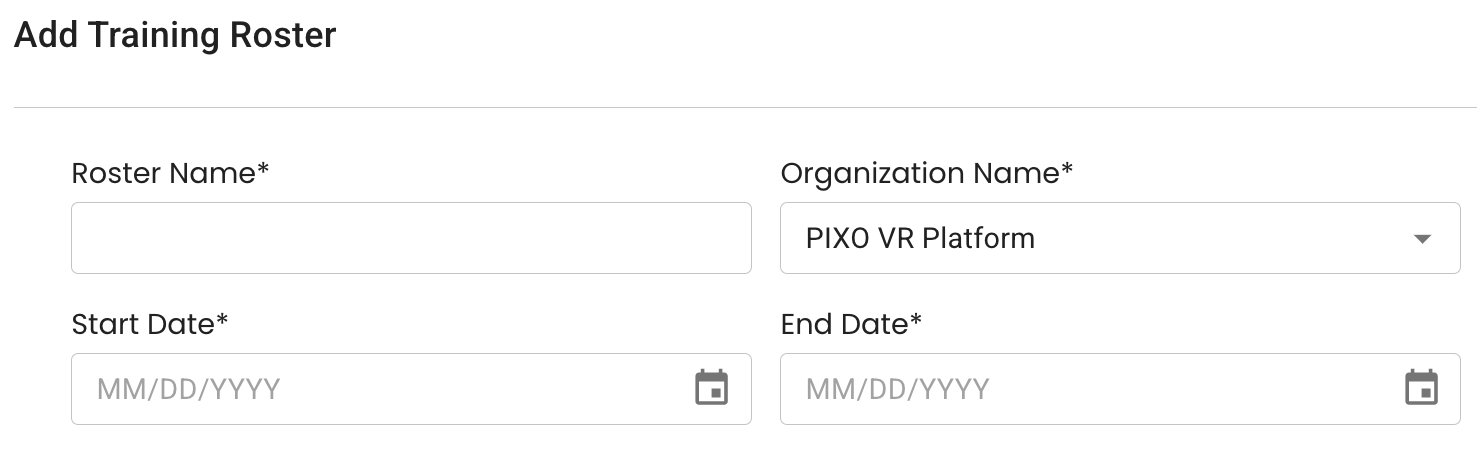
Enter the roster name, organization name, and start/end date.
-
Select an Instructor (optional).
-
Select the "Assign trainees to courses" checkbox (optional).
-
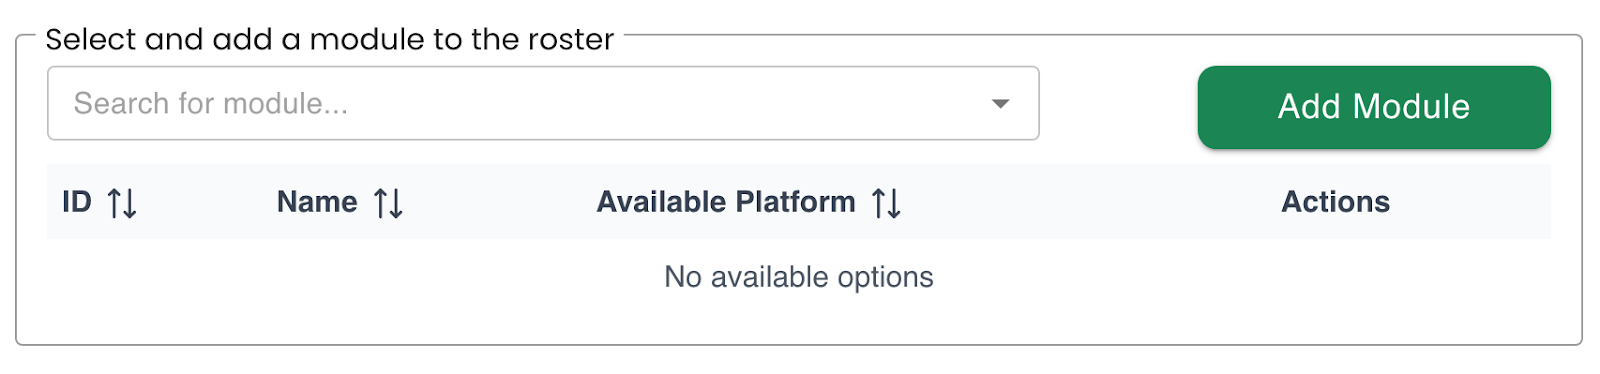
Select a module using the search bar, then click the "Add Module" button.
-
Repeat until all desired modules have been added.
-
Select a Trainee using the search bar, then click the "Add Trainee" button.

-
Repeat until all trainees have been added.
-
Click the "Save" button when finished.
View Training Progress
After adding a Training Roster, you can view the training progress for each user by navigating to the "All Training Rosters" section and clicking the "View Training Progress" icon next to the training.

PDF Functionality
You can also create a PDF of the Training Roster to print out and reference during in-person training sessions.
To create a PDF of the Training Roster, click the "Print Roster" icon next to the training:
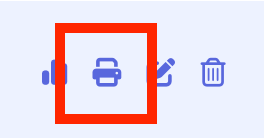
This will create a PDF detailing the instructor, training date(s), modules, list of trainees and login codes for the trainees to use during the training session.
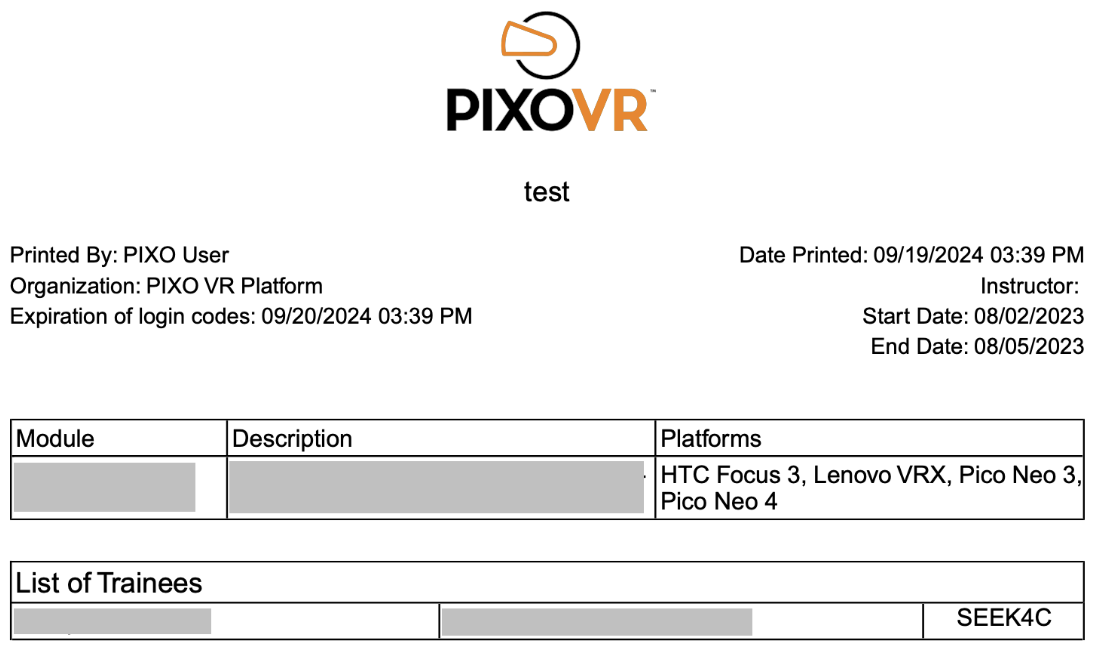
Tip: Login codes will expire at midnight on the last date of the training (or after first use).
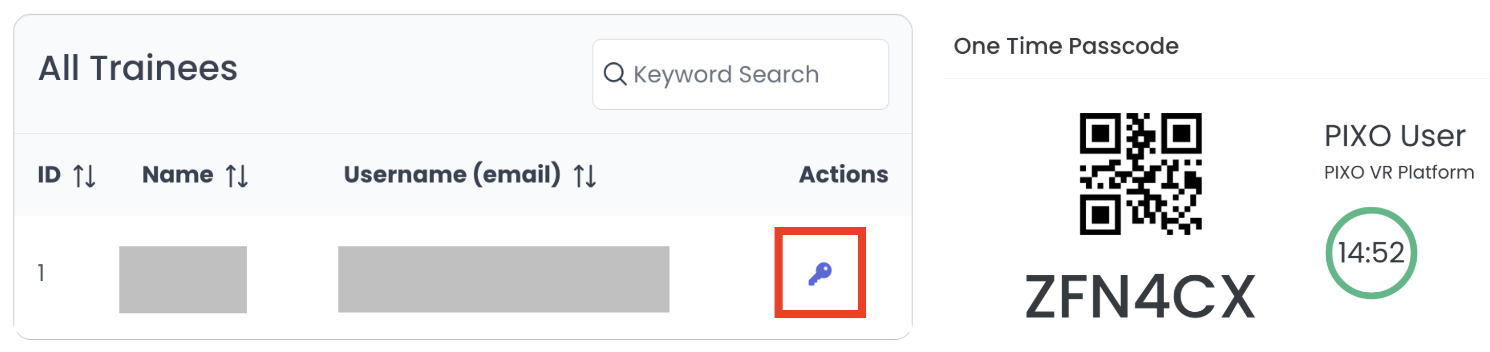
Generate a One-Time Passcode for a Trainee
Another way to generate a one-time passcode for a trainee is to check the "All Trainees" section and click the Key icon next to the user. This code will be good for 15 minutes.
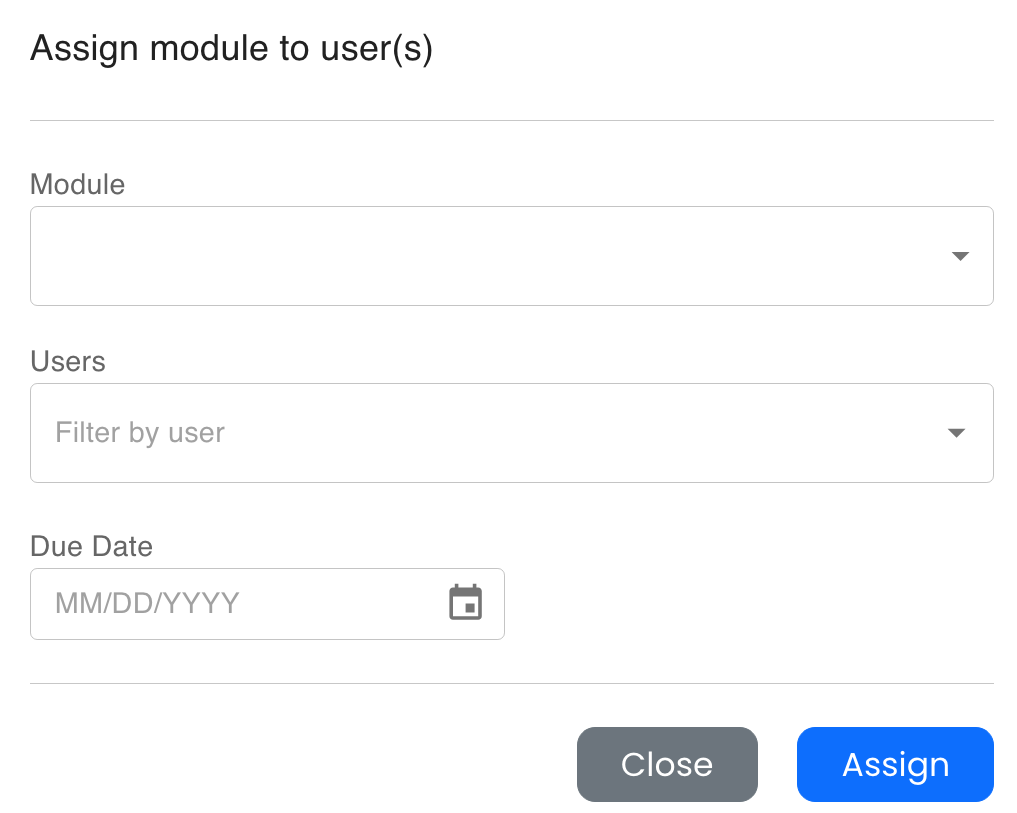
Assign Courses
Use the Assign Courses tab to assign modules to users and track their progress.
Add an Assignment
-
To assign users to a module, click the "Add Assignment" button:

-
Select a module from the dropdown, then add users and select a due date.
-
Tip: Only one active assignment for each module can be assigned to a single user.
-
Click "Assign" when finished.
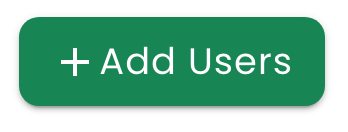
Edit an Assignment
To assign additional users to a module, select the module in the "Assignments" panel and click the "Add Users" button at the top of the "Edit Assignments" panel:
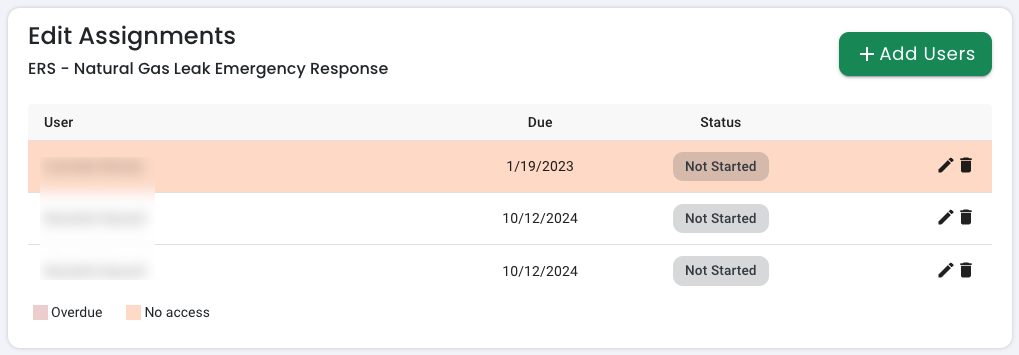
-
Click the Edit button on the "Edit Assignments" panel to modify the assignment's due date or passing score.
-
Click the Delete button on the "Edit Assignments" panel to remove the assignment.
-
Assignments that have not been completed by the provided due date will be highlighted in red.
Courses
In the Courses tab, you can see a library of all the modules that you have access to download.
The library is split up into three categories: Your Modules, Players, and Available Modules
-
Your Modules — a list of all the modules you have access to download
-
Players — players that you have access to download
-
Available Modules — a list of modules you don’t currently have access to but can be purchased by reaching out to a PIXO Sales Representative

If you select one of the modules on this page, you can read a description of the module and view its most up to date builds that you can download, download the user manual for the module, and watch a video showcasing the module.
The Organizations Tab
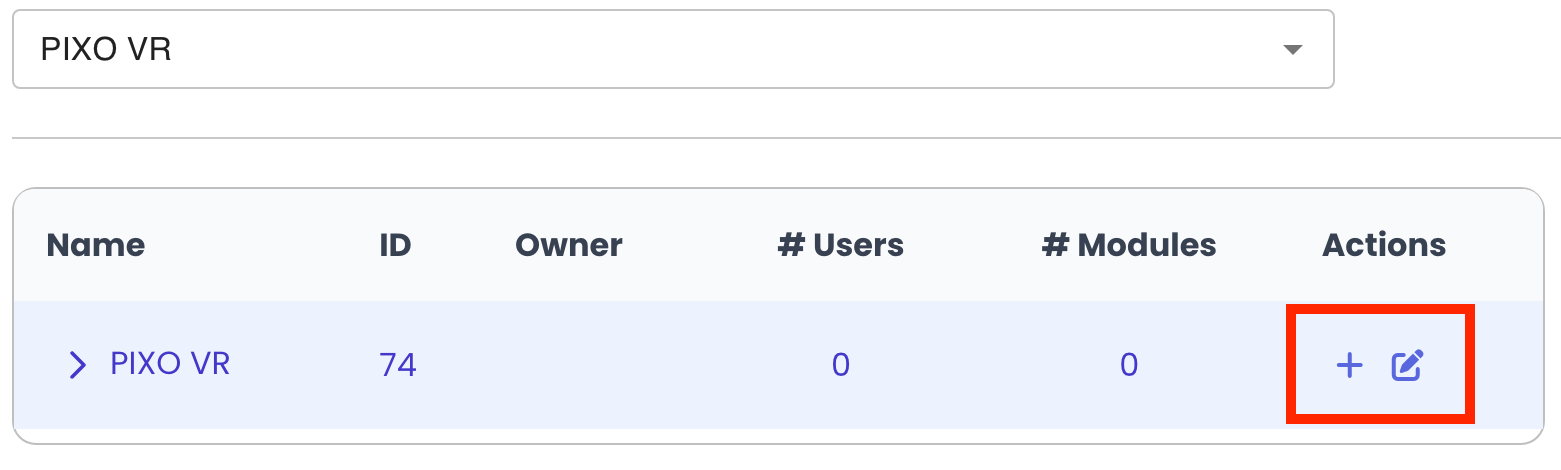
Organization Units
Use the Organization Units tab to add sub organization units or add users to organization units. This helps if you want to grant access to certain modules by team or department, for example.
-
Click on the "+" icon next to the organization unit:
-
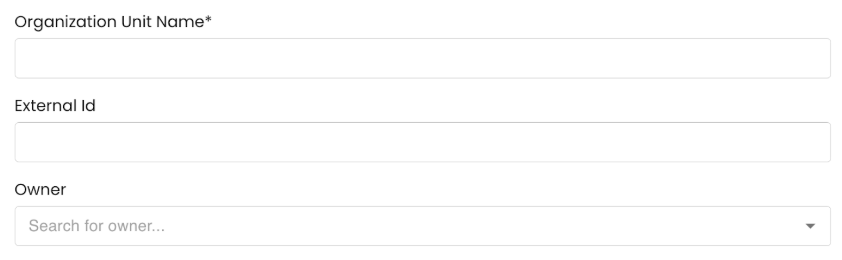
Enter the organization unit name and select an owner.
-
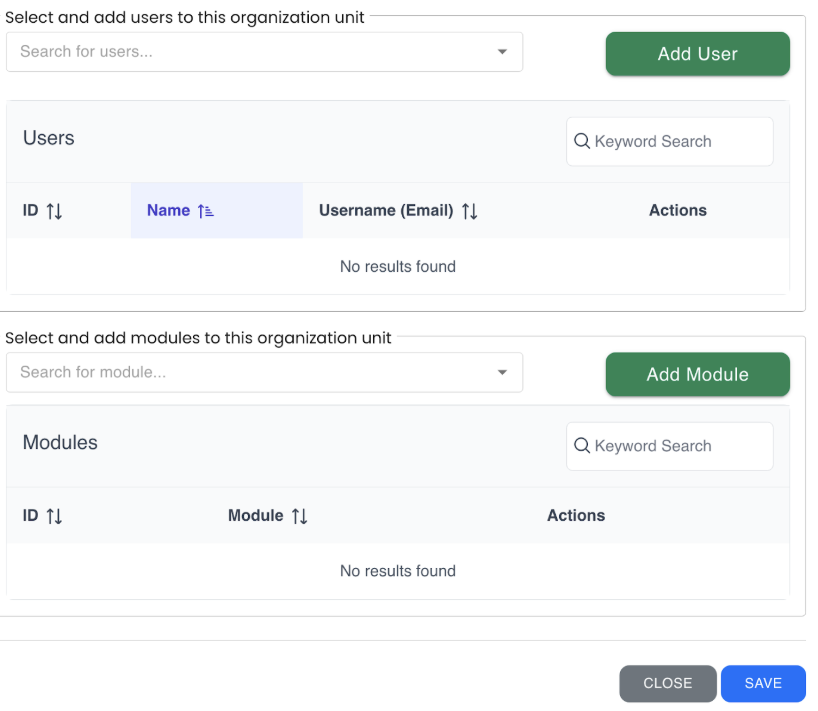
Next, add the users you would like in the organizational unit and choose which modules they will have access to.
-
Click "Save" when finished.
The Help Center Tab
Click the Help Center tab to access documentation regarding the PIXO platform.
Questions and Support
If you have any issues, please contact our tech support team at [email protected]

